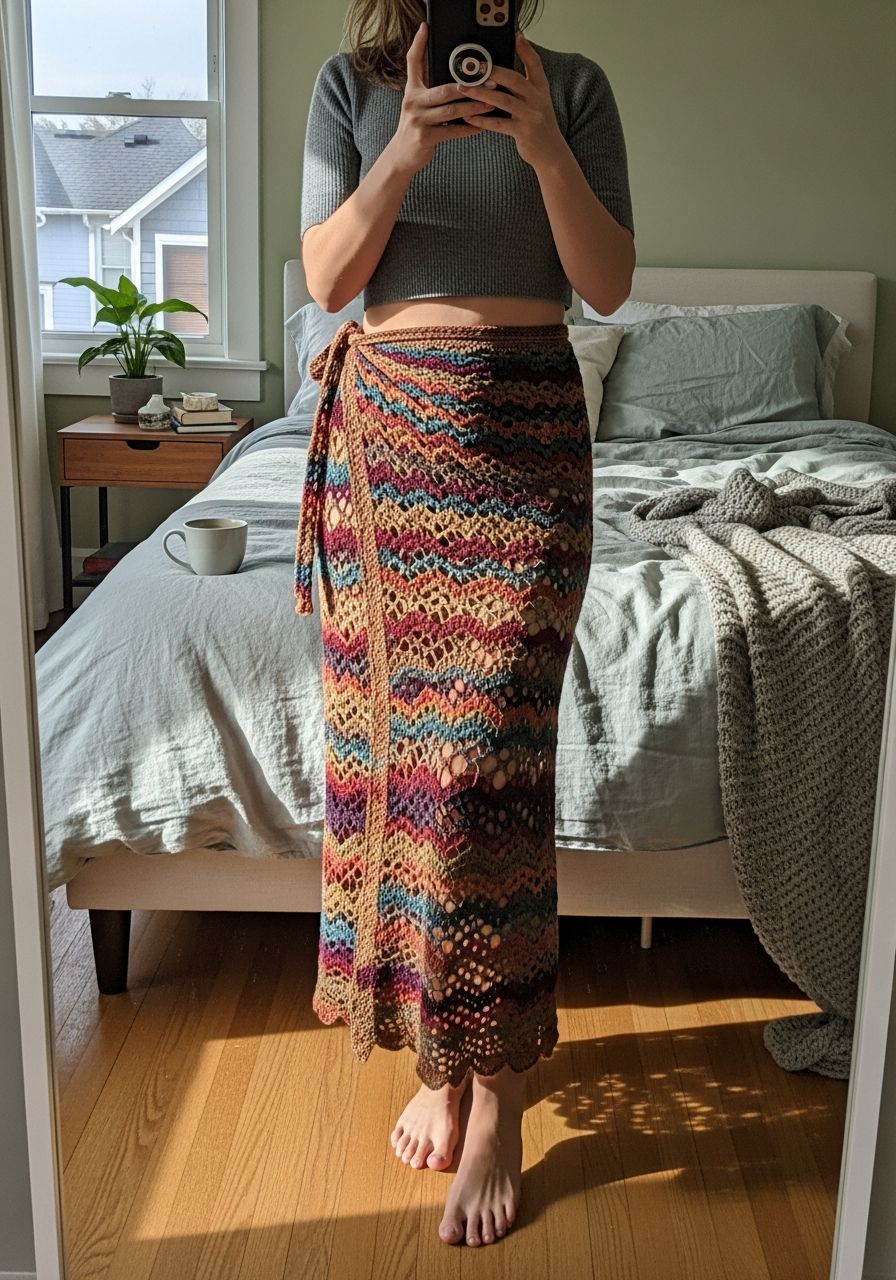
Imagine stepping out, feeling utterly radiant, in a garment you've crafted with your own hands – a piece that drapes beautifully, flatters every figure, and whispers tales of your creativity. That's the magic of our new Crochet Wrap Skirt pattern! This design isn't just a pattern; it's an invitation to weave comfort, style, and personal expression into your wardrobe. Get ready to fall in love with a project that's as rewarding to make as it is delightful to wear, offering endless styling possibilities for every season and occasion.
Welcome, fellow yarn enthusiasts, to a journey of creating a truly versatile and elegant addition to your handmade collection: the Crochet Wrap Skirt. Whether you're a seasoned hooker looking for your next captivating project or a confident beginner eager to tackle something stylish, this pattern is designed with you in mind. We'll guide you through every stitch, from selecting the perfect yarn to finishing those beautiful ties, ensuring your crafting experience is smooth, enjoyable, and results in a stunning, custom-fit skirt you'll cherish.
Why You'll Love This Pattern
- Customizable Fit: The wrap design means it's inherently adjustable, but our pattern also offers sizing guidance to ensure your skirt fits perfectly around your unique curves.
- Versatile Style: Dress it up with a blouse and heels, or keep it casual with a tank top and sandals. This skirt transitions effortlessly from beach cover-up to elegant dinner attire.
- Beginner-Friendly: While it looks sophisticated, this pattern primarily uses basic stitches (half double crochet!), making it accessible for those new to garment making.
- Unique Wardrobe Addition: Stand out from the crowd with a handmade piece that reflects your personal style and craftsmanship.
- Comfort & Drape: Designed with yarn choice and stitch pattern in mind to create a fabric that's soft, breathable, and drapes beautifully.
Materials Needed
- Yarn: Approximately 800-1200 yards (730-1100 meters) of Worsted Weight (Category 4) yarn. A cotton blend or acrylic offers great drape and washability. (Amount varies by size and desired length).
- Crochet Hook: US H/8 (5.0 mm) or size needed to obtain gauge.
- Stitch Markers: A few to help keep track of rows and sections.
- Tapestry Needle: For weaving in ends.
- Scissors: For cutting yarn.
- Measuring Tape: Essential for checking gauge and sizing.
Gauge & Sizing
Achieving the correct gauge is crucial for garments to ensure your skirt turns out the intended size and uses the correct amount of yarn. Take the time to make a swatch!
Gauge Swatch Instructions:
- Chain 20.
- Row 1: Hdc in 2nd chain from hook and in each chain across. (19 hdc)
- Row 2: Chain 1, turn. Hdc in BLO (back loop only) in each stitch across. (19 hdc)
- Repeat Row 2 until your swatch measures at least 5 inches tall.
- Measure the center of your swatch. Your gauge should be 16 hdc BLO x 12 rows = 4 inches (10 cm).
If your swatch is too small, try a larger hook. If your swatch is too large, try a smaller hook. Remember, every crocheter's tension is unique!
Sizing Guide (Approximate, adjustable by tie):
- Small (S): Fits waist 26-28 inches (66-71 cm)
- Medium (M): Fits waist 30-32 inches (76-81 cm)
- Large (L): Fits waist 34-36 inches (86-91 cm)
- Extra-Large (XL): Fits waist 38-40 inches (96-102 cm)
The wrap skirt is designed to overlap significantly for modesty and adjustability. The width listed in the pattern (number of rows) accounts for this overlap.
Abbreviations
- ch: Chain
- sc: Single Crochet
- hdc: Half Double Crochet
- sl st: Slip Stitch
- st(s): Stitch(es)
- BLO: Back Loop Only
- rep: Repeat
- FO: Fasten Off
- R: Row
- RS: Right Side
- WS: Wrong Side
Step-by-Step Pattern
This skirt is constructed as a large rectangular panel, worked side-to-side, which forms the body of the skirt. A waistband with integrated ties is then added along one long edge.
Main Skirt Panel
The initial chain determines the length of your skirt. The number of rows determines the width of the skirt (how much it wraps around).
- Initial Chain (Skirt Length):
- For S: Ch 40 (approx. 15 inches / 38 cm long)
- For M: Ch 45 (approx. 17 inches / 43 cm long)
- For L: Ch 50 (approx. 19 inches / 48 cm long)
- For XL: Ch 55 (approx. 21 inches / 53 cm long)
- To adjust length: Chain more for a longer skirt, fewer for a shorter skirt. Remember your stitch count will be (initial chain - 1).
- Row 1 (RS): Hdc in 2nd ch from hook and in each ch across. (e.g., S: 39 hdc; M: 44 hdc; L: 49 hdc; XL: 54 hdc). Ch 1, turn.
- Row 2 (WS): Hdc in BLO in each st across. Ch 1, turn.
- Repeat Row 2: Continue repeating Row 2 until your panel reaches the desired width for your size. This creates a beautiful ribbed texture with excellent drape.
- For S: Work a total of 60 rows. (Panel width approx. 15 inches / 38 cm)
- For M: Work a total of 70 rows. (Panel width approx. 17.5 inches / 44 cm)
- For L: Work a total of 80 rows. (Panel width approx. 20 inches / 51 cm)
- For XL: Work a total of 90 rows. (Panel width approx. 22.5 inches / 57 cm)
- To adjust width: Add more rows for a wider wrap/more overlap, or fewer rows for less overlap.
- Do not fasten off. You will now rotate your work to add the waistband.
Waistband & Ties
The waistband is worked along the top long edge of your main skirt panel, incorporating the ties.
- Row 1 (Waistband Base - RS): Turn your main panel so you are working along the top raw edge (where you started your initial chain). Ch 1. Work 1 sc into the side of each hdc row end across the top edge. Aim for an even distribution. For this pattern, approximately 1 sc per row end should work well, but you can adjust slightly to keep the edge flat. (e.g., S: 60 sc; M: 70 sc; L: 80 sc; XL: 90 sc). Ch 1, turn.
- Row 2-4 (Waistband Thickness): Sc in each sc across. Ch 1, turn. (3 rows total for a standard waistband. Add more rows for a wider waistband).
- Row 5 (First Tie - RS): After completing Row 4, do not turn. Ch 150 (this creates one long tie). Work 1 sc into the 2nd ch from hook and in each ch across the chain you just made. When you reach the end of the chain, continue to sc across the Row 4 of the waistband. Ch 1, turn.
- Row 6 (Waistband & Second Tie - WS): Sc in each sc across the waistband until you reach the end of the waistband. Ch 150 (this creates the second long tie). Work 1 sc into the 2nd ch from hook and in each ch across the chain you just made. Sl st into the last sc of the waistband to secure.
- Fasten off, leaving a long tail for weaving.
Finishing
- Weave in all remaining ends securely using your tapestry needle.
- Blocking: Gently block your skirt to even out stitches, enhance drape, and achieve final dimensions. Wet blocking (soaking in water, gently squeezing, then pinning to shape and letting air dry) is highly recommended for cotton or cotton blend yarns. For acrylics, steam blocking can work wonders.
- Try on your beautiful new Crochet Wrap Skirt and admire your work!
Pro Tips
- Yarn Choice Matters: For a flowy, comfortable skirt, choose yarns with good drape. Cotton, bamboo, linen blends, or even a soft acrylic will work beautifully. Avoid stiff yarns.
- Try It On: As you work, especially when nearing the end of the main panel, periodically hold it up to yourself (or pin it to a dress form) to ensure you're happy with the width and how it wraps.
- Stitch Markers are Your Friend: Use stitch markers to mark the beginning of rows, or to keep track of your stitch count, especially on the longer rows of the main panel.
- Consistent Tension: Try to maintain consistent tension throughout your project to avoid wavy edges or uneven fabric.
- Customize Length & Width: Don't be afraid to adjust the initial chain for length or the number of rows for width. This is your custom piece! Just remember that altering dimensions will affect yarn usage.
Frequently Asked Questions
Can I make this wrap skirt longer or shorter?
Absolutely! The initial chain determines the length of your skirt. To make it longer, simply chain more stitches at the very beginning of the Main Skirt Panel section. To make it shorter, chain fewer stitches. Just remember that your first row of hdc will have (initial chain - 1) stitches.
Is this pattern suitable for complete beginners?
While this pattern involves making a garment, it primarily uses the half double crochet stitch and works in a simple rectangular shape, making it very approachable for confident beginners who are comfortable with basic stitches and reading patterns. The main challenge will be maintaining consistent tension and counting stitches on longer rows, but the overall construction is straightforward.
What kind of yarn is best for a crochet wrap skirt?
For a beautiful drape and comfortable wear, we highly recommend a cotton or cotton blend yarn. These fibers are breathable, soft, and have a lovely weight that helps the skirt hang well. Acrylic yarns can also work if you choose a softer variety, and they are often more budget-friendly and easy to care for. Avoid very stiff or bulky yarns, as they might not achieve the desired flowy effect.
Congratulations! You've just created a stunning, handmade Crochet Wrap Skirt that embodies comfort, versatility, and your incredible talent. Wear it with pride, knowing every stitch tells a story of dedication and creativity. This skirt isn't just an accessory; it's a testament to the joy of making and the beauty of handmade fashion. Enjoy styling your new favorite piece!