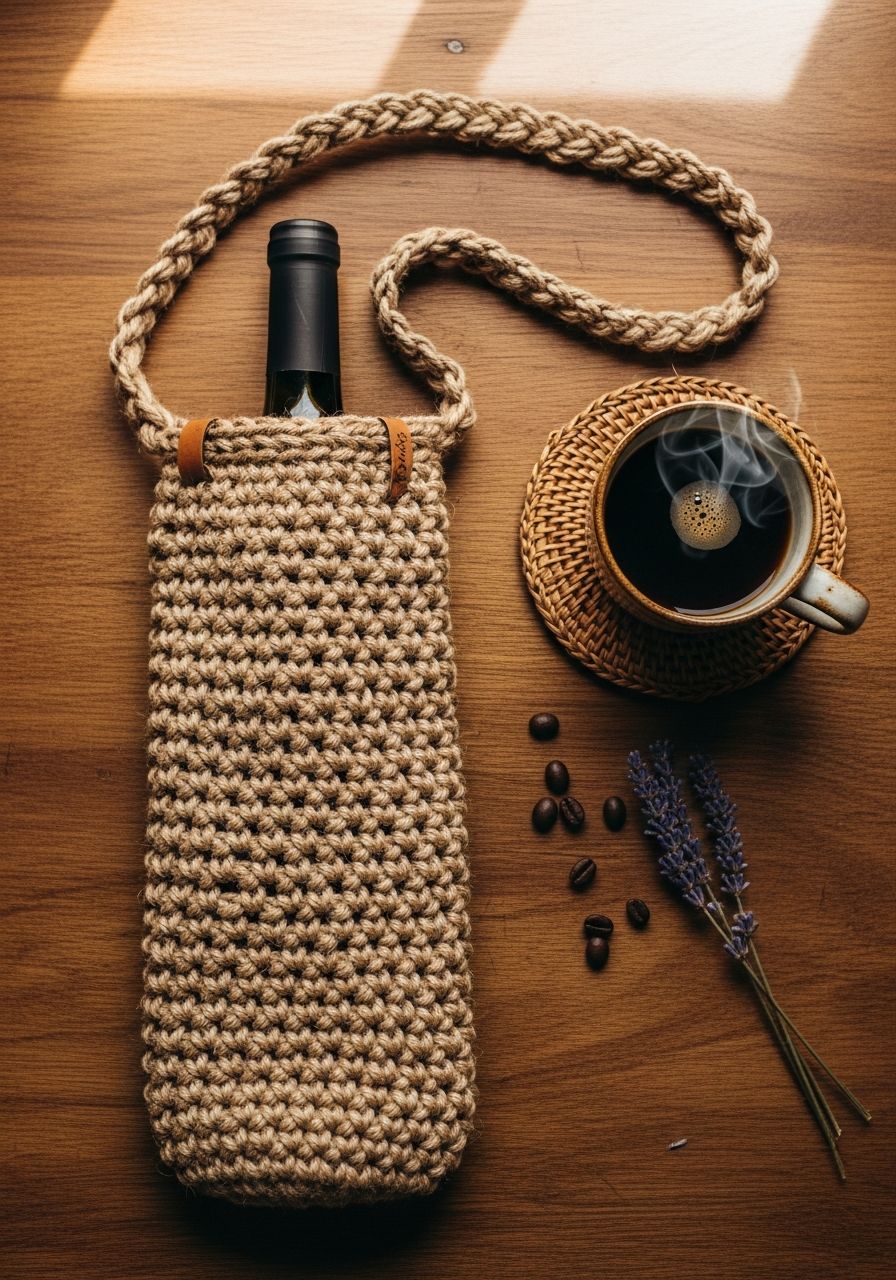
Imagine presenting a bottle of wine, not in a flimsy paper bag, but nestled within a beautifully handcrafted carrier that speaks volumes of your thoughtfulness and personal touch. That's the magic of creating your own Crochet Wine Bag – it transforms a simple gift into an unforgettable gesture, perfect for hostess gifts, special occasions, or simply elevating your next picnic. Get ready to add a touch of handmade elegance to your celebrations!
Welcome, fellow crafters! We're thrilled to share with you a delightful and surprisingly quick project that's as practical as it is charming: a custom-designed crochet wine bag. This versatile accessory is not only a fantastic way to personalize gifts but also an eco-friendly alternative to single-use bags. Whether you're an experienced crocheter looking for a speedy make or a confident beginner ready to tackle a rewarding challenge, this free pattern will guide you every step of the way to creating a sturdy, stylish carrier for your favorite bottle.
Why You'll Love This Pattern
- **Perfect Gift:** Elevate any wine bottle into a thoughtful, personalized present for birthdays, holidays, housewarmings, or "just because."
- **Eco-Friendly:** Ditch the paper bags and plastic carriers! This reusable wine bag is a sustainable choice you can feel good about.
- **Quick & Satisfying:** Work up this project in just a few hours, making it ideal for last-minute gifts or a weekend craft session.
- **Customizable:** Easily adapt the colors, yarn type, and even the length of the strap to match any occasion or recipient's style.
- **Skill-Building:** Practice fundamental crochet stitches like single crochet, half double crochet, and working in the round, building your confidence with each row.
- **Versatile:** Not just for wine! Use it for sparkling cider, olive oil, or even a water bottle on the go.
Materials Needed
- **Yarn:** Worsted Weight (Category 4) cotton yarn, approximately 150-180 yards (e.g., Lily Sugar'n Cream, Dishie Cotton). Cotton is recommended for its durability and stitch definition.
- **Crochet Hook:** US H/8 (5.0 mm)
- **Stitch Marker:** Essential for working in the round.
- **Yarn Needle:** For weaving in ends.
- **Scissors**
Gauge & Sizing
To ensure your bag fits a standard wine bottle (approx. 3-3.25 inches diameter), it's important to check your gauge:
- **Gauge:** 13 sc and 14 rows = 4 inches (10 cm) using a 5.0 mm hook.
- **Finished Size:** Approximately 4 inches (10 cm) diameter at the base, 10 inches (25 cm) tall, with a 12-inch (30 cm) strap length (unstretched). Fits a standard 750ml wine bottle.
Abbreviations
- **ch:** chain
- **sc:** single crochet
- **hdc:** half double crochet
- **dc:** double crochet
- **sl st:** slip stitch
- **inc:** increase (2 sc in the same stitch)
- **dec:** decrease (sc2tog - single crochet 2 together)
- **st(s):** stitch(es)
- **rnd(s):** round(s)
- **FO:** fasten off
- **MR:** Magic Ring (or adjustable ring)
Step-by-Step Pattern
Base of the Bag
We'll start by creating a sturdy circular base for your wine bag.
- **Rnd 1:** Make a MR, ch 1 (does not count as a stitch), 8 sc into MR. Pull ring tight to close. Sl st to first sc to join. (8 sc)
- **Rnd 2:** Ch 1, 2 sc in each st around. Sl st to first sc to join. (16 sc)
- **Rnd 3:** Ch 1, *1 sc in next st, 2 sc in next st (inc)* repeat around. Sl st to first sc to join. (24 sc)
- **Rnd 4:** Ch 1, *1 sc in next 2 sts, 2 sc in next st (inc)* repeat around. Sl st to first sc to join. (32 sc)
- **Rnd 5:** Ch 1, *1 sc in next 3 sts, 2 sc in next st (inc)* repeat around. Sl st to first sc to join. (40 sc)
- **Rnd 6:** Ch 1, *1 sc in next 4 sts, 2 sc in next st (inc)* repeat around. Sl st to first sc to join. (48 sc)
- **Rnd 7:** Ch 1, *1 sc in next 5 sts, 2 sc in next st (inc)* repeat around. Sl st to first sc to join. (56 sc)
- **Rnd 8:** Ch 1, *1 sc in next 6 sts, 2 sc in next st (inc)* repeat around. Sl st to first sc to join. (64 sc)
*Your base should now measure approximately 4 inches in diameter. If it's too small/large, adjust hook size or check gauge.*
Body of the Bag
Now, we'll build the sides of the bag straight up to hold your bottle.
- **Rnd 9:** Ch 1, working in the **back loop only** for this round, sc in each st around. Sl st to first sc to join. (64 sc)
*Working in the back loop creates a nice defined edge for the base.* - **Rnd 10-38 (or desired height):** Ch 1, sc in each st around. Sl st to first sc to join. (64 sc)
*Continue these rounds until your bag reaches approximately 10 inches in height, or just below the neck of a standard wine bottle. For a tighter fabric, you can use hdc instead of sc here, but adjust gauge accordingly.*
Strap
For a seamless look, we'll integrate the strap directly into the final rounds of the bag.
- **Rnd 39:** Ch 1, sc in first 10 sts. Ch 40 (this will form your strap). Skip the next 32 sts. Sc in the next 22 sts. Sl st to first sc to join. (32 sc + 40 ch sts)
*This creates the first half of the strap and prepares for the second half.* - **Rnd 40:** Ch 1, sc in first 10 sc. Now, working into the back bump of each ch, sc in each of the 40 ch sts. Sc in the next 22 sc. Sl st to first sc to join. (72 sc)
*Working into the back bump of the chain makes for a sturdier, neater strap edge.* - **Rnd 41:** Ch 1, sc in each st around. Sl st to first sc to join. (72 sc)
- **Rnd 42:** Ch 1, sc in each st around. Sl st to first sc to join. (72 sc)
- **Rnd 43:** Ch 1, sc in each st around. Sl st to first sc to join. (72 sc)
Finishing
- **Fasten Off:** Cut yarn, leaving a 6-inch tail. Pull the tail through the last loop on your hook to secure.
- **Weave in Ends:** Use your yarn needle to carefully weave in all loose ends throughout your project. Take your time to hide them securely for a professional finish.
- **Blocking (Optional but Recommended):** Gently wet your bag, squeeze out excess water, and shape it over a wine bottle or similar-sized object. Allow it to air dry completely. This helps to even out stitches and give your bag a polished look.
Pro Tips
- **Yarn Choice Matters:** Cotton is recommended for sturdiness, but acrylic or blends can be used for a different drape.
- **Add Embellishments:** Personalize your bag with crochet appliques, embroidered initials, or a decorative tag.
- **Drawstring Option:** For added security, consider adding a chain drawstring through the top rounds instead of a full strap.
- **Gifting Presentation:** Pair your handmade bag with a quality bottle, gourmet snacks, or wine accessories for an impressive gift.
- **Practice Your Tension:** Consistent tension is crucial for an even fabric. Adjust your hook size if your stitches are too loose or too tight.
Frequently Asked Questions
Can I use a different yarn weight for this pattern?
Yes, you can! However, be aware that changing yarn weight will significantly alter the final size of your bag. If you use a lighter weight yarn (e.g., DK or sport weight), your bag will be smaller and you'll need to increase the number of stitches in each base round and potentially the number of body rounds to achieve the desired dimensions. Conversely, a bulkier yarn (e.g., chunky or bulky weight) will result in a much larger bag. Always check your gauge and adjust your hook size accordingly to ensure the bag fits your intended bottle.
How do I make the bag taller or shorter?
Adjusting the height of your wine bag is very straightforward. To make the bag taller, simply add more rounds to the "Body of the Bag" section (Rnds 10-38). If you want a shorter bag, decrease the number of these rounds. Make sure to try your bag on a wine bottle periodically to ensure it reaches your desired height before starting the strap section.
Is this pattern suitable for beginners?
This pattern is suitable for confident beginners who are comfortable with basic stitches like chain, single crochet, and slip stitch, and have some experience working in the round. The main challenges would be maintaining consistent tension and keeping track of stitch counts, which are excellent skills to practice! We recommend reviewing tutorials for Magic Ring and working in the back loop if these are new to you. With a little patience and practice, any beginner can create a beautiful crochet wine bag.
And there you have it – your very own handmade crochet wine bag, ready to impress and carry your favorite libations in style! We hope you enjoyed creating this practical and pretty project. Don't forget to share your finished bags with us and inspire others in the crochet community. Happy hooking!