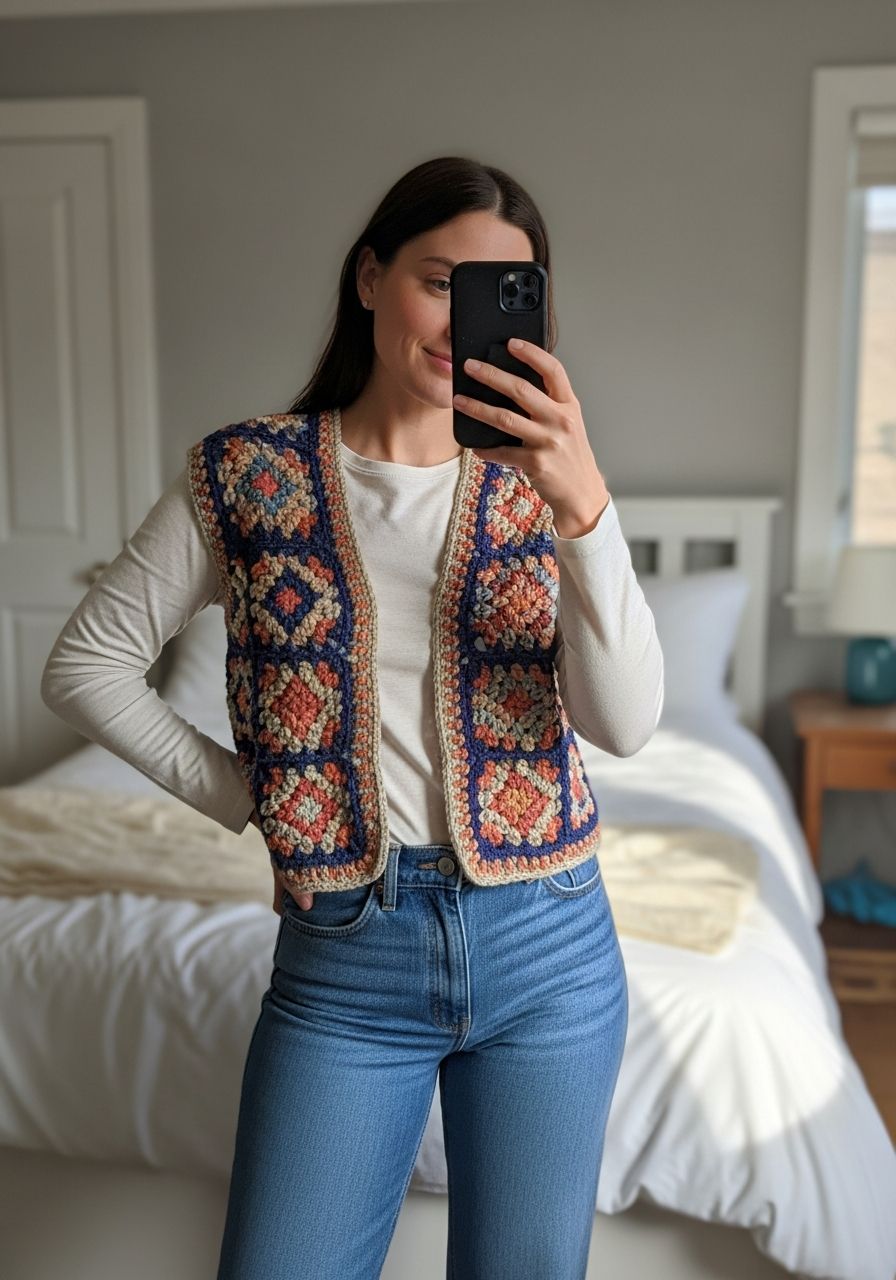
Imagine wrapping yourself in a handcrafted hug, a cozy layer that adds instant style and warmth to any outfit. That’s the magic of a perfectly crocheted vest! Forget complicated patterns and daunting instructions – our free Crochet Vest pattern is designed to be wonderfully achievable, even for adventurous beginners, guiding you stitch-by-stitch to create a chic, versatile garment you’ll reach for again and again. Get ready to fall in love with your hooks and yarn all over again, because this vest is about to become your new favorite project!
Welcome, fellow yarn enthusiasts! Today, we’re embarking on a delightful journey to create a stylish, comfortable vest perfect for layering over your favorite long-sleeved tops, dresses, or even just a simple t-shirt. This pattern features a timeless design, worked primarily in half double crochet for a beautiful drape and texture, and is easily customizable to fit a wide range of sizes. Whether you’re looking to add a touch of handmade elegance to your wardrobe or craft a thoughtful gift, this guide has everything you need to succeed.
Why You'll Love This Pattern
- Beginner-Friendly: Uses basic stitches (chain, slip stitch, single crochet, half double crochet) with clear, step-by-step instructions.
- Versatile Style: A classic, open-front design that complements various outfits and can be dressed up or down.
- Comfortable & Cozy: The recommended yarn weight and stitch choice create a soft, breathable, yet warm fabric.
- Customizable Sizing: Includes instructions for sizes Small through 3XL, with tips on adjusting length and width.
- Quick to Make: Half double crochet works up quickly, making this a satisfying project you can finish in a reasonable timeframe.
- Perfect for Layering: Adds an extra layer of warmth without bulk, ideal for transitional weather or chilly evenings.
Materials Needed
- Yarn: Worsted Weight (Aran / 10-Ply) yarn, 100% Acrylic or an Acrylic blend for good drape and easy care. (Approx. 700 - 1200 yards depending on size)
- Crochet Hook: 5.5 mm (US I/9)
- Yarn Needle: For weaving in ends and seaming.
- Scissors: For cutting yarn.
- Stitch Markers: Helpful for marking rows and seams.
- Measuring Tape: Essential for checking gauge and sizing.
Gauge & Sizing
Achieving the correct gauge is crucial for your vest to turn out the correct size. Please take the time to make a gauge swatch before you begin!
Gauge Swatch: Chain 15, then work 12 rows of Half Double Crochet (hdc). Your swatch should measure 4 inches (10 cm) wide by 4 inches (10 cm) tall. If your swatch is too small, try a larger hook. If it’s too large, try a smaller hook.
Finished Bust Measurements (approximate, with 2-4 inches of positive ease):
- Small (S): 34-36 inches (86-91 cm)
- Medium (M): 38-40 inches (96-102 cm)
- Large (L): 42-44 inches (107-112 cm)
- X-Large (XL): 46-48 inches (117-122 cm)
- 2X-Large (2XL): 50-52 inches (127-132 cm)
- 3X-Large (3XL): 54-56 inches (137-142 cm)
The pattern is written for the smallest size with larger sizes in parentheses: S (M, L, XL, 2XL, 3XL).
Abbreviations
- ch: Chain
- st(s): Stitch(es)
- sl st: Slip Stitch
- sc: Single Crochet
- hdc: Half Double Crochet
- sk: Skip
- rep: Repeat
- BLO: Back Loop Only
- RS: Right Side
- WS: Wrong Side
Step-by-Step Pattern
This vest is constructed from three flat panels: one back panel and two front panels. These panels are then seamed together, and a ribbed trim is added for a polished finish.
Back Panel
The back panel is worked flat in rows.
- Ch 59 (65, 71, 78, 84, 91).
- Row 1 (RS): Hdc in the 3rd ch from hook and in each ch across. (57, 63, 69, 76, 82, 89 hdc). Ch 2, turn.
- Row 2 (WS): Hdc in each st across. (57, 63, 69, 76, 82, 89 hdc). Ch 2, turn.
- Repeat Row 2 until your panel measures approximately 20 (21, 22, 23, 24, 25) inches [51 (53, 56, 58, 61, 64) cm] from the starting chain. Fasten off, leaving a long tail for seaming.
Front Panels (Make 2)
Each front panel is worked flat in rows, identical to each other.
- Ch 30 (33, 36, 39, 42, 45).
- Row 1 (RS): Hdc in the 3rd ch from hook and in each ch across. (28, 31, 34, 37, 40, 43 hdc). Ch 2, turn.
- Row 2 (WS): Hdc in each st across. (28, 31, 34, 37, 40, 43 hdc). Ch 2, turn.
- Repeat Row 2 until your panel measures the same length as your Back Panel. Fasten off, leaving a long tail for seaming.
Assembly
Time to bring your vest to life!
- Shoulder Seams: Lay the Back Panel flat with the RS facing up. Place one Front Panel on top, RS down, aligning the top edges. Using a yarn needle and the long tail, seam across the top 10 (11, 12, 13, 14, 15) stitches from the outer edge for each shoulder. This leaves an opening for the neck. Repeat for the second Front Panel.
- Side Seams: Lay the vest flat, RS sides together (WS facing out). Align the side edges of the Front and Back Panels. Measure down 7 (7.5, 8, 8.5, 9, 9.5) inches [18 (19, 20, 22, 23, 24) cm] from the shoulder seam for the armhole opening and place a stitch marker. Seam the sides from the bottom up to the stitch marker, leaving the armholes open. Weave in all remaining ends.
Edging (Optional but Recommended)
Adding a ribbed trim gives your vest a professional, finished look.
- Armhole Edging (Make 2):
- Join yarn with a sl st at the bottom of an armhole. Ch 1. Sc evenly around the entire armhole opening. Sl st to first sc. (Approx. 40-60 sc depending on size and how evenly you space them).
- Ch 1, turn. Sc in each sc around. Sl st to first sc.
- Fasten off. Repeat for the second armhole. Weave in ends.
- Main Opening Ribbed Edging:
- Create the Ribbing Strip: Ch 11.
- Row 1: Sc in the 2nd ch from hook and in each ch across. (10 sc). Ch 1, turn.
- Row 2: Sc in the BLO of each sc across. (10 sc). Ch 1, turn.
- Repeat Row 2 until the strip is long enough to go around the entire front opening of your vest (from bottom front, up one side, around the neck, down the other side, and to the bottom front). Stretch slightly to measure. This will be approximately 60-80 inches (152-203 cm) depending on your vest size and desired drape. Fasten off, leaving a very long tail for seaming.
- Attach the Ribbing: With the RS of the vest facing you, pin the ribbed strip along the entire raw edge of the front opening, starting and ending at the bottom corners. Using your yarn needle and the long tail, sew the ribbed strip to the vest using a whip stitch or mattress stitch, working through the outer loops of the ribbing and the edge stitches of the vest. Work slowly and evenly for a neat finish.
Pro Tips
- Read Through: Always read the entire pattern before you start to familiarize yourself with the steps.
- Stitch Markers are Your Friends: Use them to mark the beginning of rows, specific stitch counts, or armhole openings for easier assembly.
- Count Your Stitches: Especially at the end of each row. It prevents mistakes and ensures your panels are symmetrical.
- Weave in Ends as You Go: This makes the finishing process much less daunting at the end.
- Blocking: For a professional finish, lightly block your completed vest. This helps even out stitches and can improve drape.
- Yarn Substitutions: If substituting yarn, ensure it matches the recommended weight and check your gauge carefully.
Frequently Asked Questions
Can I use a different yarn weight?
Yes, you can! However, using a different yarn weight (e.g., DK or Chunky) will significantly alter your gauge and therefore the finished size of your vest. You'll need to make a much larger gauge swatch and recalculate your starting chain and row counts based on your new gauge and desired finished measurements. Always make a swatch!
How do I adjust the length of the vest?
Adjusting the length is simple! For the Back and Front Panels, you will simply crochet more or fewer rows of Row 2 (hdc in each st across) until you reach your desired length before fastening off. Remember to keep the Back and Front Panels the same length for proper assembly.
What if my vest seems too stiff or too floppy?
The drape of your vest is largely determined by your yarn choice and hook size relative to that yarn. If it's too stiff, you might be crocheting too tightly, or your hook is too small for your yarn. Try going up a hook size or relaxing your tension. If it's too floppy, your hook might be too large, or your tension too loose. Try going down a hook size. Sometimes, simply blocking the finished piece can also help improve the drape.
And there you have it! A beautiful, handmade crochet vest ready to be a staple in your wardrobe. This project is a testament to the joy and satisfaction of creating something functional and fashionable with your own hands. We hope you enjoyed making it as much as we enjoyed sharing it with you. Happy crocheting!