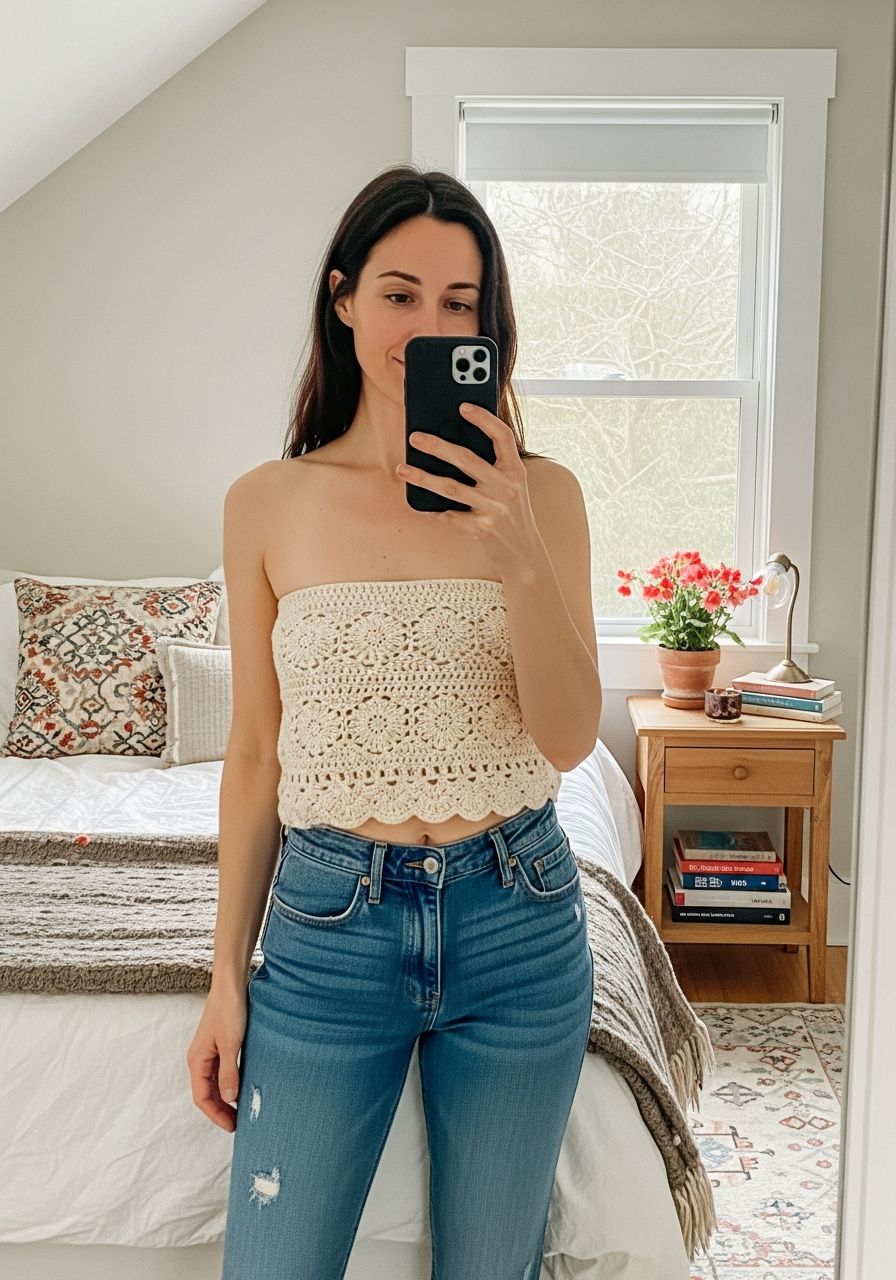
Imagine stepping out into the warm sunshine, feeling utterly confident and effortlessly stylish in a top that fits you like a dream – a top you made with your own two hands! This summer, ditch the fast fashion and embrace the joy of creating something truly special. Our incredible FREE Crochet Tube Top pattern is designed to empower you, offering a simple yet chic design that’s perfect for beach days, music festivals, or just lounging in comfort. Get ready to crochet your new favorite wardrobe staple and express your unique style!
Welcome, fellow yarn enthusiasts! Today, we're diving into a project that combines comfort, style, and the sheer satisfaction of handmade fashion: the Crochet Tube Top. This versatile garment is a must-have for warmer weather, offering endless styling possibilities. Whether you're a seasoned pro or picking up your hook for the first time, this detailed guide and free pattern will walk you through every step, ensuring you create a beautiful, custom-fit tube top that you'll adore.
Why You'll Love This Pattern
- Custom Fit: Say goodbye to ill-fitting clothes! This pattern is designed to be easily adjustable to your specific measurements, ensuring a snug and comfortable fit that won't slip.
- Quick Project: You can whip up this tube top in just a few hours or a couple of relaxing evenings, making it perfect for last-minute summer outfits or gifts.
- Beginner-Friendly: Using mostly basic stitches like single crochet and half double crochet, this pattern is accessible for those new to crochet. We'll guide you through everything!
- Versatile Style: Pair it with high-waisted shorts, a flowing maxi skirt, or layer it under an open shirt or cardigan. It’s a true wardrobe chameleon.
- Stash Buster: A great way to use up those beautiful skeins of cotton or cotton-blend yarn you've been saving.
- Comfortable & Breathable: When made with the right yarn, your tube top will be light, airy, and perfect for hot weather.
Materials Needed
- Yarn: Approximately 200-350 yards (180-320 meters) of DK (Light Worsted/Category 3) weight yarn. A cotton or cotton blend is highly recommended for its breathability, drape, and stitch definition. Examples: Lion Brand 24/7 Cotton, Paintbox Yarns Cotton DK.
- Crochet Hook: G/6 (4.0 mm) or size needed to obtain gauge.
- Tapestry Needle: For weaving in ends and seaming.
- Scissors: For cutting yarn.
- Stitch Markers: Essential for keeping track of rounds and specific stitches.
- Measuring Tape: Crucial for accurate sizing and gauge checks.
Gauge & Sizing
Achieving the correct gauge is PARAMOUNT for a tube top, as it dictates the fit and stretch. A tube top needs to be snug enough to stay up without being uncomfortably tight.
- Gauge Swatch: With your chosen yarn and hook, chain 17.
- Row 1: Hdc in 2nd ch from hook and in each ch across. (16 hdc)
- Row 2: Ch 1 (does not count as st), turn. Hdc in BLO of each st across. (16 hdc)
- Repeat Row 2 for a total of 10 rows.
- Measure your swatch: 16 hdc in BLO x 10 rows should measure approximately 4 inches (10 cm) by 4 inches (10 cm).
- If your swatch is larger, try a smaller hook. If it's smaller, try a larger hook.
Sizing
This pattern is written for a customizable fit. The key is to create a foundation band that stretches to fit snugly around the fullest part of your bust, but measures slightly smaller when unstretched to ensure it stays up. Here’s a general guide:
- XS: Bust 28-30 inches (71-76 cm) – Unstretched band length approx. 24-26 inches
- S: Bust 32-34 inches (81-86 cm) – Unstretched band length approx. 28-30 inches
- M: Bust 36-38 inches (91.5-96.5 cm) – Unstretched band length approx. 32-34 inches
- L: Bust 40-42 inches (101.5-106.5 cm) – Unstretched band length approx. 36-38 inches
- XL: Bust 44-46 inches (112-117 cm) – Unstretched band length approx. 40-42 inches
- 2XL: Bust 48-50 inches (122-127 cm) – Unstretched band length approx. 44-46 inches
- 3XL: Bust 52-54 inches (132-137 cm) – Unstretched band length approx. 48-50 inches
IMPORTANT: Measure the fullest part of your bust. You want your finished band (before joining) to be about 2-4 inches (5-10 cm) smaller than your actual bust measurement, to allow for negative ease and ensure the top stays securely in place.
Abbreviations
- ch: chain
- sl st: slip stitch
- sc: single crochet
- hdc: half double crochet
- dc: double crochet
- inc: increase (work 2 stitches into the same stitch)
- dec: decrease (work 2 stitches together)
- st(s): stitch(es)
- BLO: back loop only
- FO: fasten off
- RS: right side
- WS: wrong side
Step-by-Step Pattern
Part 1: The Foundation Band (Ribbed)
This band forms the top edge of your tube top and is crucial for a secure fit. We'll use half double crochet in the back loop only for excellent stretch.
- Determine Band Height: Decide how wide you want the ribbed band to be. For a standard tube top, 4-6 inches (10-15 cm) is common. For a 4-inch band (like our gauge swatch), you would chain 16. If you want a 5-inch band, chain 20.
- Starting Chain: Ch your desired number for the height of your band (e.g., Ch 16 for 4 inches).
- Row 1: Hdc in 2nd ch from hook and in each ch across. (You should have 1 st less than your starting chain, e.g., 15 hdc).
- Row 2: Ch 1 (does NOT count as a stitch), turn. Hdc in BLO of each st across. (15 hdc)
- Repeat Row 2: Continue repeating Row 2 until your band, when lightly stretched, measures your desired unstretched length (e.g., 32 inches for a Medium size, which corresponds to roughly 80 rows for our example gauge). This length should be 2-4 inches (5-10 cm) less than your actual bust measurement.
- Joining the Band: Once your band reaches the correct length, fold it in half with the RS facing inwards. Sl st or whip stitch the first and last rows together to form a seamless loop. Turn the band so the seam is on the inside and the RS is out.
Part 2: Building the Body of the Tube Top
Now, we'll work in continuous rounds along the top edge of your ribbed band.
- Round 1 (Foundation for Body): Ch 1, then work 1 sc into the end of each hdc row around the top edge of your band. (If you made 80 rows, you should have 80 sc). Join with a sl st to the first sc. Place a stitch marker in the first sc of this round to mark the beginning.
- Round 2: Ch 1 (does NOT count as a stitch), sc in each st around. Join with a sl st to the first sc.
- Repeat Round 2: Continue repeating Round 2 until your tube top reaches your desired length from the top of the band. A typical length for a cropped tube top is 6-8 inches (15-20 cm) from the top of the band. For a longer top, continue for more rounds.
Part 3: Finishing Touches
- Edging (Optional): For a neat finish, you can add a simple sc border to both the top and bottom edges (if you didn't already create a clean bottom edge with your band join).
- Top Edge: Ch 1, sc in each st around the top edge. Join with sl st to first sc. FO.
- Bottom Edge: Attach yarn to any stitch on the bottom edge of the ribbed band. Ch 1, sc in each st around. Join with sl st to first sc. FO.
- Weave in Ends: Use your tapestry needle to carefully weave in all loose ends. Take your time with this step for a professional finish.
- Blocking (Recommended): Gently wet your tube top, reshape it to your desired dimensions, and pin it flat on a blocking mat or towel. Allow it to air dry completely. Blocking helps to even out your stitches, enhance the drape, and give your finished garment a polished look.
Pro Tips
- Yarn Choice Matters: For summer garments, prioritize cotton, linen, or bamboo blends. Acrylic can be used but may be less breathable. Avoid wool unless you're making a winter layering piece!
- Measure, Measure, Measure: Don't skip measuring your bust and checking the band length. This is the single most important step for a well-fitting tube top. Try on the band before joining to ensure it's snug enough.
- Stitch Markers are Your Friend: Especially when working in the round, a stitch marker at the beginning of your round will save you from counting errors and frustration.
- Adjust Length Easily: To make your tube top longer or shorter, simply add or subtract rounds in Part 2 (Building the Body).
- Consider Elastic Thread: For extra security, you can weave a thin elastic thread (often found in sewing notions) through a few stitches at the very top edge of the tube top. This provides additional grip and prevents slipping.
- Customize Your Look: Add shell stitch edging, a lace pattern for the body, or even some simple embroidery once it's finished to make it uniquely yours!
Frequently Asked Questions
Can I use a different yarn weight?
Absolutely! You can use a lighter (e.g., sport weight) or heavier (e.g., worsted weight) yarn. However, you MUST adjust your hook size to match the yarn weight and re-check your gauge. A different yarn weight will significantly change the size and drape of your tube top. Always make a new gauge swatch!
How do I make the tube top longer or shorter?
To adjust the height of the tube top (from the ribbed band down), simply add or subtract rounds in Part 2: Building the Body. If you want a longer ribbed band section, increase your starting chain for Part 1: The Foundation Band. Remember to account for the number of stitches you get per inch when doing so!
How can I prevent my tube top from slipping down?
The key to a non-slipping tube top is a well-fitting, snug foundation band with adequate negative ease. Ensure your gauge is correct and the band, when unstretched, is 2-4 inches smaller than your bust measurement. Using a cotton yarn also provides a bit more grip than very smooth synthetic yarns. As a last resort, you can crochet a small loop on the inside and thread a clear elastic strap through it, or sew in a thin piece of elastic cord around the very top edge of the garment.
Congratulations, you're now equipped to crochet your very own custom-fit tube top! This project is not just about making a garment; it's about building confidence, honing your skills, and creating a piece that truly reflects your personal style. We hope you enjoy every stitch of this journey. Happy crocheting!