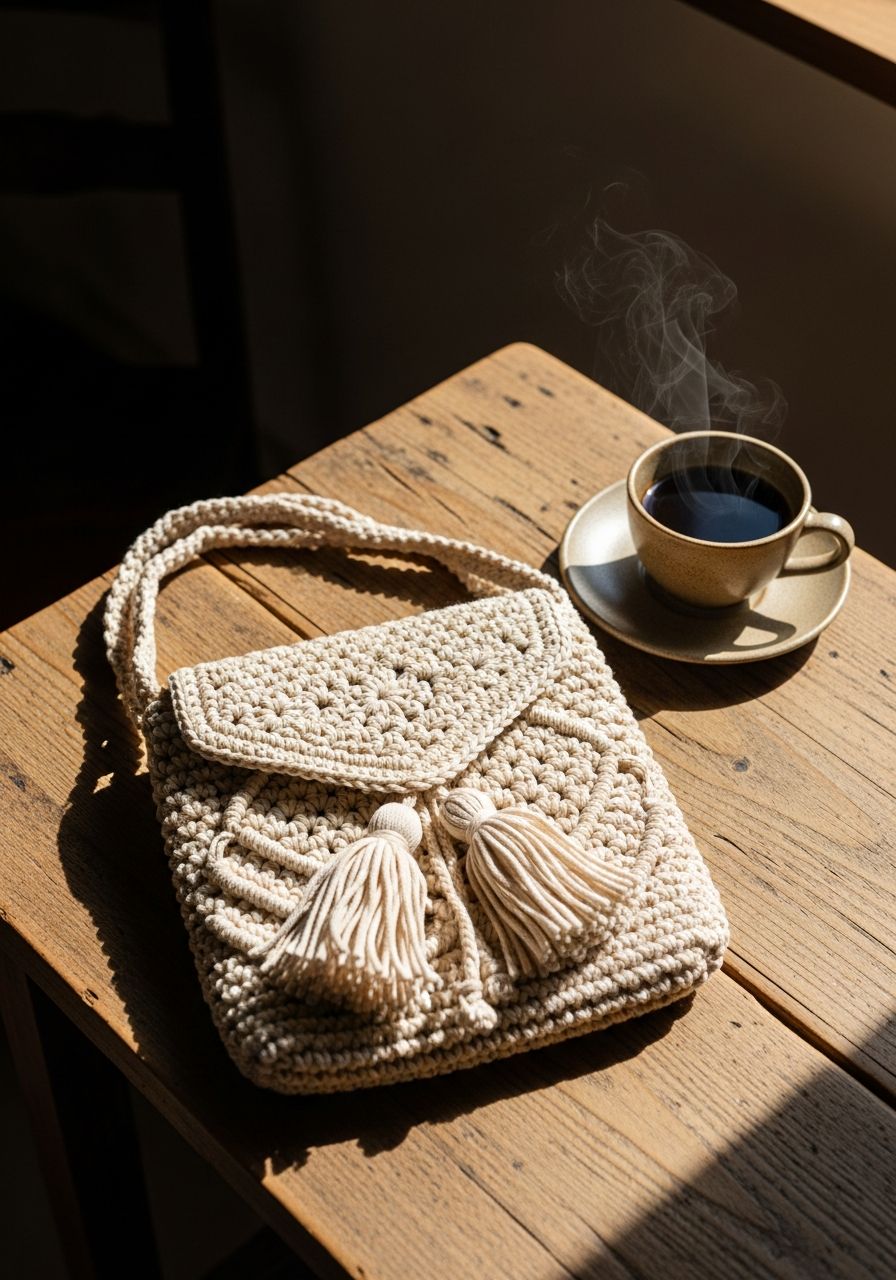
Imagine stepping out, a beautiful, unique accessory swinging playfully by your side, drawing admiring glances and sparking conversations. That's the magic you'll create with our stunning Crochet Tassel Bag! This isn't just a pattern; it's an invitation to craft a piece that reflects your personal style, a versatile companion for market strolls, coffee dates, or evening adventures. Get ready to fall in love with every stitch as you bring this chic, bohemian-inspired bag to life!
Why You'll Love This Pattern
This Crochet Tassel Bag pattern is designed with both style and simplicity in mind, making it a joy for crocheters of all levels. Here’s why it’s destined to become your next favorite project:
- Chic & Trendy: Tassel bags are eternally stylish, offering a bohemian flair that elevates any outfit.
- Surprisingly Simple: Built primarily with basic stitches like single crochet and half double crochet, this pattern is accessible for advanced beginners and enjoyable for seasoned pros.
- Customizable: Easily adapt the colors, yarn type, and even the number of tassels to match your unique taste. Make it vibrant or elegantly neutral!
- Practical Size: Perfect for carrying your essentials – phone, wallet, keys, and a few small extras without being bulky.
- Great Gift Idea: Handmade gifts are always cherished. This bag makes a thoughtful present for friends and family.
- Skill-Building: Practice working in the round, creating flat pieces, and adding fun embellishments like tassels.
Materials Needed
- Yarn: Worsted Weight (Category 4) Cotton or Cotton Blend yarn. Approximately 400-450 yards for the bag and strap, plus an additional 50-75 yards for tassels (can use contrasting colors). We recommend a sturdy cotton for good structure.
- Crochet Hook: 4.0 mm (G-6) or size needed to obtain gauge.
- Yarn Needle: For weaving in ends and assembly.
- Scissors: For cutting yarn.
- Stitch Markers: Essential for working in the round.
- Optional: Fabric for lining (about 1/2 yard), sewing needle and thread, magnetic snap closure.
Gauge & Sizing
Gauge: 16 sc and 18 rows = 4 inches (10 cm) with a 4.0 mm hook, worked in single crochet. Checking your gauge is crucial to ensure your bag turns out the intended size.
Finished Size (approximate):
- Bag Base Diameter: 7.5 inches (19 cm)
- Bag Height: 8 inches (20 cm) (excluding flap)
- Flap Length: 6 inches (15 cm)
- Strap Length: Customizable (approx. 45-50 inches for a crossbody)
Abbreviations
- ch: chain
- sl st: slip stitch
- sc: single crochet
- hdc: half double crochet
- dc: double crochet
- inc: increase (work 2 stitches into the same stitch)
- dec: decrease (work 2 stitches together)
- st(s): stitch(es)
- rnd: round
- FO: finish off
- rep: repeat
Step-by-Step Pattern
Let's get started on your beautiful new bag! We'll begin with the base, then build up the sides, create the flap, and finally, the strap and those fabulous tassels.
Bag Base (Worked in continuous rounds)
- Rnd 1: Start with a magic ring, ch 1, 8 sc into ring. Pull tail tight to close. Do not join, place stitch marker in first st. (8 sc)
- Rnd 2: *Inc* in each st around. (16 sc)
- Rnd 3: *Sc in next st, inc in next st* rep around. (24 sc)
- Rnd 4: *Sc in next 2 sts, inc in next st* rep around. (32 sc)
- Rnd 5: *Sc in next 3 sts, inc in next st* rep around. (40 sc)
- Rnd 6: *Sc in next 4 sts, inc in next st* rep around. (48 sc)
- Rnd 7: *Sc in next 5 sts, inc in next st* rep around. (56 sc)
- Rnd 8: *Sc in next 6 sts, inc in next st* rep around. (64 sc)
- Rnd 9: *Sc in next 7 sts, inc in next st* rep around. (72 sc)
- Rnd 10: *Sc in next 8 sts, inc in next st* rep around. (80 sc)
- Rnd 11: *Sc in next 9 sts, inc in next st* rep around. (88 sc)
- Rnd 12: *Sc in next 10 sts, inc in next st* rep around. (96 sc)
- Rnd 13: *Sc in next 11 sts, inc in next st* rep around. (104 sc)
- Rnd 14: *Sc in next 12 sts, inc in next st* rep around. (112 sc)
- Rnd 15: *Sc in next 13 sts, inc in next st* rep around. (120 sc)
- Rnd 16: *Sc in next 14 sts, inc in next st* rep around. (128 sc)
- Rnd 17: *Sc in next 15 sts, inc in next st* rep around. (136 sc)
- Rnd 18: *Sc in next 16 sts, inc in next st* rep around. (144 sc)
- Sl st into next st to join. Your base should now measure approximately 7.5 inches in diameter.
Bag Sides (Worked in continuous rounds)
- Rnd 19: Ch 1, sc in BLO (back loop only) of each st around. Do not join, place stitch marker in first st. This creates a neat edge for the base. (144 sc)
- Rnd 20-50 (or desired height): Sc in each st around. Continue working in continuous rounds, moving your stitch marker up with each round. (144 sc per round)
- At the end of the last round, sl st into the next st to join, then FO. Weave in ends securely.
Bag Flap (Worked in rows)
The flap will be worked directly onto the back of the bag opening. First, flatten your bag and identify the center back. Count 36 stitches to the left of the center back and attach yarn. This will leave 72 stitches for the flap (36 sts to the left of center + 36 sts to the right of center).
- Row 1: Attach yarn with a sl st to the 36th st from the center back. Ch 1, sc in the same st and in the next 71 sts across. Turn. (72 sc)
- Row 2-10: Ch 1, sc in each st across. Turn. (72 sc)
- Row 11: Ch 1, sc dec, sc in next 68 sts, sc dec. Turn. (70 sc)
- Row 12: Ch 1, sc in each st across. Turn. (70 sc)
- Row 13: Ch 1, sc dec, sc in next 66 sts, sc dec. Turn. (68 sc)
- Row 14: Ch 1, sc in each st across. Turn. (68 sc)
- Row 15: Ch 1, sc dec, sc in next 64 sts, sc dec. Turn. (66 sc)
- Continue decreasing by 2 sts every other row until you have approximately 40-42 sc remaining.
- Work 2 more rows of sc even (no decreases) to give the flap a little extra length.
- Edging: Ch 1, sc evenly around the entire flap (including the attachment edge, working into the ends of rows). Work 3 sc in each corner for a smooth turn. Sl st to first sc to join. FO.
Bag Strap
- Ch 180 (or desired length for your preferred strap drop).
- Row 1: Sc in the 2nd ch from hook and in each ch across. Turn. (179 sc)
- Row 2: Ch 1, sc in each st across. Turn. (179 sc)
- Row 3: Ch 1, sc in each st across. FO, leaving a long tail for sewing. (179 sc)
Making the Tassels (Make 3-5, or desired amount)
- Cut a piece of cardboard or sturdy plastic about 4 inches tall (this will determine tassel length).
- Wrap yarn around the cardboard approximately 50-60 times (more wraps for a fuller tassel). Hold the yarn firmly.
- Cut an 8-inch piece of yarn and thread it under the wrapped yarn at the top edge of the cardboard. Tie a tight double knot. This will be the hanging loop.
- Carefully slide the wrapped yarn off the cardboard.
- Cut another 8-inch piece of yarn. Wrap it tightly around the entire bundle of yarn about 1/2 inch from the top knot (the one forming the hanging loop). Tie a tight double knot and weave the ends into the body of the tassel. This forms the tassel head.
- Cut through all the loops at the bottom of the tassel.
- Trim the tassel ends evenly to your desired length. Repeat for all desired tassels.
Assembly
- Attach Strap: Flatten your bag. Using your yarn needle and the long tails, securely sew each end of the strap to the top side edges of the bag, just below the flap. Ensure the strap isn't twisted.
- Attach Tassels: Using the hanging loop of each tassel, attach them to the front bottom edge of the bag flap. You can attach them evenly spaced, or in a cluster in the center. Weave the remaining ends securely into the stitches of the flap.
- Optional: Add Lining: Cut a piece of fabric to match the bag's dimensions (base circle and a rectangle for the sides). Sew the fabric into a bag shape, then hand-sew it into the crochet bag opening using a whip stitch.
- Optional: Add Magnetic Snap: Sew one half of the magnetic snap to the underside of the flap (center), and the other half to the corresponding spot on the front of the bag body.
Pro Tips
- Stitch Markers are Your Best Friend: Especially when working in continuous rounds, use a stitch marker to mark the first stitch of each round to avoid losing your place.
- Maintain Even Tension: Consistent tension is key for a neat and professional-looking bag. If your stitches are too tight, the bag will be stiff; too loose, and it might lose its shape.
- Yarn Choice Matters: Cotton yarn provides excellent stitch definition and structure, making it ideal for bags. Acrylic can also work but might be softer and require a tighter tension.
- Blocking: While not strictly necessary for this bag, a light block of the bag body and flap can help even out stitches and give a more polished finish.
- Customization is Key: Don't be afraid to experiment with color combinations! A main body color with contrasting tassels or a variegated yarn can create stunning effects.
- Reinforce Stress Points: When attaching the strap, sew it on very securely, going through stitches multiple times to ensure it can withstand the weight of the bag's contents.
Frequently Asked Questions
Can I use a different yarn weight for this pattern?
You can, but be aware that using a different yarn weight (e.g., bulky or sport weight) will significantly alter the finished size of your bag. You would need to adjust your hook size accordingly and potentially modify the number of increase rounds for the base and rows for the sides to achieve a similar proportion. Always check your gauge!
How do I make the tassels fuller or thinner?
To make tassels fuller, simply wrap the yarn around your cardboard more times (e.g., 70-80 wraps instead of 50-60). For thinner tassels, wrap fewer times (e.g., 30-40 wraps). The length of your cardboard also determines the tassel's length, so you can adjust that for different looks.
Do I need to line the bag?
Lining the bag is optional but highly recommended! It adds durability, prevents small items from slipping through stitches, and gives your bag a more professional finish. If you plan to carry heavier items or want extra security, a simple fabric lining is a great addition.
There you have it – your complete guide to crocheting a beautiful and stylish tassel bag! We hope you enjoy every moment of crafting this lovely accessory. Once finished, you'll have a unique, handmade item that perfectly complements your style and carries your essentials with a touch of bohemian charm. Happy crocheting!