Imagine stepping out on a warm, sunny day, feeling utterly fabulous in a garment you created with your own hands. That's the magic of handmade fashion, and today, you're about to unlock the secret to crafting your new favorite summer staple! This comprehensive guide and free pattern will walk you through every stitch, helping you create a stunning, comfortable, and utterly customizable Crochet Tank Top that will turn heads and become an indispensable part of your warm-weather wardrobe. Get ready to hook your way to confidence and style!
Why You'll Love This Pattern
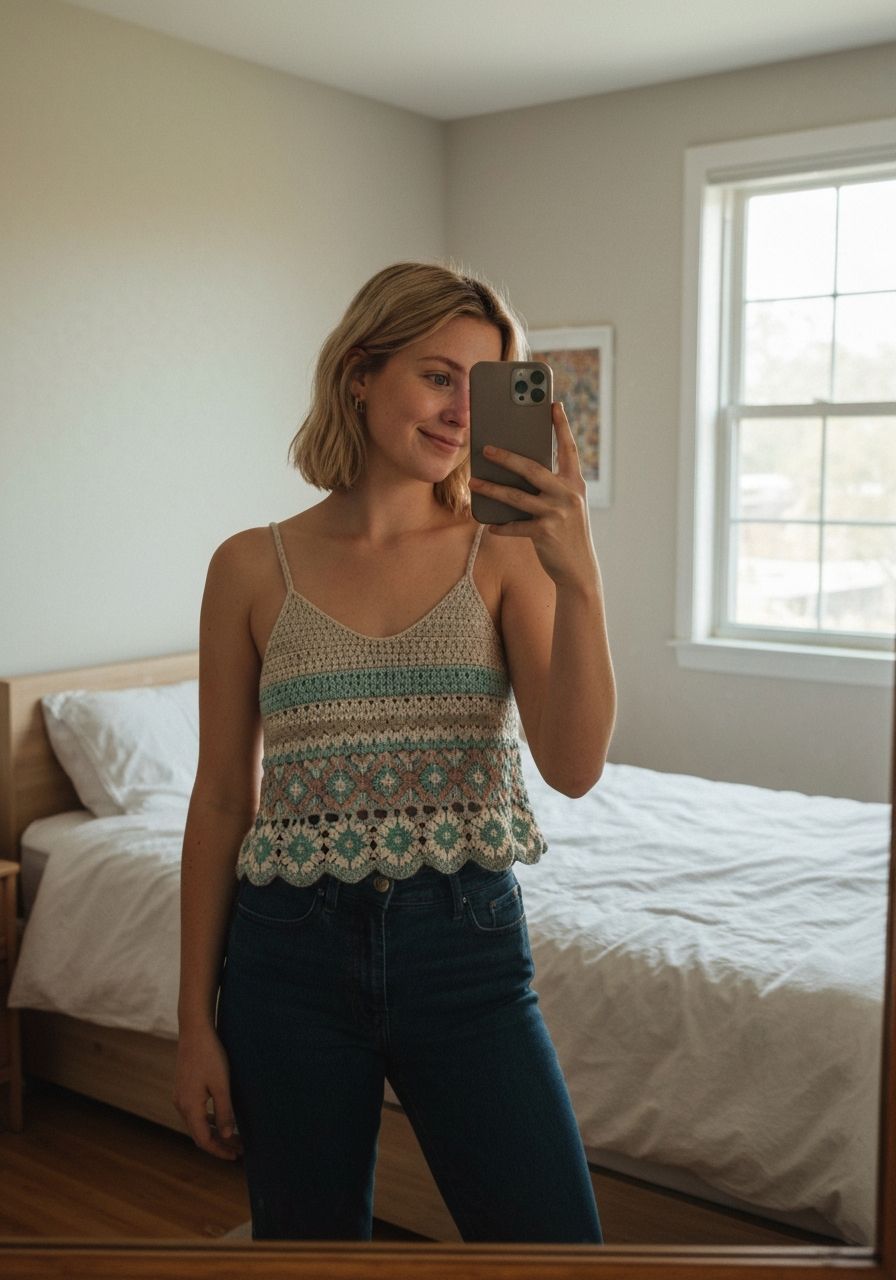
This Crochet Tank Top pattern isn't just another project; it's an invitation to elevate your handmade wardrobe with a piece that combines elegance, comfort, and personal flair. Here's why you'll absolutely adore making and wearing this tank:
- Effortless Style & Comfort: Designed with a flattering silhouette and using breathable yarn, this tank top offers both chic style and ultimate comfort for those warm days. It drapes beautifully and feels wonderfully soft against your skin.
- Customization Galore: The pattern is written to be easily adaptable. Want it longer or shorter? Prefer a different neckline depth? We'll provide tips to help you make this tank uniquely yours, from adjusting length to playing with color combinations.
- Skill-Building Project: While perfect for intermediate beginners, this pattern offers opportunities to refine your basic crochet skills. You'll practice consistent tension, seaming techniques, and working even edges, boosting your confidence for future garment projects.
- Relatively Quick to Make: Unlike larger garment projects, this tank top works up fairly quickly, making it a satisfying project you can complete in a reasonable timeframe, ready to wear for your next sunny adventure.
- Perfect for Gifting: A handmade tank top makes a thoughtful and personal gift for friends or family. Imagine their delight receiving a unique, custom-made garment!
Materials Needed
Gather your supplies before you begin. Having everything ready will ensure a smooth and enjoyable crocheting experience.
- Yarn: DK weight (Category 3) Cotton Blend yarn. Approximately 500 (600, 750, 900) yards for sizes S (M, L, XL). We recommend a cotton blend for its breathability and drape.
- Crochet Hook: 4.0 mm (G-6) or size needed to obtain gauge.
- Tapestry Needle: For weaving in ends and seaming.
- Scissors: For cutting yarn.
- Stitch Markers: Essential for marking important stitches and rows, especially when working on shaping.
- Measuring Tape: Crucial for checking your gauge and ensuring your top is the correct size.
Gauge & Sizing
Achieving the correct gauge is the single most important step for garment making. It ensures your finished tank top matches the intended dimensions and fits correctly. Please do not skip this step!
Gauge Swatch Instructions:
Using your 4.0 mm hook and chosen yarn, chain 18. Work 16 rows of half double crochet (hdc). Your swatch should measure approximately 4 inches (10 cm) by 4 inches (10 cm). If your swatch is too large, try a smaller hook. If it's too small, try a larger hook. Repeat until your gauge matches.
Finished Measurements (Approximate):
This pattern is written for sizes Small (S), Medium (M), Large (L), and Extra Large (XL). Sizes are written as S (M, L, XL).
- Bust Circumference: 32 (36, 40, 44) inches / 81 (91, 102, 112) cm
- Finished Flat Width (Front or Back Panel): 16 (18, 20, 22) inches / 40.5 (45.5, 51, 56) cm
- Finished Length (Shoulder to Hem): 19 (20, 21, 22) inches / 48 (51, 53.5, 56) cm
Abbreviations
Understanding these standard crochet abbreviations will help you follow the pattern effortlessly.
- ch: Chain
- sc: Single Crochet
- hdc: Half Double Crochet
- dc: Double Crochet
- sl st: Slip Stitch
- st(s): Stitch(es)
- rep: Repeat
- yo: Yarn Over
- inc: Increase (typically 2 stitches in one stitch)
- dec: Decrease (typically working 2 stitches together)
- FO: Fasten Off
- MR: Magic Ring (not used in this pattern but a common abbreviation)
- RS: Right Side
- WS: Wrong Side
Step-by-Step Pattern
This tank top is constructed from two identical panels (front and back), which are then seamed together and edged. We'll be using half double crochet (hdc) for the main body to create a lovely, drapes fabric.
General Notes:
- Ch 2 at the beginning of hdc rows counts as the first hdc.
- Always check your stitch counts at the end of each row to ensure accuracy.
- Read through the entire pattern before beginning.
Back Panel (Make 1)
- Initial Chain: Ch 65 (73, 81, 89).
- Row 1 (RS): Hdc in the 3rd ch from hook and in each ch across. (63 (71, 79, 87) hdc). Ch 2, turn.
- Rows 2 - 48 (51, 54, 57): Hdc in each st across. (63 (71, 79, 87) hdc). Ch 2, turn. (You should have worked approximately 12 (13, 14, 15) inches from the bottom edge. Adjust rows here for desired length before armholes).
- Armhole Shaping - Row 49 (52, 55, 58): Hdc2tog over the first 2 sts, hdc in each st until the last 2 sts, hdc2tog over the last 2 sts. (61 (69, 77, 85) hdc). Ch 2, turn.
- Row 50 (53, 56, 59): Rep Row 4. (59 (67, 75, 83) hdc). Ch 2, turn.
- Rows 51 (54, 57, 60) - 62 (65, 68, 71): Hdc in each st across. (59 (67, 75, 83) hdc). Ch 2, turn. (Work straight for approximately 3-4 inches after decreases).
- Fasten Off: Cut yarn, leaving a long tail for seaming.
Front Panel (Make 1)
- Initial Chain: Ch 65 (73, 81, 89).
- Row 1 (RS): Hdc in the 3rd ch from hook and in each ch across. (63 (71, 79, 87) hdc). Ch 2, turn.
- Rows 2 - 48 (51, 54, 57): Hdc in each st across. (63 (71, 79, 87) hdc). Ch 2, turn. (Same as Back Panel).
- Armhole Shaping - Row 49 (52, 55, 58): Hdc2tog over the first 2 sts, hdc in each st until the last 2 sts, hdc2tog over the last 2 sts. (61 (69, 77, 85) hdc). Ch 2, turn.
- Row 50 (53, 56, 59): Rep Row 4. (59 (67, 75, 83) hdc). Ch 2, turn.
- Neckline Shaping - Row 51 (54, 57, 60): Hdc in the first 15 (17, 19, 21) sts. Ch 2, turn. (This creates the first shoulder strap).
- Rows 52 (55, 58, 61) - 62 (65, 68, 71): Hdc in each of the 15 (17, 19, 21) sts across. Ch 2, turn. (Work straight for approximately 3-4 inches).
- Fasten Off: Cut yarn, leaving a long tail for seaming.
- Second Shoulder Strap: Skip the central 29 (33, 37, 41) sts on Row 50 (53, 56, 59). Rejoin yarn with a sl st in the next st (the 15th (17th, 19th, 21st) st from the end of the row). Ch 2, hdc in the same st and in the remaining 14 (16, 18, 20) sts. (15 (17, 19, 21) hdc). Ch 2, turn.
- Rows 52 (55, 58, 61) - 62 (65, 68, 71): Hdc in each of the 15 (17, 19, 21) sts across. Ch 2, turn.
- Fasten Off: Cut yarn, leaving a long tail for seaming.
Joining Panels & Seaming
Now it's time to bring your tank top to life!
- Shoulder Seams: Lay the Front and Back panels with RS together. Using your tapestry needle and the long tails you left, mattress stitch or whip stitch the shoulder straps together. Alternatively, you can use sl sts with your hook for a flatter seam. Secure and weave in ends.
- Side Seams: With RS together, align the side edges of the front and back panels. Starting from the bottom hem, use your tapestry needle to mattress stitch or whip stitch up to the armhole opening. Repeat for the other side. Secure and weave in ends.
Armhole Edging
Creating a neat edge around the armholes gives your tank a polished finish.
- Attach Yarn: With RS facing, join yarn with a sl st at the bottom of one armhole.
- Round 1: Ch 1 (does not count as st), sc evenly around the entire armhole opening. Aim for approximately 2 sc for every hdc row and 1 sc for every hdc stitch along the decreased sections. Join with a sl st to the first sc.
- Fasten Off: Cut yarn and weave in ends. Repeat for the second armhole.
Neckline Edging
A simple sc border will define the neckline beautifully.
- Attach Yarn: With RS facing, join yarn with a sl st at one shoulder seam.
- Round 1: Ch 1 (does not count as st), sc evenly around the entire neckline opening. Be mindful to keep your tension consistent to avoid puckering or gaping. Join with a sl st to the first sc.
- Fasten Off: Cut yarn and weave in ends.
Bottom Edging (Optional Ribbing)
For a clean, simple finish, you can add a round of sc to the bottom. For a more defined, ribbed look, try this:
- Attach Yarn: With RS facing, join yarn with a sl st at a side seam along the bottom edge.
- Round 1: Ch 2 (counts as first hdc), hdc evenly around the entire bottom opening. Join with a sl st to the top of the beginning Ch 2.
- Round 2: Ch 2 (counts as first hdc), *front post double crochet (fpdc) around the next hdc, back post double crochet (bpdc) around the next hdc*; rep from * to * around. Join with a sl st to the top of the beginning Ch 2.
- Round 3: Rep Round 2.
- Fasten Off: Cut yarn and weave in ends.
Pro Tips
Elevate your crocheting game and make your tank top truly professional with these expert tips:
- Block Your Garment: Blocking is a game-changer! After finishing, gently wet your tank top, lay it flat to measurements, and let it dry. This relaxes the fibers, evens out stitches, and improves the drape significantly.
- Choose the Right Yarn: While cotton blends are recommended for summer, consider bamboo or linen blends for even more drape and cooling properties. For a warmer version, a wool blend could work, but adjust the hook and gauge accordingly.
- Adjusting Length: To make your tank top longer or shorter, simply add or remove rows from the body section *before* you start the armhole shaping. Remember to make the same adjustments to both front and back panels.
- Seamless Joins: When adding new yarn, try to do it at the beginning or end of a row or round, in an inconspicuous spot. Leave longer tails for weaving in later to ensure they don't unravel.
- Weave in Ends as You Go: While tedious, weaving in ends as you complete sections (especially smaller ones like shoulder straps) can save you a big job at the end.
- Use Stitch Markers Liberally: Mark your first and last stitch of a row, especially during shaping. Use them to indicate the start of a round when working in the round, or to delineate specific sections.
Frequently Asked Questions
Can I use a different yarn weight for this pattern?
Yes, you absolutely can! However, be aware that changing yarn weight will significantly alter your gauge and likely the final size of your tank top. If you use a different weight (e.g., worsted weight), you will need to adjust your hook size and re-check your gauge diligently. You might also need to adjust the initial chain count and subsequent stitch counts to achieve the desired width and length.
How do I make this tank top longer or shorter?
To adjust the length of your tank top, simply add or subtract rows in the main body section *before* you begin the armhole shaping. Ensure you make the same number of adjustments to both the front and back panels to maintain symmetry. For example, if you want it 2 inches longer, and your gauge is 4 rows per inch, add 8 rows to both panels before starting the armhole decreases.
Is this pattern suitable for complete beginners?
This pattern is designed for an intermediate beginner. While it uses basic stitches (hdc, sc, sl st), it introduces garment construction elements like shaping for armholes and necklines, seaming, and working evenly around edges. A complete beginner might find the shaping a bit challenging, but with patience, attention to detail, and a good understanding of the basic stitches, it's definitely achievable. Don't be afraid to try!
And there you have it! Your very own, beautifully handcrafted Crochet Tank Top. We hope you enjoyed every moment of creating this versatile piece. Wear it with pride, knowing that each stitch was made with your unique touch. We can't wait to see your finished creations – share them with us and inspire fellow crocheters!