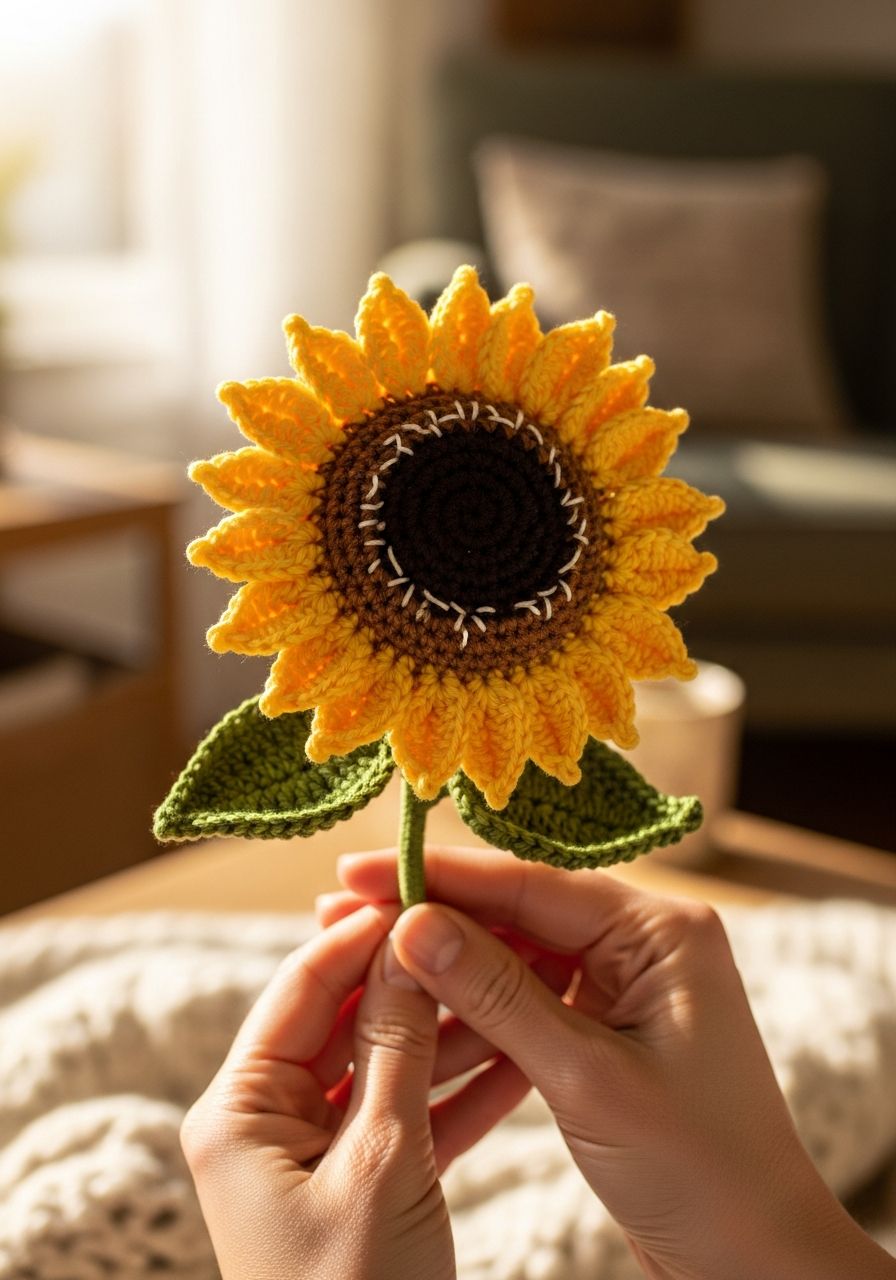
Imagine holding a piece of everlasting sunshine in your hands, a vibrant bloom that never wilts, always radiating joy and warmth. That's the magic you're about to create with this delightful crochet sunflower amigurumi pattern! Forget the winter blues or the fleeting beauty of fresh flowers; with your hook and yarn, you can craft a symbol of happiness that lasts forever, a perfect handmade gift, or a cheerful accent for your own space. Get ready to fall in love with every stitch as we bring this iconic flower to life!
Sunflowers are more than just beautiful; they symbolize adoration, loyalty, and longevity. Crocheting one allows you to infuse these meanings into a tangible, cuddly object. Whether you're a seasoned crocheter looking for a fun, quick project or a beginner eager to dive into the world of amigurumi, this pattern is designed to guide you every step of the way. We'll cover everything from selecting your yarn to the final assembly, ensuring your finished sunflower is as perfect as a sunny summer's day.
Why You'll Love This Pattern
- Beginner-Friendly: Uses basic crochet stitches and simple construction, making it accessible for those new to amigurumi.
- Quick & Satisfying: The individual components work up relatively fast, giving you a sense of accomplishment with each completed piece.
- Versatile Decor: Perfect as a desk companion, a cheerful shelf accent, or even part of a larger floral arrangement.
- Heartfelt Gift: Handmade sunflowers make incredibly thoughtful presents for friends, family, or anyone who needs a little pick-me-up.
- Scrap Yarn Friendly: A great way to use up those smaller skeins of yellow, brown, and green yarn you've been saving.
- Everlasting Bloom: Enjoy the beauty of a sunflower all year round, without needing water or sunlight!
Materials Needed
- Worsted Weight Yarn (Category 4):
- Brown (for the center)
- Bright Yellow (for the petals)
- Green (for the back, stem, and leaves)
- Crochet Hook: 3.5mm (E hook)
- Safety Eyes: 6mm (or black embroidery floss for embroidered eyes)
- Fiberfill Stuffing
- Yarn Needle (Tapestry Needle)
- Stitch Markers
- Scissors
Gauge & Sizing
For amigurumi, exact gauge isn't critical as long as your stitches are tight enough to prevent stuffing from showing through. However, for reference, a 4-inch square in single crochet should be approximately 20 stitches by 22 rows using the recommended yarn and hook. When finished and assembled, your crochet sunflower amigurumi will stand approximately 7-8 inches tall (including the stem) with a flower head diameter of about 3.5-4 inches.
Abbreviations
- ch: Chain
- sc: Single Crochet
- hdc: Half Double Crochet
- dc: Double Crochet
- sl st: Slip Stitch
- inc: Increase (2 sc in the same stitch)
- dec: Decrease (sc 2 together)
- MR: Magic Ring (also known as Magic Circle or Adjustable Ring)
- FO: Fasten Off
- st(s): Stitch(es)
- Rnd: Round
- BLO: Back Loop Only
Step-by-Step Pattern
Center of the Sunflower (Brown Yarn)
- Rnd 1: Start with a MR, sc 6 into the ring. (6 sts)
- Rnd 2: Inc in each st around. (12 sts)
- Rnd 3: (Sc, inc) x 6 times. (18 sts)
- Rnd 4: (2 sc, inc) x 6 times. (24 sts)
- Rnd 5: (3 sc, inc) x 6 times. (30 sts)
- Rnd 6: (4 sc, inc) x 6 times. (36 sts)
- Rnd 7-10: Sc in each st around for 4 rounds. (36 sts)
- At this point, if using safety eyes, insert them between Rnd 7 and Rnd 8, approximately 4-5 stitches apart. Secure the backs. If embroidering eyes, you can do this later.
- Rnd 11: (4 sc, dec) x 6 times. (30 sts)
- Begin stuffing firmly with fiberfill. Continue stuffing as you go.
- Rnd 12: (3 sc, dec) x 6 times. (24 sts)
- Rnd 13: (2 sc, dec) x 6 times. (18 sts)
- Rnd 14: (Sc, dec) x 6 times. (12 sts)
- Rnd 15: (Dec) x 6 times. (6 sts)
- FO, leaving a short tail. Thread the tail through the remaining 6 stitches and pull tight to close the hole. Weave in the end.
Petals (Yellow Yarn - Make 15-18)
- Ch 10.
- Starting in the 2nd ch from the hook: sl st, sc, hdc, dc in the next 4 chains, hdc, sc, sl st in the last chain. (This completes one side of the petal)
- Ch 1, turn. Work down the other side of the starting chain: sl st, sc, hdc, dc in the next 4 chains, hdc, sc, sl st in the last stitch.
- Sl st to join at the base of the petal.
- FO, leaving a long tail (approx. 8-10 inches) for sewing.
- Repeat steps 1-5 to make a total of 15-18 petals. The exact number depends on how full you want your sunflower to look.
Back of the Sunflower (Green Yarn)
- Rnd 1: Start with a MR, sc 6 into the ring. (6 sts)
- Rnd 2: Inc in each st around. (12 sts)
- Rnd 3: (Sc, inc) x 6 times. (18 sts)
- Rnd 4: (2 sc, inc) x 6 times. (24 sts)
- Rnd 5: (3 sc, inc) x 6 times. (30 sts)
- Rnd 6: (4 sc, inc) x 6 times. (36 sts)
- Rnd 7: Sc in each st around. (36 sts)
- FO, leaving a very long tail (at least 20-24 inches) for sewing this piece to the front of the sunflower later.
Stem (Green Yarn)
- Rnd 1: Start with a MR, sc 6 into the ring. (6 sts)
- Rnd 2: Inc in each st around. (12 sts)
- Rnd 3: (Sc, inc) x 6 times. (18 sts)
- Rnd 4: Sc in BLO in each st around. (18 sts) This creates a nice defined edge for the stem to begin.
- Rnd 5-25: Sc in each st around for 21 rounds, or until your desired stem length is achieved. (18 sts)
- As you work, firmly stuff the stem with fiberfill. Ensure it's packed tightly enough to stand upright.
- FO, leaving a long tail for sewing.
Leaves (Green Yarn - Make 2)
- Ch 10.
- Working in the back bumps of the chain:
- Sl st in 2nd ch from hook, sc in next, hdc in next 2, dc in next 2, hdc in next 2, sc in last. (One side of the leaf is complete)
- Ch 2 (forms the tip of the leaf), turn.
- Working down the other side of the original chain:
- Sc in next, hdc in next 2, dc in next 2, hdc in next 2, sc in next, sl st in last.
- Ch 1, turn. Sc in each st around the entire edge of the leaf. Sl st to join at the base.
- FO, leaving a long tail for sewing.
- Repeat to make a second leaf.
Assembly
- Attach Petals: Take your brown sunflower center. Using the long tails from the yellow petals, sew them evenly around the edge of the brown center. You can sew them in one or two layers for a fuller look. Weave in the ends securely.
- Assemble Flower Head: Place the green back piece against the back of the brown center, sandwiching the bases of the petals between them. Using the long tail from the green back piece, whip stitch or mattress stitch the green back to the brown center, making sure to catch the bases of the petals to secure them further. Continue to stuff the flower head as you sew, ensuring it's firm and holds its shape.
- Attach Stem: Using the long tail from the stem, center it on the back of the green flower head. Sew it securely, going through both the stem and the green back piece several times to ensure it's very stable.
- Attach Leaves: Position the two leaves on the stem at your desired height. Use the long tails from the leaves to sew them firmly to the stem. You can overlap them slightly or place them opposite each other.
- Final Touches: Weave in any remaining loose ends. Fluff up your sunflower and admire your beautiful creation!
Pro Tips
- Invisible Decreases: For a cleaner look, use the invisible decrease method (insert hook into front loop of first stitch, then into front loop of second stitch, yarn over, pull through both loops, yarn over, pull through remaining two loops).
- Tight Stitches: Work your stitches tightly to prevent stuffing from showing through. If your stitches are naturally loose, consider going down a hook size.
- Stuffing Evenly: Stuff your amigurumi firmly and evenly to avoid bumps and ensure it holds its shape. Use small pieces of fiberfill to reach into tight spots.
- Secure Ends: Always weave in your yarn tails securely to prevent unraveling. A yarn needle is your best friend here.
- Stitch Markers are Essential: Especially when working in the round, a stitch marker will save you from constantly counting and getting lost.
- Embroidered vs. Safety Eyes: For babies and young children, embroidered eyes are a safer alternative to plastic safety eyes.
- Color Changes: When changing colors, do the last yarn over of the last stitch in the old color with the new color to create a seamless transition.
Frequently Asked Questions
Q: Can I use different yarn weights for this pattern?
A: Absolutely! You can use any yarn weight you prefer. However, be aware that changing the yarn weight will affect the finished size of your sunflower. You'll also need to adjust your hook size accordingly. Generally, a smaller hook than recommended for the yarn weight is used for amigurumi to ensure tight stitches.
Q: How do I make my sunflower stand on its own more stably?
A: For extra stability, you can insert a piece of floral wire or a dowel into the center of the stem as you stuff it. Ensure the wire or dowel is slightly shorter than the stem itself and has a rounded or taped end to prevent it from poking through. Alternatively, you can create a small crocheted base to attach the bottom of the stem to.
Q: Can I make this pattern larger or smaller?
A: Yes! To make a larger sunflower, use a bulkier yarn (e.g., chunky or super bulky) and a proportionally larger hook. To make a smaller sunflower, use a finer yarn (e.g., sport weight or fingering weight) and a smaller hook. Remember that the finished item will scale up or down with your yarn and hook choice.
Congratulations, you've just brought a ray of sunshine into the world with your very own crocheted sunflower! Crafting this cheerful bloom is not just about following a pattern; it's about creating something beautiful with your own hands, stitch by delightful stitch. We hope you enjoyed this journey and that your new amigurumi sunflower fills your home with joy and a constant reminder of brighter days. Don't hesitate to personalize it with different colors or expressions, making it truly unique. Happy crocheting!