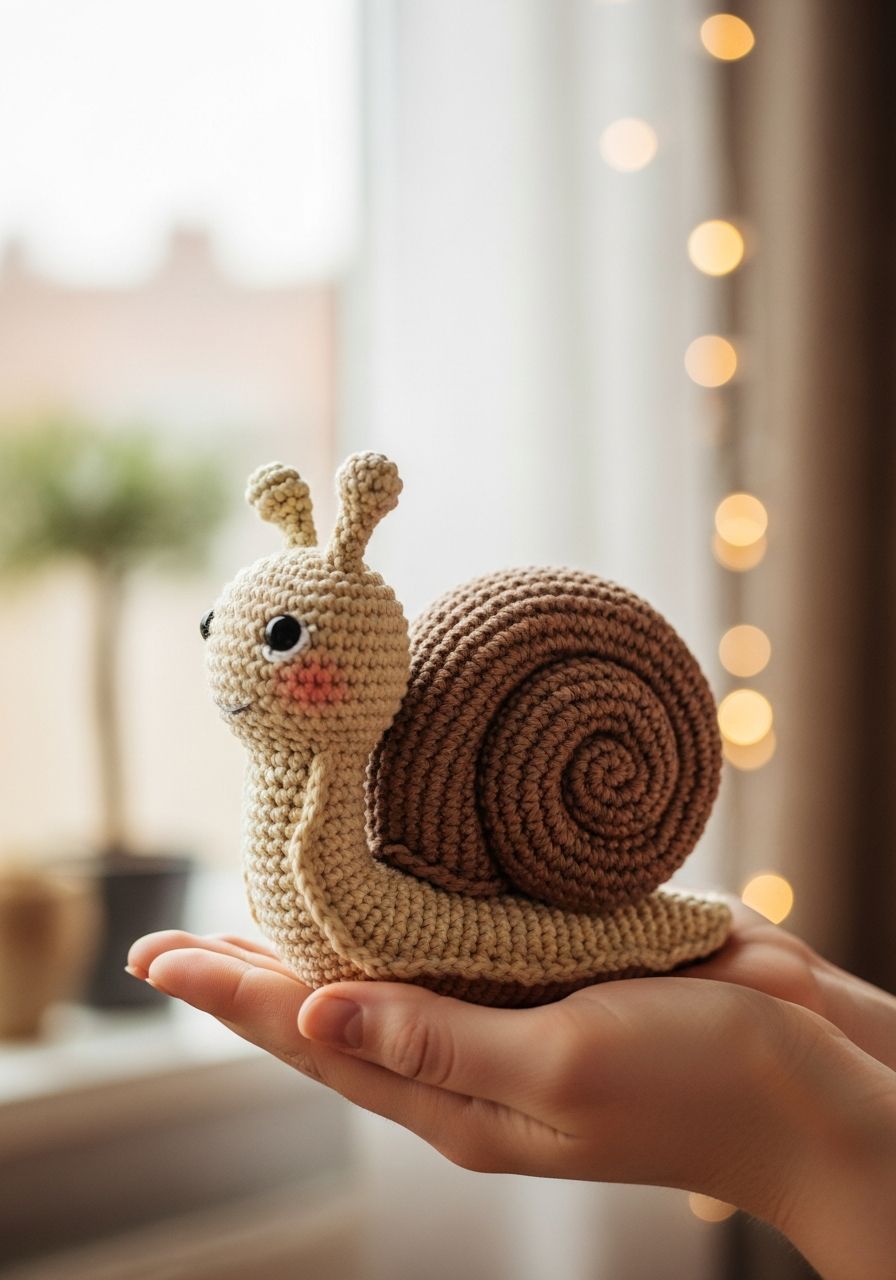
Imagine a tiny, whimsical friend peeking out from a dewy leaf, carrying its cozy home on its back, ready to bring a touch of garden magic into your life. That's the joy you're about to create with your own hands! Dive into the delightful world of amigurumi with our enchanting and absolutely free **crochet snail amigurumi** pattern. This little guy is more than just a toy; he's a charming companion, a thoughtful gift, or a sweet desk buddy that promises to bring a smile to anyone's face. Get ready to fall in love with every stitch as you bring this adorable creature to life!
Welcome, fellow yarn enthusiasts! As an expert crochet designer, I'm thrilled to share one of my favorite quick and satisfying projects: the humble yet incredibly cute snail. This pattern is designed to be accessible for crocheters of various skill levels, from confident beginners looking to tackle their first amigurumi project to seasoned pros seeking a relaxing, fun make. We'll break down each component – the squishy body and the perfectly spiraled shell – into easy-to-follow steps, ensuring your snail emerges as charming as can be. Grab your hook, pick your favorite yarn colors, and let's get started on creating a tiny masterpiece!
Why You'll Love This Pattern
- Beginner-Friendly: While we'll use standard amigurumi techniques like working in the round, increases, and decreases, the shapes are simple and repetitive, making it an excellent project for those new to amigurumi.
- Quick & Satisfying: This isn't a massive project that takes weeks. You can easily whip up a snail (or two!) in a day or over a weekend, providing instant gratification.
- Customizable: Play with colors! Make a natural-toned snail, or go wild with bright, vibrant hues for a fantasy garden creature. Different yarn weights will also yield different sizes.
- Perfect for Gifting: Hand-crocheted gifts are always cherished. These snails make adorable baby shower gifts, stocking stuffers, party favors, or just a sweet surprise for a friend.
- Stash Buster: Snails don't require much yarn, making this a fantastic project for using up those leftover bits and bobs from previous projects.
- Skill Building: Practice your magic ring, invisible decreases, and seamless color changes, honing essential amigurumi techniques.
Materials Needed
- Yarn: Worsted weight (Aran/10-ply) acrylic or cotton yarn in two colors: one for the body (Color A) and one for the shell (Color B). Small amounts are needed.
- Crochet Hook: 3.5mm (E/4) or 4.0mm (G/6) – choose a hook size that gives you tight stitches to prevent stuffing from showing through.
- Safety Eyes: Two 6mm or 8mm safety eyes (optional, you can embroider eyes for younger children).
- Stuffing: Polyester fiberfill.
- Yarn Needle: For weaving in ends and assembly.
- Stitch Marker: Essential for working in continuous rounds.
- Scissors: For cutting yarn.
Gauge & Sizing
For amigurumi, exact gauge isn't as critical as it is for garments, as long as your stitches are tight enough to hold the stuffing without gaps. A general rule of thumb is to use a hook size one or two sizes smaller than recommended on your yarn label. This helps create a dense fabric suitable for stuffed toys.
Using worsted weight yarn and a 3.5mm hook, your finished snail will be approximately 4-5 inches long from head to tail, and the shell will be about 2.5-3 inches in diameter. Feel free to adjust your yarn weight and hook size for a larger or smaller snail; just ensure your hook is appropriate for your chosen yarn to maintain tight stitches.
Abbreviations
- ch: chain
- sl st: slip stitch
- sc: single crochet
- hdc: half double crochet
- dc: double crochet
- inc: increase (2 single crochet in one stitch)
- dec: decrease (single crochet 2 stitches together)
- MR: Magic Ring
- FO: Fasten Off
- st(s): stitch(es)
- ( ): repeat instructions in parentheses the specified number of times
- [ ]: total number of stitches at the end of the round
Step-by-Step Pattern
We'll start by making the snail's body, then move on to the spiral shell, and finally, assemble our adorable garden friend. Work in continuous rounds unless otherwise specified, using a stitch marker to keep track of your first stitch in each round.
Snail Body (Color A)
Start with Color A (e.g., green or brown).
- Round 1: MR, 6 sc in ring. [6]
- Round 2: (inc) x 6. [12]
- Round 3: (sc, inc) x 6. [18]
- Round 4: sc around. [18]
- Round 5: (2 sc, inc) x 6. [24]
- Rounds 6-10: sc around (5 rounds). [24]
- Round 11: (2 sc, dec) x 6. [18]
- Round 12: sc around. [18]
- Round 13: (sc, dec) x 6. [12]
- Round 14: sc around. [12]
- Round 15: (dec) x 6. [6]
- Stuff the body firmly, shaping as you go. FO, leaving a long tail for sewing. Using your yarn needle, weave the tail through the front loop of each remaining stitch and pull tight to close the opening. Weave in the end.
Snail Head & Antennae (Color A)
This section is worked directly onto the closed end of the body from Round 15. Rejoin Color A yarn into one of the stitches from Round 15 (where you closed it).
- Round 1: 6 sc evenly around the closed end of the body. [6]
- Round 2: (inc) x 6. [12]
- Rounds 3-6: sc around (4 rounds). [12]
At the end of Round 6, insert safety eyes between Rounds 4 and 5, about 4 stitches apart. Begin stuffing the head firmly.
- Round 7: (sc, dec) x 4. [8]
- Round 8: (dec) x 4. [4]
Finish stuffing the head. FO, leaving a long tail. Close the opening as before and weave in the end.
Antennae (Make 2):
- Ch 5.
- Starting in the 2nd ch from hook, sc in next 4 ch.
- Sl st into the side of the head where you want the antenna to be.
- Repeat for the second antenna, ensuring they are symmetrical. Weave in ends.
Snail Shell (Color B)
Start with Color B (e.g., yellow, orange, or a contrasting color).
- Round 1: MR, 6 sc in ring. [6]
- Round 2: (inc) x 6. [12]
- Round 3: (sc, inc) x 6. [18]
- Round 4: (2 sc, inc) x 6. [24]
- Round 5: (3 sc, inc) x 6. [30]
- Round 6: (4 sc, inc) x 6. [36]
- Round 7: (5 sc, inc) x 6. [42]
- Round 8: Working in the back loops only for this round: sc around. [42]
- Round 9: Working in both loops: sc around. [42]
- Round 10: (5 sc, dec) x 6. [36]
- Round 11: sc around. [36]
- Round 12: (4 sc, dec) x 6. [30]
Stuff the shell firmly, but don't overstuff to maintain its shape.
- Round 13: (3 sc, dec) x 6. [24]
- Round 14: (2 sc, dec) x 6. [18]
- Round 15: (sc, dec) x 6. [12]
Continue stuffing as needed.
- Round 16: (dec) x 6. [6]
- FO, leaving a long tail. Close the opening as before. Do not weave in this tail yet; you'll use it for sewing.
Assembly
- Position the shell on the snail's back, slightly towards the tail end, so the widest part of the shell sits comfortably over the snail's body.
- Using the long tail from the shell and your yarn needle, carefully sew the shell to the snail's body. Stitch through the base of the shell and into the body, working around the circumference to secure it firmly.
- Once the shell is securely attached, weave in any remaining ends.
- If you opted not to use safety eyes, use black embroidery floss to embroider small eyes or French knots onto the head. You can also embroider a small mouth if desired for extra character.
Pro Tips
- Invisible Decrease: For a cleaner look in amigurumi, use the invisible decrease (inv dec). Insert your hook into the front loop of the first stitch, then into the front loop of the second stitch, yarn over, pull through both front loops, yarn over, and pull through the remaining two loops on your hook.
- Stuffing Technique: Stuff your amigurumi firmly and evenly. Use small pieces of fiberfill, pushing them into all nooks and crannies with the back of your hook or a blunt tool. Avoid overstuffing too quickly, as it can create lumps.
- Color Changes: To make a neat color change, complete the last yarn over of the last stitch of the old color with the new color. This creates a seamless transition.
- Stitch Markers are Your Best Friend: Seriously, don't skip it! Working in continuous rounds can be confusing without one. Move it up with each new round.
- Yarn Tails for Sewing: Always leave a long tail (at least 12-18 inches) when fastening off parts that need to be sewn together. It saves you from weaving in an extra end just to attach new yarn.
- Embroidered Features: For baby-safe toys or a softer look, embroider eyes and mouths instead of using safety eyes.
Frequently Asked Questions
Can I use different yarn weights for this pattern?
Absolutely! You can use any yarn weight you prefer, from fingering weight for a tiny snail to super bulky for a giant, huggable one. Just remember to adjust your hook size accordingly. A general rule for amigurumi is to use a hook at least one size smaller than what's recommended on the yarn label to ensure tight stitches that won't let the stuffing show through.
My snail's shell isn't spiraling correctly. What am I doing wrong?
The spiral effect in this pattern comes naturally from working in continuous rounds with increasing stitches. The key to a good spiral is consistent tension and accurate stitch counts. Double-check your stitch count at the end of each round. The 'working in back loops only' round also helps define a bit of a ridge, enhancing the spiral look. If it still looks off, try gently shaping it with your hands after stuffing.
How can I make my snail stand up on its own?
While this snail is designed to be soft and squishy, you can help it stand by ensuring the body is firmly stuffed, especially towards the base. You can also place a small, flat, weighted object (like plastic pellets in a small fabric pouch, safely secured inside the body during stuffing) at the very bottom of the body. Alternatively, crocheting a slightly wider, flatter base for the body can also provide more stability.
Congratulations, you've just brought a charming little snail to life! Whether this is your first amigurumi or your hundredth, I hope you found joy and relaxation in every stitch. These adorable creatures are perfect for adding a touch of handmade charm to your home, gifting to loved ones, or simply keeping as a sweet companion. Don't be afraid to experiment with different colors and create a whole snail family. Happy crocheting, and may your yarn adventures always be full of delightful discoveries!