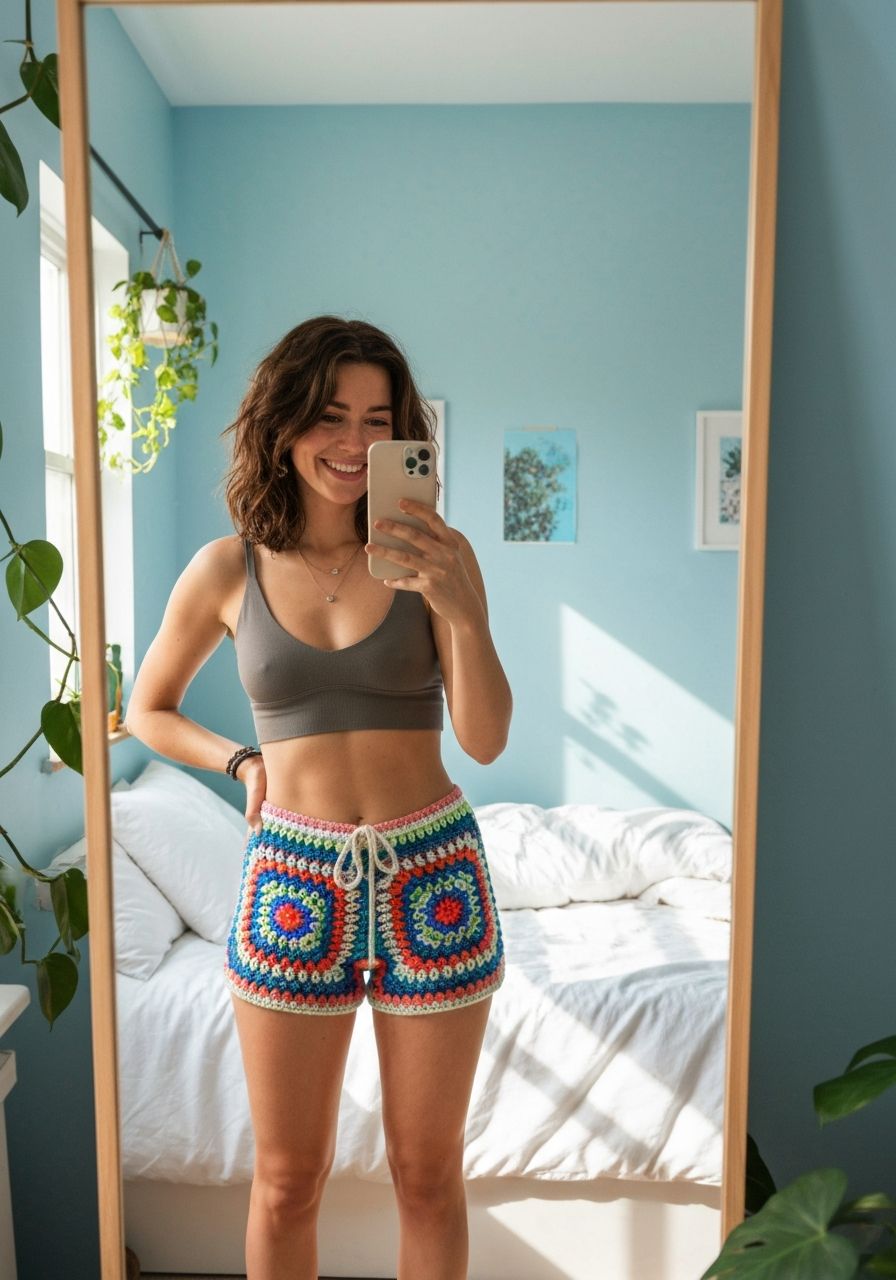
Imagine stepping out on a warm, sunny day, feeling utterly comfortable and stylish in a garment you created with your own hands. Picture the soft drape of the yarn, the perfect custom fit hugging your curves just right, and the undeniable pride of wearing something truly unique. That's the magic of our new free pattern for crochet shorts! Whether you're lounging at home, strolling on the beach, or heading to a casual brunch, these shorts are your ticket to handmade fashion bliss. Get ready to hook up your new favorite warm-weather staple, crafted with love and a little bit of yarn!
Welcome, fellow yarn enthusiasts, to your next exciting project! This comprehensive guide provides you with everything you need to crochet your very own pair of comfortable, stylish shorts. Designed with versatility and ease in mind, this pattern is perfect for crocheters of various skill levels. We'll walk you through each step, from choosing the right materials to finishing touches, ensuring you create a garment that fits beautifully and makes you feel amazing. So grab your hook, pick your favorite yarn, and let's embark on this creative journey together!
Why You'll Love This Pattern
-
Customizable Fit: Say goodbye to ill-fitting store-bought shorts! This pattern is designed to be easily adjustable, allowing you to create a pair that perfectly complements your unique body shape. We'll guide you on how to modify the waist, hips, and leg length for a truly bespoke garment.
-
Versatile Style: Whether you prefer a relaxed, beachy vibe or a more tailored look, these shorts can be styled to suit any occasion. Choose a vibrant cotton for a playful summer look or a neutral blend for understated elegance. Add a drawstring, pockets, or a decorative border to truly make them your own.
-
Comfort First: Crafted with soft, breathable yarn (we recommend a cotton or cotton blend!), these shorts offer unparalleled comfort. They're perfect for lounging, exploring, or simply enjoying the warmth of the season without feeling restricted.
-
Skill-Building Project: While straightforward, this pattern introduces techniques like working in the round, increasing for shaping, and creating a sturdy waistband. It's an excellent opportunity for advanced beginners to expand their skills and for experienced crocheters to enjoy a quick, satisfying make.
-
Sustainable Fashion: By creating your own clothing, you're embracing slow fashion and reducing your environmental footprint. Hand-making garments is a wonderful way to connect with your craft and build a wardrobe that's both meaningful and sustainable.
Materials Needed
- Yarn: Approximately 600-900 yards of Worsted Weight (Category 4) cotton or cotton blend yarn. (Exact yardage will vary based on size and length. For reference, a size Medium typically uses around 700 yards.)
- Crochet Hook: 5.0mm (H-8) or size needed to obtain gauge.
- Stitch Markers: Essential for marking rounds and important stitches.
- Tapestry Needle: For weaving in ends.
- Scissors: For cutting yarn.
- Measuring Tape: Crucial for checking gauge and sizing.
- Elastic Band (Optional): 1-inch wide non-roll elastic, length equal to your waist circumference, for a more secure waistband.
Gauge & Sizing
Getting the Right Gauge is CRUCIAL for accurate sizing! Please do not skip this step.
Gauge Swatch: Using your 5.0mm hook and chosen yarn, chain 17. Work 15 rows of Half Double Crochet (hdc). Your swatch should measure 4 inches by 4 inches (10 cm x 10 cm). If your swatch is too small, try a larger hook. If it's too large, try a smaller hook. Remember, everyone's tension is different, so matching gauge ensures your shorts will turn out the intended size.
Sizing Notes (for a custom fit):
This pattern is written for a women's size Medium, fitting approximately a 28-30 inch waist and 38-40 inch hip. However, I've included notes on how to adjust for other sizes. To achieve a custom fit, you'll want to take the following measurements:
- Waist Circumference: Measure around the narrowest part of your waist.
- Hip Circumference: Measure around the fullest part of your hips.
- Rise (Front): Measure from your natural waist down to where you want the crotch of the shorts to be.
- Thigh Circumference: Measure around the fullest part of your thigh.
- Desired Leg Length: Measure from your crotch down to where you want the hem of the shorts to fall.
You can adjust the initial waistband length, the number of increase rounds in the yoke, and the length of the legs to fit your specific measurements. Always try on your work as you go!
Abbreviations
- ch: Chain
- sc: Single Crochet
- hdc: Half Double Crochet
- sl st: Slip Stitch
- st(s): Stitch(es)
- Rnd(s): Round(s)
- BLO: Back Loop Only
- inc: Increase (work 2 stitches in one stitch)
- hdc2tog: Half Double Crochet 2 Together (decrease)
- FO: Fasten Off
- rep: Repeat
Step-by-Step Pattern
This pattern is worked from the top-down, starting with the waistband, then the main body (yoke), and finally splitting for each leg.
The Waistband
We'll create a ribbed waistband that offers a snug, comfortable fit.
- Foundation Chain: Ch 8. (This determines the height of your waistband. For a wider band, ch more; for a narrower band, ch less).
- Row 1: Sc in 2nd ch from hook and in each ch across. (7 sc)
- Row 2: Ch 1, turn. Sc in BLO of each sc across. (7 sc)
- Repeat Row 2: Continue repeating Row 2 until your ribbed piece measures approximately 28 inches (71 cm) when slightly stretched. This length should be slightly less than your natural waist measurement, as it will stretch to fit. For a size Small, aim for 26 inches; for Large, 30 inches, and so on.
- Join Waistband: Bring the two short ends of your ribbed strip together. Sl st through the BLO of the last row and the corresponding loop of the foundation chain to form a seamless loop. Turn the waistband inside out to hide the seam.
The Yoke (Body of Shorts)
This section creates the main body of the shorts, gradually increasing to accommodate your hips.
- Rnd 1: Turn your waistband right side out. Ch 2 (counts as first hdc here and throughout). Work 96 hdc evenly around the side edge of the waistband. Join with a sl st to the top of the beginning ch 2. (96 hdc)
(Sizing Note: For a smaller size, aim for 80-88 hdc. For a larger size, 104-120 hdc, ensuring the count is divisible by 8 for future increases, or by the number of increase sections you plan.) - Rnd 2-3: Ch 2, hdc in each st around. Join with a sl st. (96 hdc)
- Rnd 4 (Increase Rnd): Ch 2, *hdc in next 11 sts, 2 hdc in next st (inc)*. Rep from * to * 8 times around. Join with a sl st. (104 hdc)
- Rnd 5-6: Ch 2, hdc in each st around. Join with a sl st. (104 hdc)
- Rnd 7 (Increase Rnd): Ch 2, *hdc in next 12 sts, 2 hdc in next st*. Rep from * to * 8 times around. Join with a sl st. (112 hdc)
- Rnd 8-9: Ch 2, hdc in each st around. Join with a sl st. (112 hdc)
- Rnd 10 (Increase Rnd): Ch 2, *hdc in next 13 sts, 2 hdc in next st*. Rep from * to * 8 times around. Join with a sl st. (120 hdc)
- Rnd 11-15: Ch 2, hdc in each st around. Join with a sl st. (120 hdc)
(Sizing Note: Continue adding increase rounds, spaced every 2-3 plain rounds, until your piece measures your desired rise from the top of the waistband, plus a few extra inches for the crotch depth. Try on the piece at this point to ensure a comfortable fit around the hips before splitting for legs.)
Dividing for Legs
Now we'll create the leg openings and the crotch.
- Rnd 16 (Divide): Ch 2, hdc in the next 59 sts (total 60 hdc for the front leg). Ch 8 (this creates the crotch seam). Skip the next 60 hdc (these will form the back leg). Join with a sl st to the top of the beginning ch 2. (60 hdc + 8 ch)
Leg 1
Work on one leg at a time. The side you just joined to is Leg 1.
- Rnd 1: Ch 2, hdc in each of the 60 hdc sts. Then work 8 hdc into the ch-8 space. Join with a sl st to the top of the beginning ch 2. (68 hdc)
- Rnd 2-10 (or desired length): Ch 2, hdc in each st around. Join with a sl st. (68 hdc)
(Sizing Note: For longer shorts, add more rounds. For shorter shorts, make fewer rounds. If you want a more tapered leg, incorporate hdc2tog decreases evenly around every few rounds. For example, hdc2tog twice per round, every 3 rounds.) - Final Round (Optional Edging): Ch 1, sc in each st around. Join with a sl st to the first sc. FO.
Leg 2
Attach yarn for the second leg.
- Rnd 1: With the right side facing, attach your yarn with a sl st to the first skipped hdc from Rnd 16 (the first of the 60 back stitches). Ch 2, hdc in each of the 60 skipped hdc sts. Work 8 hdc into the underside of the ch-8 space (the same chain space used for Leg 1). Join with a sl st to the top of the beginning ch 2. (68 hdc)
- Rnd 2-10 (or desired length): Ch 2, hdc in each st around. Join with a sl st. (68 hdc)
- Final Round (Optional Edging): Ch 1, sc in each st around. Join with a sl st to the first sc. FO.
Finishing Touches
- Weave in Ends: Use your tapestry needle to carefully weave in all loose yarn tails for a neat finish.
- Optional Elastic Waistband: If using elastic, measure it to your exact waist circumference, overlapping by 1 inch. Sew the ends together securely to form a loop. Insert the elastic into the top of the ribbed waistband you created. Use your tapestry needle and matching yarn to sew the elastic to the inside of the waistband in a few spots to keep it from twisting.
- Blocking (Recommended): Gently wet your finished shorts and lay them flat or on a mannequin/form to dry. This will help even out stitches, improve drape, and set the final shape.
Pro Tips
-
Swatch, Swatch, Swatch! I cannot stress this enough. Your gauge determines your size. A small difference in your tension can lead to a significantly different outcome.
-
Try On As You Go: Crochet fabric is stretchy and forgiving, but it's much easier to make adjustments before the project is complete. Periodically try on your shorts, especially after the yoke is formed and before starting the legs, to ensure a comfortable fit.
-
Yarn Choice Matters: For comfortable, breathable shorts, opt for cotton, linen, or a cotton/acrylic blend. Avoid 100% acrylic if you want a garment that breathes well in warm weather. Consider mercerized cotton for a smoother finish and better stitch definition.
-
Customize Your Length: Don't be afraid to adjust the number of rounds for the legs to create anything from short shorts to a knee-length style. Just remember to repeat the same number of rounds for both legs!
-
Add a Drawstring: For extra waist security or a decorative touch, crochet a simple chain or I-cord to weave through the top of your waistband.
-
Consider Pockets: If you're feeling adventurous, you can easily add patch pockets or even hidden pockets to your shorts. Simply crochet two flat pieces and sew them onto the finished shorts.
Frequently Asked Questions
Can I use a different yarn weight for these shorts?
Yes, you can! However, you will need to adjust your hook size and stitch count to match the gauge specified in the pattern. A different yarn weight will likely alter the drape and overall feel of the shorts. For example, using a DK weight (Category 3) yarn will result in a lighter, finer fabric, requiring more stitches to achieve the same circumference. Always make a gauge swatch with your chosen yarn and hook to ensure your finished shorts will be the correct size.
How do I make these shorts longer or shorter?
Adjusting the length is one of the easiest modifications! Once you've completed the 'Dividing for Legs' section and started working on each individual leg (Leg 1 and Leg 2, Rnd 2-10), simply add or subtract rounds until you reach your desired length. Just be sure to count the rounds carefully and make both legs the exact same number of rounds for an even hem.
Are these crochet shorts suitable for swimming?
While cotton yarn is absorbent and comfortable, it's not ideal for swimming as it can become heavy and take a long time to dry. If you're looking for crochet shorts to wear as swimwear, you would need to use a specific type of synthetic yarn, such as a nylon or polyester blend, designed for quick-drying and water resistance. This pattern, as written with cotton, is best suited for lounging, casual wear, or as a stylish cover-up.
There you have it – your complete guide to crocheting a fabulous pair of custom-fit shorts! We hope you enjoy every stitch of this rewarding project. Don't forget to embrace the process, customize to your heart's content, and wear your beautiful handmade shorts with pride. Happy crocheting!