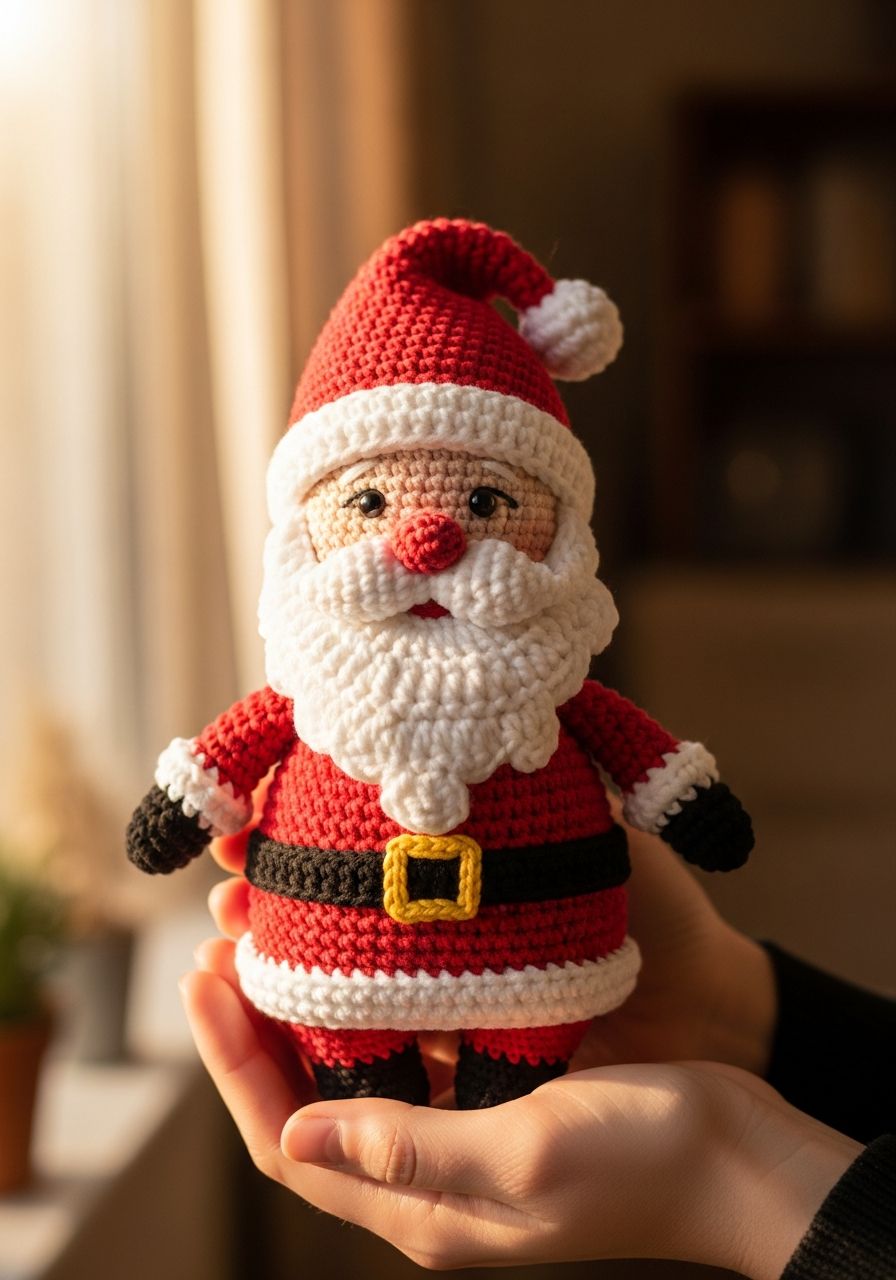
Imagine the delight on a child's face, or the warm, festive glow in your home, as a tiny, handcrafted Father Christmas takes his place among your holiday decorations. There's a special kind of magic that comes with creating something with your own hands, especially when it’s filled with the spirit of the season. This year, capture that magic by crocheting your very own jolly old elf! Get ready to spread joy and create a treasured keepsake with our comprehensive, free pattern for a charming Crochet Santa Amigurumi.
Welcome, fellow crochet enthusiasts, to a pattern designed to bring the magic of the holidays right to your fingertips. Whether you're looking for the perfect handmade gift, a new addition to your festive decor, or simply a joyful project to immerse yourself in, this Santa amigurumi is sure to bring a smile. This pattern is suitable for intermediate beginners or those familiar with basic amigurumi techniques, guiding you through each stitch to create a lovable Santa Claus.
Why You'll Love This Pattern
- Joyful Project: Immerse yourself in the festive spirit as you bring Santa to life stitch by stitch.
- Perfect for Gifting: Handmade amigurumi make incredibly thoughtful and personalized presents for friends, family, or even as stocking stuffers.
- Charming Decor: Add a touch of whimsical, handmade charm to your holiday display, mantelpiece, or Christmas tree.
- Uses Basic Stitches: If you know how to single crochet, increase, and decrease, you're well on your way to creating this adorable Santa.
- Detailed Instructions: Our step-by-step guide with clear stitch counts ensures a smooth and enjoyable crafting experience.
- Customizable: Feel free to experiment with different yarn textures or add unique embellishments to make your Santa truly one-of-a-kind.
Materials Needed
- Worsted Weight (Aran/10-ply) Yarn in:
- Red (approx. 50g)
- White (approx. 30g)
- Skin Tone (light peach/beige, approx. 15g)
- Black (approx. 10g)
- Small amount of Yellow/Gold for buckle
- Crochet Hook: 3.0mm or 3.5mm (US size D/3 or E/4) – choose based on your tension to create tight stitches.
- Safety Eyes: 6mm (black)
- Fiberfill Stuffing
- Yarn Needle (tapestry needle)
- Scissors
- Stitch Markers
- Optional: Pink blush for cheeks, pet brush for fluffy beard
Gauge & Sizing
Gauge is not critical for amigurumi, as long as your stitches are tight enough to prevent stuffing from showing through. However, consistent tension throughout your project is important for an even result.
Using the recommended yarn and hook size, your finished Crochet Santa Amigurumi will stand approximately 6-7 inches (15-18 cm) tall, from the base to the top of his hat (excluding pompom).
Abbreviations
- ch: Chain
- sc: Single Crochet
- hdc: Half Double Crochet
- dc: Double Crochet
- sl st: Slip Stitch
- inc: Increase (2 sc in the same stitch)
- dec: Decrease (single crochet 2 together - use invisible decrease method for a cleaner look)
- MR: Magic Ring (also known as Magic Circle or Adjustable Ring)
- R: Round
- rep: Repeat
- FO: Fasten Off
- BLO: Back Loop Only
- [...] x N: Repeat the instructions in brackets N times
- (...): Indicates the total number of stitches at the end of the round
Step-by-Step Pattern
General Notes for Amigurumi: Work in continuous rounds unless otherwise specified. Use a stitch marker to mark the first stitch of each round and move it up as you go. Stuff your amigurumi firmly as you go, ensuring an even shape. Join pieces using the mattress stitch or whip stitch for a neat finish.
Head & Body (Start with Skin Tone for Head)
- R1 (Skin Tone): MR 6 sc (6)
- R2: Inc in each st around (12)
- R3: [Sc 1, inc] x 6 (18)
- R4: [Sc 2, inc] x 6 (24)
- R5: [Sc 3, inc] x 6 (30)
- R6: [Sc 4, inc] x 6 (36)
- R7-R11: Sc in each st around (36) - 5 rounds
- R12: [Sc 4, dec] x 6 (30)
- R13: [Sc 3, dec] x 6 (24) - Place safety eyes between R9 and R10, approximately 7 stitches apart. Begin stuffing firmly.
- R14: [Sc 2, dec] x 6 (18)
- R15 (Change to Red Yarn): Sc in each st around (18) - This forms the neck base. Continue stuffing.
- R16: [Sc 2, inc] x 6 (24)
- R17: [Sc 3, inc] x 6 (30)
- R18: [Sc 4, inc] x 6 (36)
- R19-R24: Sc in each st around (36) - 6 rounds
- R25: [Sc 4, dec] x 6 (30)
- R26: [Sc 3, dec] x 6 (24)
- R27: [Sc 2, dec] x 6 (18) - Ensure body is fully stuffed and shaped.
- R28: [Sc 1, dec] x 6 (12)
- R29: Dec in each st around (6)
- FO, weave in ends.
Hat (Red & White Yarn)
- R1 (Red): MR 6 sc (6)
- R2: Sc in each st around (6)
- R3: [Sc 1, inc] x 3 (9)
- R4: Sc in each st around (9)
- R5: [Sc 2, inc] x 3 (12)
- R6: Sc in each st around (12)
- R7: [Sc 3, inc] x 3 (15)
- R8: Sc in each st around (15)
- R9: [Sc 4, inc] x 3 (18)
- R10: Sc in each st around (18)
- R11: [Sc 5, inc] x 3 (21)
- R12: Sc in each st around (21)
- R13 (Change to White Yarn): In BLO, sc in each st around (21)
- R14: Sc in each st around (21)
- R15: Sl st in each st around (21)
- FO, leaving a long tail for sewing. Create a small white pompom and sew to the tip of the hat.
Arms (Make 2 - Skin Tone, Red, White Yarn)
- R1 (Skin Tone): MR 6 sc (6)
- R2-R3: Sc in each st around (6) - 2 rounds
- R4 (Change to Red Yarn): Sc in each st around (6) - Stuff hand lightly.
- R5-R9: Sc in each st around (6) - 5 rounds. Continue stuffing lightly as you go.
- R10 (Change to White Yarn): [Sc 1, inc] x 3 (9)
- R11: Sc in each st around (9)
- FO, leaving a long tail for sewing. Flatten the cuff and sew the arm closed at the end if desired before attaching.
Legs (Make 2 - Black & Red Yarn)
- R1 (Black): MR 6 sc (6)
- R2: Inc in each st around (12)
- R3: Sc in each st around (12) - Work in BLO for a defined boot edge.
- R4-R5: Sc in each st around (12) - 2 rounds. Start stuffing boot.
- R6 (Change to Red Yarn): Sc in each st around (12) - Continue stuffing firmly.
- R7-R10: Sc in each st around (12) - 4 rounds.
- FO, leaving a long tail for sewing.
Beard (White Yarn)
- Row 1: Ch 7, sc in 2nd ch from hook and in each ch across (6)
- Row 2: Ch 1, turn, sc 6 (6)
- Row 3: Ch 1, turn, dec, sc 2, dec (4)
- Row 4: Ch 1, turn, dec x 2 (2)
- Row 5: Ch 1, turn, dec (1)
- FO, leaving a long tail for sewing. For a fluffier beard, you can gently brush out the yarn with a pet slicker brush or use surface slip stitches to create texture.
Belt (Black & Yellow Yarn)
- Belt Strip (Black): Ch 20 (or enough to wrap around Santa's body), sc in 2nd ch from hook and in each ch across. (19 sc)
- FO, weave in ends.
- Buckle (Yellow): Ch 5, sl st to first ch to form a loop. Or, embroider a square directly onto the belt strip.
- Sew the yellow buckle onto the center of the black belt strip.
Assembly
This is where your Santa truly comes to life! Take your time with sewing to ensure a neat and sturdy finish.
- Attach Arms: Position the arms on either side of the body, just below the neck. Ensure they are symmetrical and facing forward. Sew them securely in place.
- Attach Legs: Sew the legs to the bottom of the body. Position them slightly forward so Santa can 'sit' if desired, or directly underneath for standing.
- Attach Hat: Place the hat on Santa's head. You can sew it down completely or just tack it in a few spots if you want it removable. Make sure the brim is level.
- Attach Beard: Position the wider top edge of the beard just under Santa's eyes, centered on his face. Sew securely.
- Attach Belt: Wrap the belt around Santa's waist (around R19-R20 of the body). Stitch it in place at the back and a few points around the sides to keep it from shifting.
- Embroider Details: With a thin strand of black yarn, embroider eyebrows above the eyes. Using a small amount of pink yarn or a tiny bit of blush, add rosy cheeks for extra character.
- Final Touches: Weave in any remaining loose ends. Give your Santa a gentle squeeze to even out the stuffing and admire your festive creation!
Pro Tips for Amigurumi Success
- Invisible Decrease: For a smoother, less bumpy fabric, use the invisible decrease method (insert hook into front loop of first stitch, then into front loop of second stitch, yarn over, pull through both front loops, yarn over, pull through both loops on hook).
- Stuffing Technique: Stuff firmly and evenly, using small pieces of fiberfill. Use the back of your hook or a chopstick to push stuffing into tight spots. Don't overstuff to the point of distorting the shape, but ensure there are no soft spots.
- Tight Stitches: Use a hook size smaller than what's typically recommended for your yarn weight. This creates a denser fabric, preventing stuffing from showing through gaps.
- Color Changes: To make color changes seamless, complete the last yarn over of the last stitch of the old color with the new color.
- Magic Ring Security: After completing your first round in the magic ring, pull the tail very tight to close the hole. You can tie a knot with the starting tail and the working yarn tail for extra security before weaving in.
- Stitch Markers are Your Friend: Always use a stitch marker to mark the first stitch of each round, especially when working in continuous spirals. This prevents you from losing your place.
Frequently Asked Questions
Can I use different yarn weights for this pattern?
Yes, you absolutely can! Just be aware that using a different yarn weight will change the final size of your Santa. If you use a thicker yarn, your Santa will be larger; if you use a thinner yarn, he will be smaller. Remember to adjust your hook size accordingly to maintain tight stitches and avoid gaps where stuffing could peek through. A good rule of thumb is to go down one to two hook sizes from what's recommended on your yarn label for amigurumi.
How do I make Santa's beard extra fluffy?
To give Santa's beard a wonderfully fluffy texture, you have a couple of options. After crocheting the beard piece as instructed, you can take a pet slicker brush (a brush with fine, wire bristles) and gently brush out the yarn. This separates the plies of the yarn, creating a soft, fuzzy effect. Alternatively, you could use a loop stitch technique when crocheting the beard, or simply attach individual strands of white yarn as fringe to create a dense, shaggy beard.
Is this pattern suitable for complete beginners?
While this pattern uses mostly basic stitches, it does involve working in continuous rounds, increasing, decreasing, and assembling multiple parts, which can be a bit challenging for someone who has never crocheted before. We recommend this pattern for 'advanced beginners' or 'intermediate beginners' – someone who has a solid understanding of basic crochet stitches and has perhaps completed a simpler amigurumi project before. Don't worry, though, with patience and our clear instructions, you'll be able to create your own Santa!
And there you have it – your very own Crochet Santa Amigurumi, ready to bring cheer and warmth to your holiday season! Each stitch you've made is a testament to your creativity and dedication, crafting not just a toy, but a cherished piece of handmade holiday magic. We hope you enjoyed this festive journey. Happy crocheting, and may your holidays be filled with joy and handmade wonders!