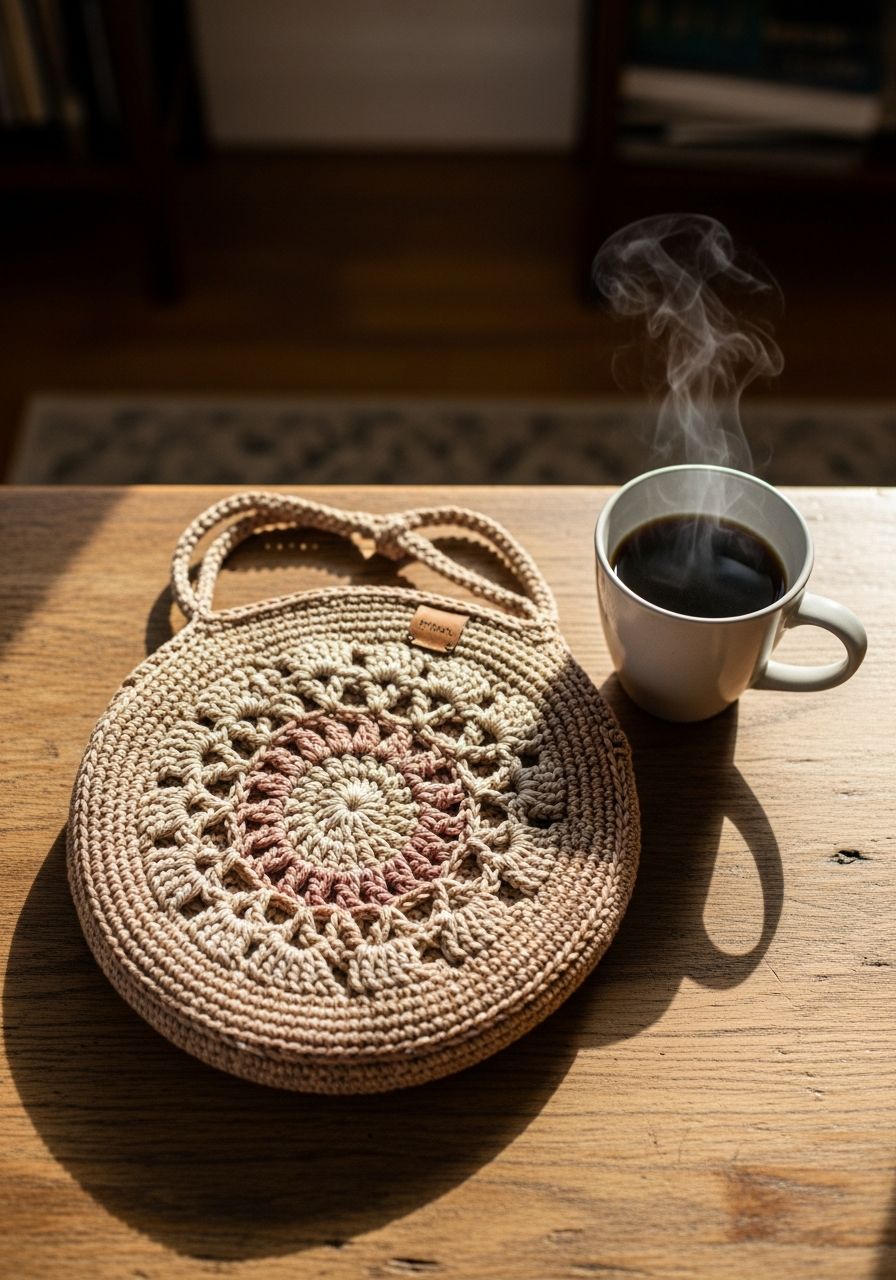
Imagine the sunshine on your face, the gentle breeze, and the perfect accessory slung over your shoulder – a chic, versatile, and utterly charming Crochet Round Bag that you made with your own hands! There's an unparalleled joy in creating something beautiful and functional, especially when it becomes your go-to statement piece. Get ready to embark on a delightful crafting journey that will not only leave you with a stunning bag but also a profound sense of accomplishment. This pattern is designed to be accessible, enjoyable, and incredibly rewarding, transforming yarn into a stylish companion for your everyday adventures.
Welcome, fellow crochet enthusiasts, to a pattern that promises to be both a joy to make and a delight to carry! The round bag has surged in popularity, offering a fresh, modern silhouette that complements any outfit, from casual denim to a breezy summer dress. Its unique shape makes it stand out, and the beauty of crochet means you can customize it to your heart's content – choose your favorite colors, experiment with textures, or add personal embellishments. This comprehensive guide will walk you through every step of creating your very own round bag, from the foundational stitches to the final assembly, ensuring a beautiful result you'll be proud to show off.
Why You'll Love This Pattern
- Modern & Stylish: The round silhouette is incredibly on-trend, offering a contemporary flair to your accessory collection.
- Versatile Accessory: Perfect for a casual day out, a beach trip, or even dressing up an evening look. It holds essentials without being bulky.
- Beginner-Friendly: While it looks sophisticated, this pattern primarily uses basic stitches like single crochet, making it approachable for those new to bag making.
- Customizable: Easily adapt the colors, add stripes, or vary the strap design to truly make it your own.
- Quick to Make: With just two panels and a gusset, you'll be surprised how quickly this stylish bag comes together!
Materials Needed
- Worsted Weight Cotton Yarn (Category 4): Approximately 350-400 yards. (e.g., Lily Sugar'n Cream, Dishie Cotton)
- Crochet Hook: 4.0mm (G-6)
- Yarn Needle (Tapestry Needle)
- Stitch Markers (at least 2)
- Scissors
- Optional: Fabric for lining, zipper (approx. 8-10 inches), sewing needle and thread.
Gauge & Sizing
Achieving the correct gauge is crucial for your bag to turn out the intended size. A different gauge will result in a larger or smaller bag and may require more or less yarn.
Gauge: 16 sc and 18 rows = 4 inches (10 cm) in single crochet.
To check your gauge, create a swatch: Chain 17, then single crochet in the 2nd chain from the hook and across (16 sc). Work for 18 rows. Measure your swatch. If it's too large, try a smaller hook. If it's too small, try a larger hook.
Finished Bag Dimensions: Approximately 8.5 inches (21.5 cm) diameter, 2 inches (5 cm) deep. Strap length approx. 30 inches (76 cm).
Abbreviations
- ch: chain
- sc: single crochet
- hdc: half double crochet
- dc: double crochet
- sl st: slip stitch
- inc: increase (2 sc in same stitch)
- dec: decrease (sc2tog - single crochet 2 together)
- st(s): stitch(es)
- rep: repeat
- rnd(s): round(s)
- MR: Magic Ring (also known as Magic Circle or Adjustable Ring)
Step-by-Step Pattern
Bag Panel (Make 2)
We'll start by creating two identical circular panels that will form the front and back of your bag. Work in continuous rounds unless otherwise specified. Use a stitch marker to mark the first stitch of each round.
- Rnd 1: Start with a Magic Ring, ch 1 (does not count as a stitch), work 6 sc into the MR. Pull tail to close ring. (6 sts)
- Rnd 2: Inc in each st around. (12 sts)
- Rnd 3: (Sc in next st, inc in next st) rep around. (18 sts)
- Rnd 4: (Sc in next 2 sts, inc in next st) rep around. (24 sts)
- Rnd 5: (Sc in next 3 sts, inc in next st) rep around. (30 sts)
- Rnd 6: (Sc in next 4 sts, inc in next st) rep around. (36 sts)
- Rnd 7: (Sc in next 5 sts, inc in next st) rep around. (42 sts)
- Rnd 8: (Sc in next 6 sts, inc in next st) rep around. (48 sts)
- Rnd 9: (Sc in next 7 sts, inc in next st) rep around. (54 sts)
- Rnd 10: (Sc in next 8 sts, inc in next st) rep around. (60 sts)
- Rnd 11: (Sc in next 9 sts, inc in next st) rep around. (66 sts)
- Rnd 12: (Sc in next 10 sts, inc in next st) rep around. (72 sts)
Sl st to the first sc to finish the round. Fasten off and weave in ends.
Repeat these steps to create a second identical Bag Panel.
Side Gusset
This rectangular strip will give your bag its depth and connect the two panels.
- Row 1: Ch 109. Sc in the 2nd ch from hook and in each ch across. (108 sc)
- Row 2-5: Ch 1, turn, sc in each st across. (108 sc)
Fasten off, leaving a very long tail (at least 30 inches / 76 cm) for sewing the gusset to the panels. This will ensure you don't run out of yarn during assembly.
Bag Assembly
Now it's time to bring your bag to life by joining the panels and gusset!
- Attach First Panel (Panel A): Lay one Bag Panel (Panel A) flat, right side facing up. Position the Side Gusset around the edge of Panel A, aligning the starting/ending seam of the gusset with any point on the panel. Use stitch markers to hold the gusset in place at various points around the panel. Using the long tail from the gusset and your tapestry needle, whip stitch or mattress stitch the Gusset to Panel A. Work through the back loop of the Gusset and both loops of the stitches on Panel A for a secure and neat seam. Ensure your stitches are tight enough to prevent gaps but not so tight they pucker the fabric.
- Attach Second Panel (Panel B) & Create Opening: Lay Panel B flat, right side facing down. Align the remaining unsewn edge of the Side Gusset with Panel B. We will leave a specific opening for the bag. Locate the seam where the Gusset ends meet. From this seam, count approximately 30 stitches along Panel B. Place a stitch marker here. Using a new length of yarn (or the remaining tail if you were able to join it from Panel A), sew the Gusset to Panel B, starting from the Gusset seam *up to* the stitch marker. Fasten off securely.
- Complete Opening: Skip the next 48 stitches along Panel B (this creates the bag opening). Re-attach your yarn to the stitch *after* the skipped section on Panel B. Continue sewing the Gusset to Panel B for the remaining 30 stitches until you reach the Gusset seam again. Fasten off and weave in all ends securely. You should now have a round bag with a clear opening at the top.
Strap
A simple, sturdy strap will complete your bag.
- Row 1: Ch 151. Sc in the 2nd ch from hook and in each ch across. (150 sc)
- Row 2: Ch 1, turn, sc in each st across. (150 sc)
Fasten off, leaving long tails (approx. 12 inches / 30 cm) on both ends of the strap for attachment.
Attach Strap: Using your tapestry needle, attach each end of the strap to the top corners of the bag opening. Secure it firmly with several stitches, weaving the tails discreetly into the bag and strap. Make sure the strap is not twisted before securing both ends.
Pro Tips
- Yarn Choice Matters: Cotton yarn provides excellent stitch definition and durability, making it ideal for bags. For a softer, drapier bag, consider an acrylic blend or even a chunky weight yarn with a larger hook (adjusting gauge accordingly).
- Stitch Markers are Your Best Friend: Especially when working in continuous rounds, stitch markers help you keep track of your first stitch and prevent mistakes. Use them generously during assembly to hold panels in place.
- Maintain Even Tension: Consistent tension is key for a polished, professional-looking finish. Try to relax your hands and keep your stitches uniform.
- Blocking for Perfection: While not strictly necessary for this bag, blocking your finished panels before assembly can help them lie perfectly flat and achieve uniform sizing. Wet blocking is ideal for cotton yarns.
- Adding a Lining & Zipper: For extra durability and security, consider adding a fabric lining and a zipper. This is best done by hand-sewing a pre-cut fabric circle (or two half-circles) into the bag after assembly, then attaching the zipper to the opening edges.
- Weave in Ends Securely: Loose ends can unravel your beautiful work. Weave them in thoroughly, going back and forth through stitches to ensure they stay hidden and secure.
Frequently Asked Questions
Can I use a different yarn weight for this pattern?
Yes, you can! However, using a different yarn weight will significantly alter the finished size of your bag. If you choose a bulkier yarn, you'll likely need to use a larger hook and fewer increase rounds for the panels, and a shorter chain for the gusset and strap. Conversely, a lighter weight yarn will require a smaller hook and more rounds/stitches. Always check your gauge and adjust stitch counts accordingly to achieve your desired bag dimensions.
How do I add a fabric lining and zipper to my Crochet Round Bag?
Adding a lining and zipper elevates your handmade bag! First, measure the inner circumference of your bag opening and the diameter of your panels. Cut two fabric circles slightly smaller than your crochet panels for the lining, and a rectangle for the gusset lining. Sew these fabric pieces together, leaving an opening for the zipper. Install your zipper into this fabric opening. Then, hand-stitch the completed fabric lining (with zipper) into your crochet bag, attaching it securely along the bag's opening. There are many excellent online tutorials for specific lining techniques that can guide you further.
Is this pattern suitable for complete beginners?
This pattern uses basic crochet stitches (single crochet, slip stitch, chain) and techniques like the Magic Ring and increases, which are fundamental to amigurumi and many other projects. If you are comfortable with these basics, you should find this pattern very approachable. The assembly part requires a bit of precision with sewing, but it's a straightforward process. It's a fantastic project for an adventurous beginner looking to expand their skills beyond scarves and blankets!
There you have it – a complete guide to crocheting your very own stylish round bag! This project is more than just a pattern; it's an opportunity to create something truly personal and useful. Each stitch you make brings you closer to a beautiful, handmade accessory that will turn heads and spark conversations. Embrace the process, enjoy the creative flow, and get ready to carry your essentials in ultimate handmade style. Happy crocheting!