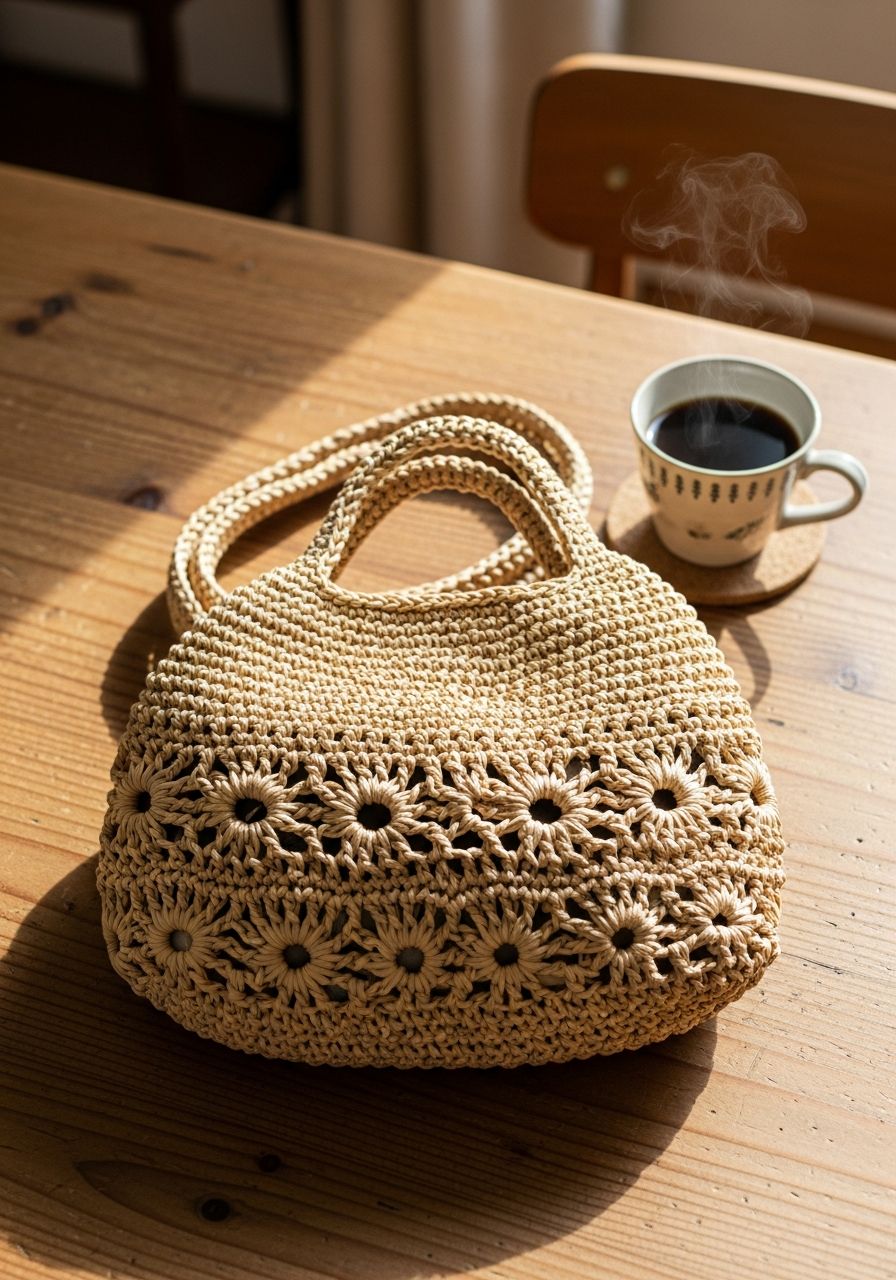
Imagine strolling through a sun-drenched market, the gentle breeze rustling, a unique, handcrafted accessory swinging effortlessly at your side – a testament to your creativity and skill. That feeling of pride and effortless style is within your grasp! This summer, trade mass-produced monotony for personalized charm with our stunning Crochet Raffia Bag pattern. It’s more than just a bag; it’s a statement, a practical companion for all your adventures, and a joyful journey into the world of natural fibers. Get ready to fall in love with making your very own chic, durable, and utterly gorgeous raffia tote!
Welcome, fellow crochet enthusiasts, to the ultimate guide for crafting your very own beautiful raffia bag. This free pattern will walk you through every step, from selecting your materials to weaving in those final ends, ensuring you create a sturdy and stylish accessory perfect for the beach, farmers market, or a casual day out. Raffia yarn offers a unique texture and natural look that is simply irresistible, making it an ideal choice for a sophisticated yet rustic bag.
Why You'll Love This Pattern
- Chic & Stylish: The natural texture of raffia yarn lends itself to an effortlessly elegant and bohemian aesthetic, perfect for summer.
- Durable & Sturdy: Raffia creates a surprisingly strong and resilient fabric, making your bag capable of carrying all your essentials without losing its shape.
- Perfect for Any Occasion: From a casual beach day to a sophisticated brunch, this bag is versatile enough to complement any outfit.
- Customizable: Easily adjust the size, strap length, or add embellishments to make it truly your own.
- Rewarding Project: There’s immense satisfaction in creating a functional and beautiful item with your own hands.
- Eco-Friendly Option: Many raffia yarns are made from natural, renewable resources or recycled paper, making it a sustainable choice.
Materials Needed
- Yarn: Approximately 350-400 yards (320-365 meters) of Paper Raffia Yarn (e.g., Hamanaka Eco Andaria or similar worsted weight equivalent raffia). You might need more or less depending on your tension and desired bag size.
- Crochet Hook: 4.5mm (US G/7) or size needed to obtain gauge.
- Stitch Markers: Essential for keeping track of rounds.
- Yarn Needle: For weaving in ends.
- Scissors: For cutting yarn.
- Optional: Fabric for lining (about 1/2 yard), sewing needle and thread, magnetic snap closure, leather handles (if not crocheting integrated handles).
Gauge & Sizing
Gauge: 4” x 4” (10 cm x 10 cm) = 14 sc and 16 rows, worked in single crochet. While gauge isn't as critical for a bag as it is for wearables, achieving close to this will ensure your bag size is similar to the pattern's intended dimensions.
Finished Bag Dimensions (approximate):
- Base Diameter: 9.5 inches (24 cm)
- Bag Height (excluding handles): 11 inches (28 cm)
- Handle Drop: 7 inches (18 cm)
Abbreviations
- ch: chain
- sc: single crochet
- hdc: half double crochet
- dc: double crochet
- sl st: slip stitch
- inc: increase (2 sc in the same stitch)
- dec: decrease (sc 2 together)
- MR: magic ring
- st(s): stitch(es)
- rep: repeat
- rnd(s): round(s)
- BLO: back loop only
Step-by-Step Pattern
Bag Base (Worked in continuous rounds)
Using your 4.5mm hook and raffia yarn:
- Rnd 1: Make a MR, ch 1, 6 sc into MR. (6 sts)
- Rnd 2: 2 sc in each st around. (12 sts)
- Rnd 3: (Sc in next st, inc) rep 6 times. (18 sts)
- Rnd 4: (Sc in next 2 sts, inc) rep 6 times. (24 sts)
- Rnd 5: (Sc in next 3 sts, inc) rep 6 times. (30 sts)
- Rnd 6: (Sc in next 4 sts, inc) rep 6 times. (36 sts)
- Rnd 7: (Sc in next 5 sts, inc) rep 6 times. (42 sts)
- Rnd 8: (Sc in next 6 sts, inc) rep 6 times. (48 sts)
- Rnd 9: (Sc in next 7 sts, inc) rep 6 times. (54 sts)
- Rnd 10: (Sc in next 8 sts, inc) rep 6 times. (60 sts)
- Rnd 11: (Sc in next 9 sts, inc) rep 6 times. (66 sts)
- Rnd 12: (Sc in next 10 sts, inc) rep 6 times. (72 sts)
- Rnd 13: (Sc in next 11 sts, inc) rep 6 times. (78 sts)
- Rnd 14: (Sc in next 12 sts, inc) rep 6 times. (84 sts)
- Rnd 15: (Sc in next 13 sts, inc) rep 6 times. (90 sts)
- Rnd 16: (Sc in next 14 sts, inc) rep 6 times. (96 sts)
- Rnd 17: (Sc in next 15 sts, inc) rep 6 times. (102 sts)
- Rnd 18: (Sc in next 16 sts, inc) rep 6 times. (108 sts)
- Rnd 19: (Sc in next 17 sts, inc) rep 6 times. (114 sts)
- Rnd 20: (Sc in next 18 sts, inc) rep 6 times. (120 sts)
Your base should now measure approximately 9.5 inches (24 cm) in diameter. Adjust the number of rounds to reach your desired base size, continuing the increase pattern (sc in N sts, inc) for each additional round.
Bag Body (Worked in continuous rounds)
After completing the base, we will now turn the work to create the sides of the bag.
- Rnd 21: Sc in the BLO (back loop only) of each st around. (120 sts) This creates a defined edge for the bag bottom.
- Rnd 22 - Rnd 55 (or desired height): Sc in each st around. (120 sts)
Work for approximately 34 rounds or until the bag body reaches your desired height (around 11 inches). Take breaks as working with raffia can be tough on the hands. Use a stitch marker to keep track of the start of each round.
Creating the Handles (Worked in rounds, then rows for reinforcement)
This method creates integrated handles directly from the bag body. Ensure your stitch count is 120 sts.
- Rnd 56: Sc in first 20 sts, ch 30 (for first handle), skip next 20 sts, sc in next 40 sts, ch 30 (for second handle), skip next 20 sts, sc in last 20 sts. (80 sc sts + 60 ch sts = 140 sts total for the round, counting chs as sts)
- Rnd 57: Sc in first 20 sc sts, sc in each of the 30 ch sts for the first handle, sc in next 40 sc sts, sc in each of the 30 ch sts for the second handle, sc in last 20 sc sts. (140 sts)
- Rnd 58 - Rnd 60: Sc in each st around. (140 sts) This reinforces the handles and gives them more bulk.
Finishing
- Sl st into the next stitch to create a neat finish.
- Cut yarn, leaving a 6-inch tail.
- Fasten off and weave in all loose ends securely using your yarn needle.
- Block your bag to achieve its final shape and structure.
Pro Tips
- Working with Raffia: Raffia yarn can be stiff and sometimes prone to splitting. Take frequent breaks to rest your hands. A slightly larger hook than you'd typically use for worsted weight yarn can help. If your raffia is too stiff, you can lightly mist it with water before crocheting to make it more pliable, but be careful not to oversaturate.
- Keep Even Tension: Maintaining consistent tension is key to a sturdy and even fabric, especially with raffia. If your tension tends to be tight, try using a hook one size larger.
- Stitch Markers are Your Best Friend: Since you're working in continuous rounds, a stitch marker is absolutely essential to know where each round begins and ends. Move it up with each new round.
- Blocking is a Must: Raffia bags benefit greatly from blocking. Once your bag is complete, gently mist it with water (or use a steamer), then stuff it with towels or newspaper to shape it. Allow it to air dry completely. This will help define the shape, flatten the base, and open up the stitches slightly.
- Add a Lining: For extra durability and to prevent small items from slipping through stitches, consider adding a fabric lining. You can sew a simple pouch that fits the inside of your bag and then hand-stitch it securely to the top edge. Cotton or linen fabric works beautifully.
- Customization Ideas: Personalize your bag with a tassel, pom-poms, embroidered initials, or even a small fabric patch. You can also experiment with different handle styles – a long shoulder strap, two short handles, or even bamboo or leather handles attached with D-rings.
Frequently Asked Questions
Q: Can I use a different type of yarn for this pattern?
A: Absolutely! While raffia gives the bag its distinctive look and structure, you can certainly adapt this pattern for other yarns like cotton, jute, or even a sturdy acrylic. Keep in mind that the finished size, drape, and stiffness of your bag will vary significantly depending on your yarn choice and hook size. Always make a gauge swatch if you want to maintain similar dimensions.
Q: How do I add a fabric lining to my crochet bag?
A: Adding a lining is a great way to finish your bag. First, measure the circumference and height of your bag's interior. Cut two pieces of fabric for the main body (adding seam allowance) and one circular piece for the bottom. Sew the two body pieces together to form a tube, then sew the circular bottom piece to one end of the tube to create a fabric pouch. Hem the top edge of the fabric pouch. Insert the finished lining into your crochet bag and hand-stitch the top hem of the lining to the inside top edge of your crocheted bag, just below the handles.
Q: Is raffia yarn difficult to work with, and how durable is it?
A: Raffia yarn can be a bit stiffer and less forgiving than traditional acrylic or wool yarns, which might take some getting used to. It can also be a bit rough on the hands, so taking breaks is recommended. However, its durability is one of its greatest assets! Once crocheted, raffia creates a very strong, structured, and resilient fabric that holds its shape well. It's surprisingly water-resistant and holds up beautifully to everyday wear, making it perfect for bags and hats.
Congratulations! You’ve just created a stunning, unique, and incredibly practical Crochet Raffia Bag that will turn heads wherever you go. This isn't just a pattern; it's an invitation to infuse your everyday with handmade beauty and a touch of summer elegance. We can't wait to see your finished creations – be sure to share them with our community! Happy crocheting!