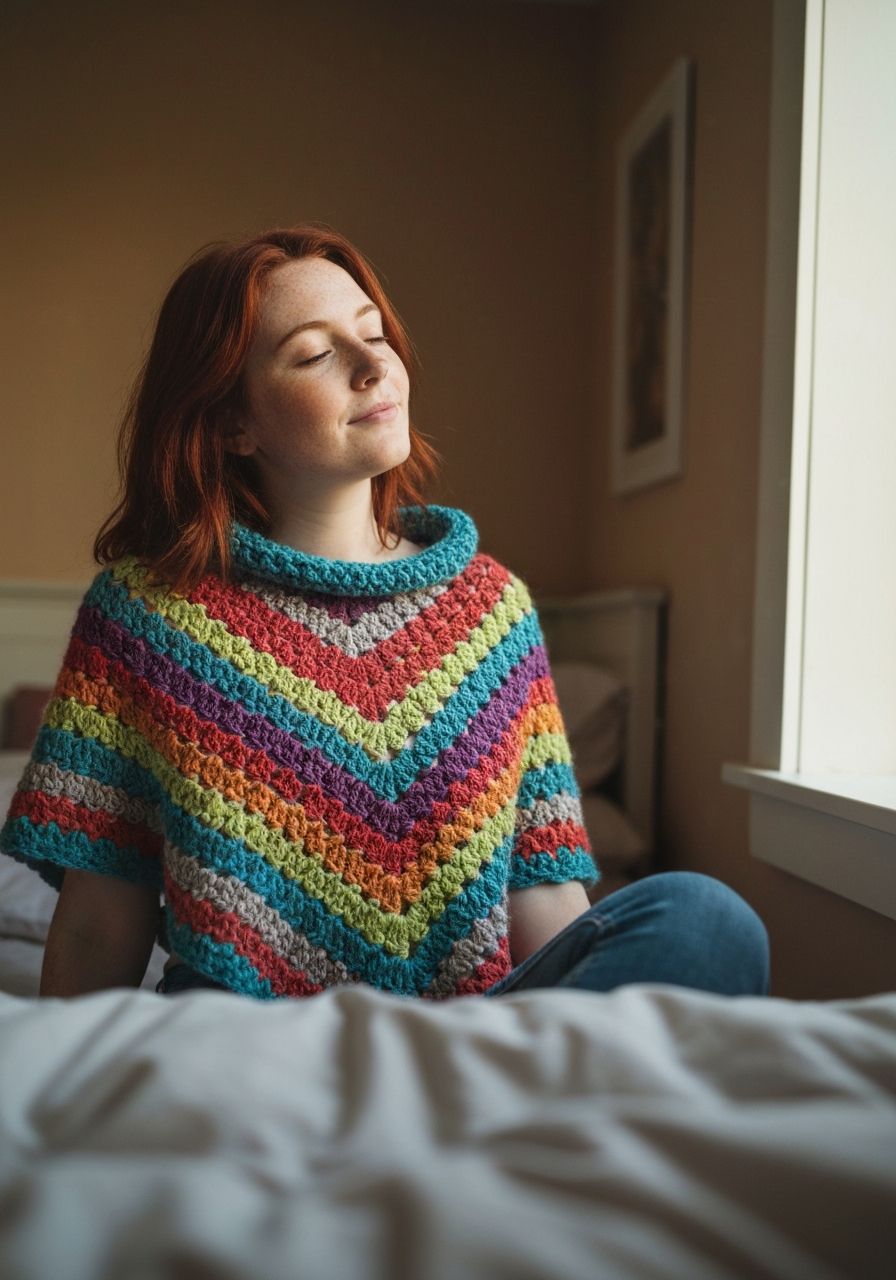
Imagine wrapping yourself in a cloud of handmade comfort, a garment that effortlessly elevates any outfit while keeping you cozy and chic. This isn't just a dream; it's the reality you'll create with our incredible free Crochet Poncho pattern! Get ready to embark on a joyful crafting journey that results in a versatile, stylish piece perfect for any season, from breezy summer evenings to crisp autumn mornings. You'll be amazed at how easily you can transform simple yarn into a stunning, wearable work of art that will garner compliments wherever you go.
Welcome, fellow yarn enthusiasts, to your next favorite project! This comprehensive guide and free pattern will walk you through creating a beautiful, modern crochet poncho. Designed with simplicity and elegance in mind, this pattern is perfect for crocheters of all skill levels, from adventurous beginners to seasoned pros looking for a relaxing and rewarding make. Our poncho is worked top-down in the round, allowing for easy customization of length and a seamless finish. Let's grab our hooks and yarn and start crafting!
Why You'll Love This Pattern
- Beginner-Friendly: Uses basic stitches (chain, slip stitch, single crochet, half double crochet, double crochet) that are clearly explained.
- Versatile Style: The timeless design makes it suitable for casual wear, dressing up an outfit, or as a cozy layer at home.
- Customizable Fit: Instructions include notes for adjusting the length and width to suit your personal style and size.
- All-Season Comfort: Depending on your yarn choice, this poncho can be a lightweight cover-up for spring/summer or a warm layer for fall/winter.
- Quick to Make: With its simple repeat pattern, you'll see your poncho grow quickly, providing a satisfying crafting experience.
- Perfect Gift: Handmade ponchos make thoughtful and cherished gifts for friends and family.
Materials Needed
- Yarn: Worsted Weight (Category 4) yarn. We recommend an acrylic or acrylic blend for good drape and easy care.
- For S/M: Approximately 1000-1200 yards (914-1097 meters)
- For L/XL: Approximately 1300-1500 yards (1188-1371 meters)
- Crochet Hook: H/5.0mm (or size needed to obtain gauge)
- Stitch Markers: 4 recommended for marking increase points
- Tapestry Needle: For weaving in ends
- Scissors: For cutting yarn
Gauge & Sizing
Achieving the correct gauge is crucial for your poncho to turn out the intended size and drape. If your gauge is off, your poncho may be too large or too small, or require significantly more or less yarn.
Gauge: 13 DC stitches and 8 rows = 4" x 4" (10 cm x 10 cm) using a H/5.0mm hook.
To check your gauge: Chain 15. DC in the 3rd chain from hook and in each chain across (13 DC). Chain 2, turn. Repeat for 8 rows. Measure your swatch. If it's too large, try a smaller hook. If it's too small, try a larger hook.
Finished Measurements (approximate, laid flat):
- S/M: Neck opening circumference 20" (51 cm), Length from shoulder to point 28" (71 cm), Width at widest point 40" (102 cm)
- L/XL: Neck opening circumference 22" (56 cm), Length from shoulder to point 32" (81 cm), Width at widest point 48" (122 cm)
Abbreviations
- ch: chain
- sl st: slip stitch
- sc: single crochet
- hdc: half double crochet
- dc: double crochet
- st(s): stitch(es)
- sk: skip
- sp: space
- inc: increase (usually by working more than one stitch into a single stitch or space)
- rep: repeat
- yo: yarn over
Step-by-Step Pattern
This poncho is worked seamlessly from the top-down, starting with the neck opening and increasing steadily to create the characteristic poncho shape.
Neck Ribbing
- Foundation Chain: Ch 74 (for S/M) or Ch 82 (for L/XL). Join with a sl st to the first ch, being careful not to twist the chain. (74 or 82 chains)
- Round 1: Ch 2 (does not count as a st), hdc in each ch around. Join with a sl st to the top of the first hdc. (74 or 82 hdc)
- Round 2-4 (or desired height): Ch 2, *hdc in the back loop only of each hdc around*. Join with a sl st to the top of the first hdc. (74 or 82 hdc)
Note: If you prefer a rolled neck or no ribbing, skip these rounds and proceed to Yoke Construction after the foundation chain for Round 1, adjusting the starting chain to be a multiple of 4.
Yoke Construction
In this section, you will be creating the increases that give the poncho its shape. We will establish 4 increase points to create a roughly square yoke that drapes into a beautiful circular poncho. Place a stitch marker in the 2nd dc of each V-stitch or increase cluster to easily identify your increase points in subsequent rounds.
- Setup Round (after ribbing or foundation): Ch 3 (counts as 1st dc). Dc in the next 17 sts (for S/M) or 19 sts (for L/XL). * (Dc, Ch 1, Dc) in the next st (this is your first increase point, mark the Ch 1 sp). Dc in the next 18 sts (S/M) or 20 sts (L/XL) *. Repeat from * to * three more times. Join with a sl st to the top of the starting Ch 3. You should have 4 (Dc, Ch 1, Dc) increase points and 72 (S/M) or 80 (L/XL) dc stitches between them. (72 or 80 dc + 4 ch-1 spaces)
- Round 1: Ch 3 (counts as 1st dc). Dc in each dc until you reach the next Ch 1 space. * (Dc, Ch 1, Dc) into the Ch 1 space (move stitch marker to new Ch 1 space). Dc in each dc until you reach the next Ch 1 space *. Repeat from * to * three more times. Join with a sl st to the top of the starting Ch 3. (80 or 88 dc + 4 ch-1 spaces)
- Round 2: Ch 3. Dc in each dc until you reach the next Ch 1 space. * (Dc, Ch 1, Dc) into the Ch 1 space. Dc in each dc until you reach the next Ch 1 space *. Repeat from * to * three more times. Join with a sl st to the top of the starting Ch 3. (88 or 96 dc + 4 ch-1 spaces)
- Repeat Round 2: Continue repeating Round 2 until your yoke measures approximately 9-10 inches (23-25 cm) from the neckline (for S/M) or 11-12 inches (28-30 cm) (for L/XL) at the deepest point of a corner, or until the poncho comfortably fits over your shoulders and upper arms. Keep track of your stitch count: each repeat of Round 2 adds 8 dc stitches to the total circumference. For S/M, this will typically be 15-17 increase rounds total. For L/XL, 18-20 increase rounds.
Body of Poncho
Once your yoke is complete and reaches your desired shoulder width, you will stop increasing and work straight rounds to create the body of the poncho.
- Round 1 (Body): Ch 3. Dc in each dc around, making sure to dc into the Ch 1 space at each corner (do not make a Ch 1 in the corner anymore). Join with a sl st to the top of the starting Ch 3. (Total stitch count will be your last yoke round's total dc count + 4 from the ch-1 spaces, e.g., if your last yoke round had 144 dc + 4 ch-1 spaces, this round will have 148 dc).
- Repeat Round 1 (Body): Continue repeating Round 1 (dc in each dc around) until the poncho reaches your desired length. For a typical S/M, this might be 20-25 additional rounds after the yoke. For L/XL, 25-30 additional rounds. Remember, you can try it on as you go to ensure you get the perfect length.
Bottom Border (Optional)
Add a beautiful finishing touch to your poncho with a simple scalloped border.
- Border Round 1: Ch 1, sc in the first 2 sts. *Sk 1 st, 5 dc in the next st (shell made), sk 1 st, sc in the next 2 sts*. Repeat from * to * around. Adjust last repeat if necessary to end neatly (e.g., sk 1 st, sc in last st, join to first sc). Join with a sl st to the first sc.
- Finishing: Fasten off, weave in all loose ends securely using your tapestry needle. Block your poncho lightly if desired, to help open up the stitches and improve drape.
Pro Tips
- Yarn Choice Matters: For a flowing, elegant drape, choose a yarn that isn't too stiff. Acrylic, bamboo, or a cotton blend work wonderfully. For warmth, a wool or alpaca blend is ideal.
- Stitch Markers are Your Best Friend: Especially in the yoke section, use stitch markers to keep track of your increase points. This will save you time and prevent errors.
- Customize Length: Try on your poncho periodically as you work the body rounds. Stop when it reaches your preferred length, whether that's hip-length, knee-length, or somewhere in between.
- Blocking for the Win: While optional, blocking your finished poncho can significantly improve its drape, even out your stitches, and give it a professional finish. Follow your yarn label's care instructions for wet or steam blocking.
- Don't Be Afraid to Experiment: Once you understand the basic construction, feel free to experiment with different stitch patterns for the body (e.g., moss stitch, granny stitch) or more elaborate borders.
Frequently Asked Questions
Can I use a different weight of yarn for this pattern?
Yes, you can! However, be aware that using a different yarn weight will significantly alter your gauge and thus the final size of your poncho. You will need to adjust your hook size accordingly to achieve a fabric you like, and your stitch counts may need to be modified. It's highly recommended to make a substantial gauge swatch (at least 6x6 inches) with your chosen yarn and hook, and then adjust the initial chain and number of increase rounds to achieve your desired neck circumference and yoke width.
How do I make this poncho larger or smaller?
To adjust the size, you have a few options: For a larger poncho, you can start with a longer foundation chain for the neck (ensure it's a multiple of 4 + 2 for the hdc ribbing, or a multiple of 4 for direct dc start), and/or work more increase rounds in the yoke section. For a smaller poncho, use a shorter foundation chain and/or work fewer increase rounds. Remember to check the fit over your head and shoulders as you go. The body length is easily adjustable by simply working more or fewer straight rounds.
Is this pattern suitable for complete beginners?
This pattern is excellent for ambitious beginners! While it uses basic stitches (chain, slip stitch, single crochet, half double crochet, double crochet), understanding how to work in the round and manage increases is key. If you've made a few scarves or dishcloths and are ready for a wearable project, this poncho is a great next step. Take your time, read each step carefully, and don't hesitate to use stitch markers to keep track of your progress.
Congratulations, you've just created a stunning, handmade poncho! This versatile garment is sure to become a staple in your wardrobe, offering comfort and style for years to come. We hope you enjoyed crafting this beautiful piece as much as we enjoyed designing it for you. Don't forget to share your finished poncho with us on social media!