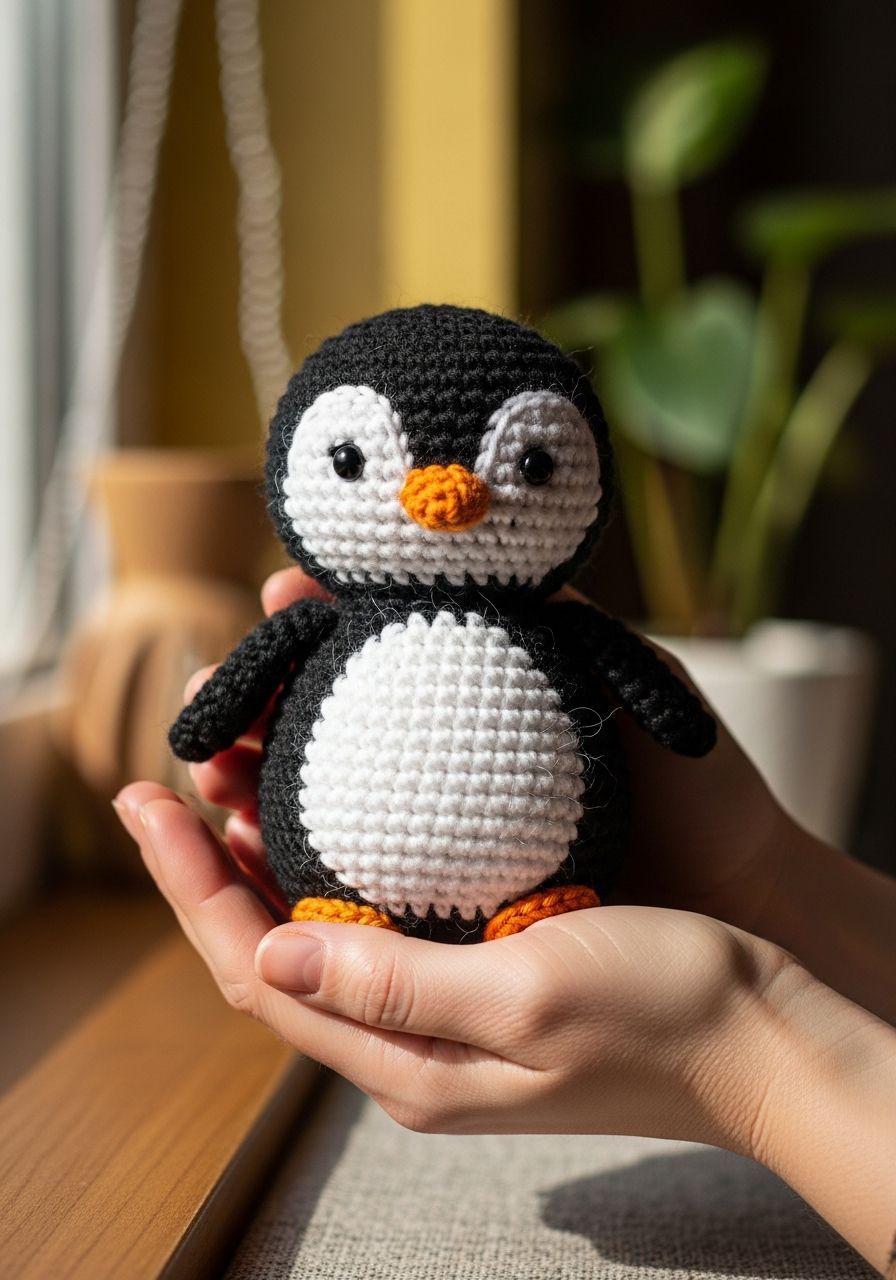
Imagine the pure joy of holding a tiny, squishy friend you made with your own hands, a little companion ready to bring warmth and smiles! Today, we're diving into the delightful world of amigurumi to create an utterly charming Crochet Penguin Amigurumi that's perfect for gifting, decorating, or simply cuddling. Get ready to embark on a fun, rewarding crochet journey that will leave you with an adorable waddler you'll cherish!
Penguins hold a special place in our hearts – their wobbly walk, dapper appearance, and playful nature make them universally adored. This free pattern allows you to capture that irresistible charm in yarn form. Whether you're a seasoned crocheter looking for a quick, satisfying project or a beginner eager to try your first amigurumi, this pattern is designed to be clear, encouraging, and incredibly fun. Let's gather our hooks and yarn and bring these cute creatures to life!
Why You'll Love This Pattern
- Beginner-Friendly: While it creates a detailed finished product, the individual components use basic stitches and straightforward shaping, making it an excellent first amigurumi project.
- Quick to Make: With its relatively small size, you can whip up one of these adorable penguins in a single afternoon or over a relaxing weekend. Perfect for last-minute gifts!
- Adorable & Customizable: The classic black and white design is timeless, but feel free to experiment with different colors for a truly unique penguin. Imagine a rainbow waddler!
- Perfect Gift: Handmade gifts are always cherished. This penguin makes a fantastic present for birthdays, baby showers, or just to show someone you care.
- Skill Builder: Practice your magic ring, increases, decreases, color changes, and sewing techniques in a manageable and fun way.
Materials Needed
- Worsted Weight (Aran/10-ply) Yarn in:
- Black (approx. 50g)
- White (approx. 30g)
- Orange or Yellow (small amount for beak and feet)
- 3.0mm or 3.5mm Crochet Hook (or size recommended for your yarn to achieve tight stitches)
- 9mm or 10mm Safety Eyes (or embroider eyes for young children)
- Polyester Fiberfill for stuffing
- Tapestry Needle for sewing parts together and weaving in ends
- Stitch Markers (essential for working in continuous rounds)
- Scissors
Gauge & Sizing
Gauge isn't critical for amigurumi, but the most important thing is to use a hook size that creates tight stitches without gaps, preventing the stuffing from showing through. If your stitches are too loose, go down a hook size. When finished, your Crochet Penguin Amigurumi will stand approximately 4.5-5 inches (11-13 cm) tall, depending on your yarn and tension.
Abbreviations
- MR: Magic Ring (or adjustable ring)
- ch: Chain
- sc: Single Crochet
- hdc: Half Double Crochet
- dc: Double Crochet
- sl st: Slip Stitch
- inc: Increase (2 single crochets in the same stitch)
- dec: Decrease (single crochet two stitches together – invisible decrease recommended)
- FO: Fasten Off
- st/sts: Stitch/Stitches
- Rnd: Round
- BLO: Back Loop Only
Step-by-Step Pattern
This pattern is worked in continuous rounds unless otherwise specified. Use a stitch marker to mark the first stitch of each round.
Body (Start with Black Yarn)
- Rnd 1: Start with a MR, 6 sc into the ring. (6 sts)
- Rnd 2: Inc in each st around. (12 sts)
- Rnd 3: (Sc in next st, inc) x 6 times. (18 sts)
- Rnd 4: (Sc in next 2 sts, inc) x 6 times. (24 sts)
- Rnd 5: (Sc in next 3 sts, inc) x 6 times. (30 sts)
- Rnd 6: (Sc in next 4 sts, inc) x 6 times. (36 sts)
- Rnd 7-10: Sc in each st around. (36 sts) (4 rounds)
- Change to White Yarn.
- Rnd 11-16: Sc in each st around. (36 sts) (6 rounds)
- Rnd 17: (Sc in next 4 sts, dec) x 6 times. (30 sts)
- Rnd 18: (Sc in next 3 sts, dec) x 6 times. (24 sts)
- Rnd 19: (Sc in next 2 sts, dec) x 6 times. (18 sts)
- Begin stuffing the body firmly, shaping as you go.
- Rnd 20: (Sc in next st, dec) x 6 times. (12 sts)
- Rnd 21: Dec x 6 times. (6 sts)
- FO, leaving a long tail. Use a tapestry needle to weave the tail through the front loop of the remaining 6 stitches, pull tight to close, and weave in the end.
Head (Black Yarn)
- Rnd 1: Start with a MR, 6 sc into the ring. (6 sts)
- Rnd 2: Inc in each st around. (12 sts)
- Rnd 3: (Sc in next st, inc) x 6 times. (18 sts)
- Rnd 4: (Sc in next 2 sts, inc) x 6 times. (24 sts)
- Rnd 5: (Sc in next 3 sts, inc) x 6 times. (30 sts)
- Rnd 6-9: Sc in each st around. (30 sts) (4 rounds)
- Insert safety eyes between Rnd 7 and 8, about 5-6 stitches apart.
- Rnd 10: (Sc in next 3 sts, dec) x 6 times. (24 sts)
- Rnd 11: (Sc in next 2 sts, dec) x 6 times. (18 sts)
- Begin stuffing the head firmly.
- Rnd 12: (Sc in next st, dec) x 6 times. (12 sts)
- Rnd 13: Dec x 6 times. (6 sts)
- FO, leaving a long tail. Weave through remaining stitches to close and weave in the end.
Wings (Make 2, Black Yarn)
- Rnd 1: Start with a MR, 6 sc into the ring. (6 sts)
- Rnd 2: Inc in each st around. (12 sts)
- Rnd 3: Sc in each st around. (12 sts)
- Fold the wing flat. Sc through both layers of stitches to close the opening, creating a flat wing. (6 sc)
- FO, leaving a long tail for sewing.
Beak (Orange/Yellow Yarn)
- Rnd 1: Start with a MR, 4 sc into the ring. (4 sts)
- Rnd 2: (Sc in next st, inc) x 2 times. (6 sts)
- Rnd 3: Sc in each st around. (6 sts)
- Sl st into the next st. FO, leaving a long tail for sewing.
Feet (Make 2, Orange/Yellow Yarn)
- Rnd 1: Ch 4. Sc in 2nd ch from hook, sc in next ch, 3 sc in last ch. Working down the other side of the chain: sc in next ch, inc in last st. (8 sts)
- Rnd 2: Inc, sc in next st, (inc) x 3 times, sc in next st, (inc) x 2 times. (14 sts)
- Rnd 3: Sc in each st around. (14 sts)
- Fold the foot flat. Sc through both layers of stitches to close the opening, creating a flat foot. (7 sc)
- FO, leaving a long tail for sewing.
Assembly
- Attach the Head to the Body: Using the long tail from the head and your tapestry needle, center the head on top of the body (on the black section) and sew securely in place. Take your time to make sure it's straight and firmly attached.
- Attach the Beak: Position the beak centrally on the head, just below and between the safety eyes. Stitch securely with the orange/yellow yarn tail. You can gently stuff the beak with a tiny bit of fiberfill before fully closing if you want it fuller.
- Attach the Wings: Pin the wings to the sides of the body, just below the neck seam, slightly towards the front. Use the black yarn tails to sew them firmly in place.
- Attach the Feet: Position the feet on the bottom of the body, towards the front, making sure the penguin can sit upright. Sew securely with the orange/yellow yarn tails.
- Final Touches: Weave in any remaining loose ends. Give your penguin a gentle squeeze to redistribute the stuffing and shape it.
Pro Tips
- Tight Stitches: Always aim for tight stitches in amigurumi to prevent stuffing from showing through. If your work looks gappy, try going down a hook size.
- Invisible Decrease: For a cleaner look, use the invisible decrease method (insert hook into front loop of first stitch, then front loop of second stitch, yarn over and pull through both front loops, yarn over and pull through remaining two loops on hook).
- Stuffing: Stuff firmly and evenly, using small pieces of fiberfill. Use the blunt end of your hook or a chopstick to push stuffing into tight spots. Don't overstuff to the point of distorting the shape or creating gaps.
- Stitch Markers are Your Friend: Especially when working in continuous rounds, a stitch marker is crucial for keeping track of the beginning of your rounds.
- Long Tails for Sewing: Always leave a long tail (at least 12-15 inches) when fastening off pieces that need to be sewn together. This saves you from having to attach new yarn for assembly.
- Safety Eye Placement: Before securing the safety eye backs, place them on the head and make sure you like the positioning. Play around with it – even a slight shift can change the whole expression!
Frequently Asked Questions
Can a beginner make this pattern?
Absolutely! This pattern is designed with beginners in mind. It uses fundamental crochet stitches like single crochet, increases, and decreases, and the shaping is straightforward. The detailed step-by-step instructions break down each part, making it easy to follow along. Don't be afraid to try – the results are incredibly rewarding!
What type of yarn is best for amigurumi?
Worsted weight (or Aran) acrylic yarn is highly recommended for amigurumi, especially for beginners. It's affordable, widely available, comes in a vast array of colors, and is easy to work with. Its slight stretch helps create firm, even stitches, and it holds its shape well. Plus, it's machine washable, which is great for plush toys!
How long does it take to make one penguin?
The time it takes can vary depending on your crochet speed and experience. For a beginner, it might take 4-6 hours to complete the entire penguin, including all the sewing. More experienced crocheters might finish it in 2-3 hours. It's a perfect project to tackle over a couple of evenings or a relaxed weekend.
And there you have it – your very own handmade Crochet Penguin Amigurumi, waddling with personality and ready for adventures! Whether this little friend finds a home on a shelf, in a child's arms, or as a thoughtful gift, it's sure to bring immense joy. Remember, every stitch tells a story, and the love you pour into creating something handmade is truly priceless. Happy crocheting!