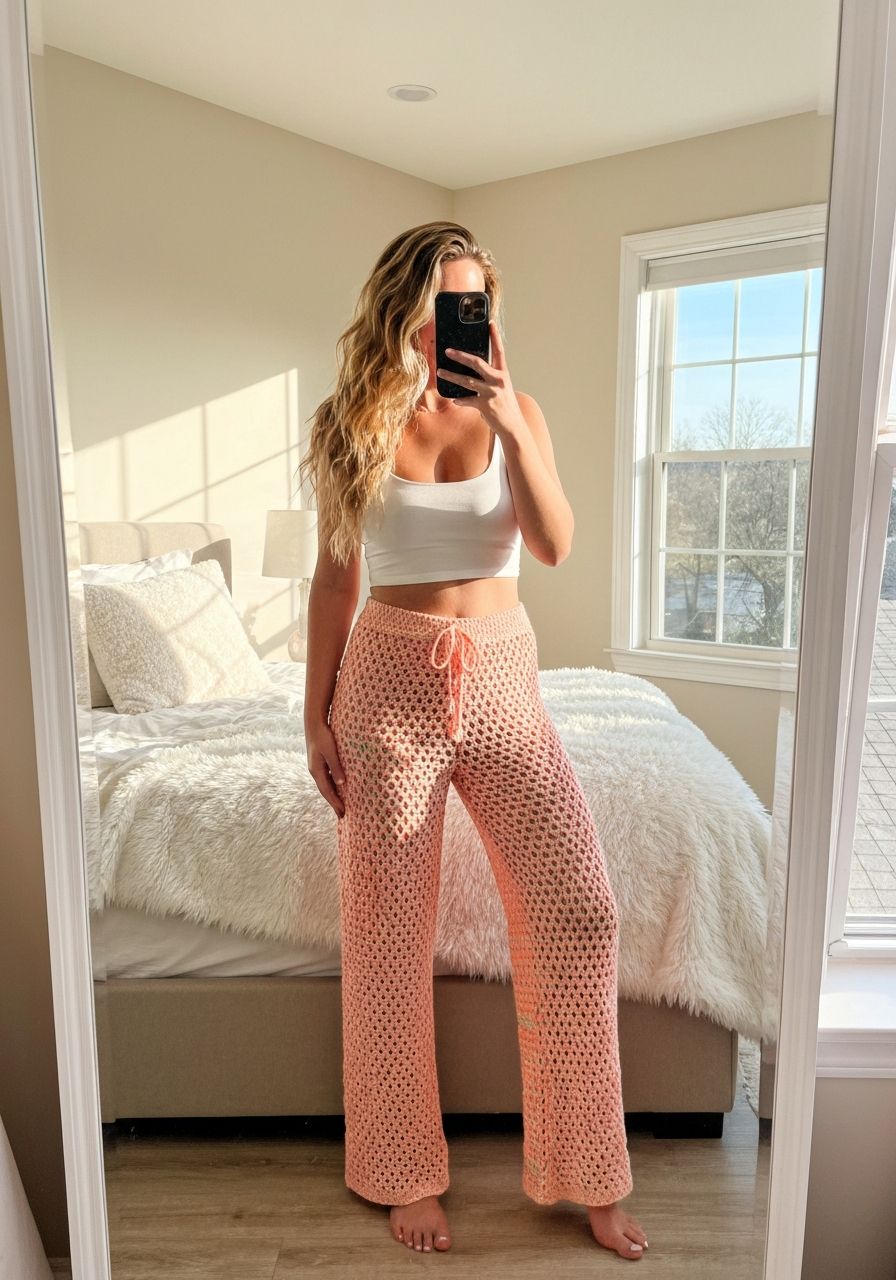
Imagine slipping into a pair of pants that feel like a gentle cloud, flowing with every step, making you feel effortlessly chic and wonderfully comfortable. What if I told you that you could create this dream garment with your own hands? Get ready to transform your wardrobe with our stunning free pattern for Crochet Palazzo Pants – a project that promises not just a beautiful finished item, but a joyful journey of creativity.
Welcome, fellow yarn enthusiasts! Today, we’re diving into the delightful world of garment making with a project that’s both stylish and surprisingly achievable: the crochet palazzo pant. These wide-leg beauties are not only on-trend but offer unparalleled comfort, making them perfect for lounging, a casual day out, or even dressed up for an evening event. This comprehensive guide will walk you through every step, from selecting your materials to finishing your fabulous new trousers, ensuring you create a pair that fits perfectly and expresses your unique style.
Why You'll Love This Pattern
- Ultimate Comfort: Designed with a relaxed fit and generous drape, these palazzo pants will quickly become your go-to for comfort, allowing for unrestricted movement and breathability.
- Fashion-Forward Style: Palazzo pants are a timeless fashion statement. Crocheting your own means you can customize them to match your personal aesthetic, from a breezy beach cover-up to a sophisticated evening look.
- Customizable Fit: The pattern is written for a standard size M but includes clear instructions for adjusting the length and width, ensuring a perfect, made-to-measure fit for your unique body.
- Skill Building: This project is a fantastic way to level up your crochet skills, introducing you to garment construction, working in the round, seamless joining, and creating a comfortable waistband.
- Personalized Wardrobe: Say goodbye to fast fashion and hello to a unique, handcrafted piece that you'll cherish for years. Choose your favorite yarn color and fiber to truly make them your own.
- Sustainable Crafting: Creating your own clothing reduces waste and supports slow fashion, giving you a beautiful item with a clear conscience.
Materials Needed
- Yarn: Approximately 1200-1600 yards of DK (weight 3) or Light Worsted (weight 3/4) yarn. A cotton blend, bamboo, or rayon blend yarn is highly recommended for excellent drape and breathability. (Example: Lion Brand Comfy Cotton Blend, Paintbox Yarns Cotton DK)
- Crochet Hook: Size H/5.00mm (or hook needed to meet gauge)
- Stitch Markers: Essential for marking rounds, increases, and joining points.
- Yarn Needle: For weaving in ends.
- Scissors: For cutting yarn.
- Measuring Tape: Crucial for checking gauge and length.
- Elastic Band (optional): 1-inch wide, length equal to your waist circumference, for a secure waistband.
Gauge & Sizing
Gauge: 13 HDC x 10 rows = 4" x 4" (10 cm x 10 cm) using H/5.00mm hook.
Achieving the correct gauge is absolutely critical for garment patterns! Take the time to make a swatch (at least 6" x 6") and measure accurately. If your swatch is too small, go up a hook size; if it’s too large, go down a hook size. The drape of your fabric will also be affected by your gauge.
Sizing Information (approximate finished hip circumference):
- Small (S): 34-36 inches (86-91 cm)
- Medium (M): 38-40 inches (96-102 cm) - Pattern written for this size
- Large (L): 42-44 inches (107-112 cm)
- Extra Large (XL): 46-48 inches (117-122 cm)
To Adjust Sizing: The starting chain for each leg will determine the initial width. For larger sizes, add multiples of 2 chains to the starting chain. For smaller sizes, subtract multiples of 2. Adjust increase rounds accordingly to achieve desired flare. You will also adjust the length of the legs and the height of the rise.
Abbreviations
- ch: Chain
- sc: Single Crochet
- hdc: Half Double Crochet
- dc: Double Crochet
- sl st: Slip Stitch
- st(s): Stitch(es)
- rep: Repeat
- inc: Increase (typically 2 hdc in one st)
- dec: Decrease (hdc2tog)
- FO: Fasten Off
- RS: Right Side
- WS: Wrong Side
- BLO: Back Loop Only
Step-by-Step Pattern
This pattern is worked seamlessly in the round, starting with two separate legs, joining them, and then working upwards to the waist. We will use the Half Double Crochet (hdc) stitch for the main body for its excellent drape and speed.
Leg 1 (Make 2)
We’ll start by creating the first leg. Remember to make two identical pieces.
- Foundation Chain: Ch 50 (54, 58, 62 for S, M, L, XL respectively). Sl st to the first ch to form a ring, being careful not to twist. (50, 54, 58, 62 sts)
- Round 1: Ch 1 (does not count as a st), hdc in each ch around. Join with sl st to first hdc. (50, 54, 58, 62 hdc)
- Round 2: Ch 1, hdc in each hdc around. Join with sl st to first hdc. (50, 54, 58, 62 hdc)
- Round 3 (Increase Round): Ch 1, *hdc in next 9 (10, 11, 12) sts, 2 hdc in next st (inc)*. Rep from * to * 5 times around. Join with sl st. (55, 60, 65, 70 hdc)
- Round 4-6: Ch 1, hdc in each hdc around. Join with sl st. (55, 60, 65, 70 hdc)
- Round 7 (Increase Round): Ch 1, *hdc in next 10 (11, 12, 13) sts, 2 hdc in next st (inc)*. Rep from * to * 5 times around. Join with sl st. (60, 65, 70, 75 hdc)
- Round 8-10: Ch 1, hdc in each hdc around. Join with sl st. (60, 65, 70, 75 hdc)
- Round 11 (Increase Round): Ch 1, *hdc in next 11 (12, 13, 14) sts, 2 hdc in next st (inc)*. Rep from * to * 5 times around. Join with sl st. (65, 70, 75, 80 hdc)
- Round 12-14: Ch 1, hdc in each hdc around. Join with sl st. (65, 70, 75, 80 hdc)
- Continue increasing: Repeat an increase round every 3-4 rounds, increasing by 5 stitches each time, until you reach your desired leg width for a palazzo effect. For size M, you'll want approximately 80-90 hdc per leg.
- Work straight: Once desired width is achieved, continue working in hdc in each st around for approximately 25-35 more rounds, or until your leg measures 2-3 inches (5-7.5 cm) shorter than your desired finished length from the crotch (crotch to hem).
- Finishing Leg 1: FO.
- Leg 2: Repeat steps 1-12 for the second leg. Do NOT FO on the second leg.
Joining Legs & Body
Now we bring the two separate legs together to form the body of the pants.
- Join Legs: With the hook still in Leg 2 (do not turn), ch 3 (this creates the crotch seam). Take Leg 1, insert hook into any stitch on Leg 1, and sl st to join. Place a stitch marker here.
- Round 1 (Joined): Ch 1, hdc in each hdc around Leg 1. When you reach the ch-3 space, hdc in each of the 3 chains. Then, hdc in each hdc around Leg 2. When you reach the other ch-3 space, hdc in each of the 3 chains. Join with sl st to first hdc. (Total sts: (Leg 1 sts + 3 ch sts + Leg 2 sts + 3 ch sts). For size M, this would be 80+3+80+3 = 166 sts).
- Round 2 (Crotch shaping): Ch 1, hdc in next st, hdc2tog (dec) over next 2 sts. Hdc in each st around until you reach 3 sts before the center of the back crotch (where the ch-3 joined). Hdc2tog over next 2 sts, hdc in last st. Join with sl st. (2 decreases per round, total 4 sts decreased from previous round).
- Round 3: Ch 1, hdc in each st around. Join with sl st.
- Repeat Rounds 2 & 3: Repeat Rounds 2 and 3 for 2 (3, 3, 4) more times, or until the rise of the pants feels comfortable when held up against your body. This gradual decrease creates a smooth, comfortable rise for the crotch.
- Work Straight to Waist: After the rise shaping, continue working in hdc in each st around, without increasing or decreasing, until the pants reach your desired height, ending at your natural waist. This will be approximately 15-20 more rounds, depending on your torso length.
Waistband
A ribbed waistband provides both comfort and a polished finish.
- Round 1 (Waistband setup): Ch 1, sc in each hdc around. Join with sl st.
- Round 2 (Start Ribbing): Ch 7 (this will be the height of your ribbed band), turn. Sc in 2nd ch from hook and in next 5 chs (6 sc total). Sl st into the first sc of Round 1 on the pants body.
- Round 3: Sl st into the next sc of Round 1 on the pants body. Turn. Sc in BLO of each of the 6 sc. Ch 1, turn.
- Round 4: Sc in BLO of each of the 6 sc. Sl st into the next sc of Round 1 on the pants body.
- Repeat Rounds 3 & 4: Continue repeating Rounds 3 and 4 around the entire circumference of the pants body, always attaching to the next available sc on the pants body with a sl st.
- Join Waistband: Once you've worked all the way around, sl st the ends of the ribbed band together using the BLO technique for a seamless join.
- Optional Elastic Insert: If using an elastic band, weave it through the rows of the ribbed waistband (between the sc stitches) and securely sew the ends of the elastic together.
Finishing
- Weave in all remaining yarn tails securely using your yarn needle.
- Block your palazzo pants gently according to your yarn's recommendations. This will help even out stitches, enhance the drape, and ensure they lay beautifully.
- Try them on and admire your handiwork!
Pro Tips
- Choose Your Yarn Wisely: The type of yarn you choose will dramatically affect the drape and feel of your palazzo pants. Opt for natural fibers like cotton, bamboo, or linen blends for excellent breathability and flow. Acrylic blends can work, but look for those labeled "soft" or "drapey" to avoid stiffness.
- Check Your Gauge Religiously: I cannot stress this enough! A few stitches off in gauge can mean the difference between a perfect fit and a pair that's too tight or too baggy.
- Try On As You Go: Especially when joining the legs and working the rise, periodically try on your pants (or hold them up to yourself) to check the fit and length. This allows for adjustments before it's too late.
- Use Stitch Markers: Place stitch markers at the beginning of each round, and particularly at increase/decrease points. This helps you keep track of your stitch counts and placement, especially important in garment construction.
- Blocking is Your Friend: After your pants are complete, wet blocking (soaking in water and gently shaping) will relax the fibers, even out your stitches, and significantly improve the drape and overall look of your finished garment.
- Customizing Length: To adjust the length, simply add or subtract rounds from the straight sections of the legs. Remember to account for the waistband height.
Frequently Asked Questions
What kind of yarn is best for crochet palazzo pants?
For the best drape and comfort, especially in warmer weather, a DK (weight 3) or light worsted (weight 3/4) yarn made from cotton, bamboo, linen, or a blend of these fibers is ideal. These natural fibers breathe well and create a fabric that flows beautifully. Avoid very stiff or heavy yarns, as they might make the pants bulky and less comfortable.
Can I make these shorter, like culottes or shorts?
Absolutely! The beauty of a handmade pattern is its adaptability. To create culottes, simply stop crocheting the leg length at your desired point, typically mid-calf or below the knee. For shorts, stop much earlier, making sure to leave enough length for comfortable wear before joining the legs and working the rise.
How do I ensure a good fit around the hips and waist?
The most crucial step is to achieve the correct gauge. Beyond that, measuring your hips and waist accurately will guide your initial chain count and increase rounds. The pattern provides flexibility in the number of increase rounds for the legs. For the waist, the ribbed waistband offers some stretch, and adding an elastic band inside provides a very secure and comfortable fit, preventing the pants from slipping down.
And there you have it! Your very own pair of handcrafted crochet palazzo pants, ready to bring comfort, style, and a touch of handmade magic to your everyday life. We hope you've enjoyed this pattern and found the process as rewarding as the finished product. Don't forget to share your creations with us – we can't wait to see your unique spin on this versatile design!