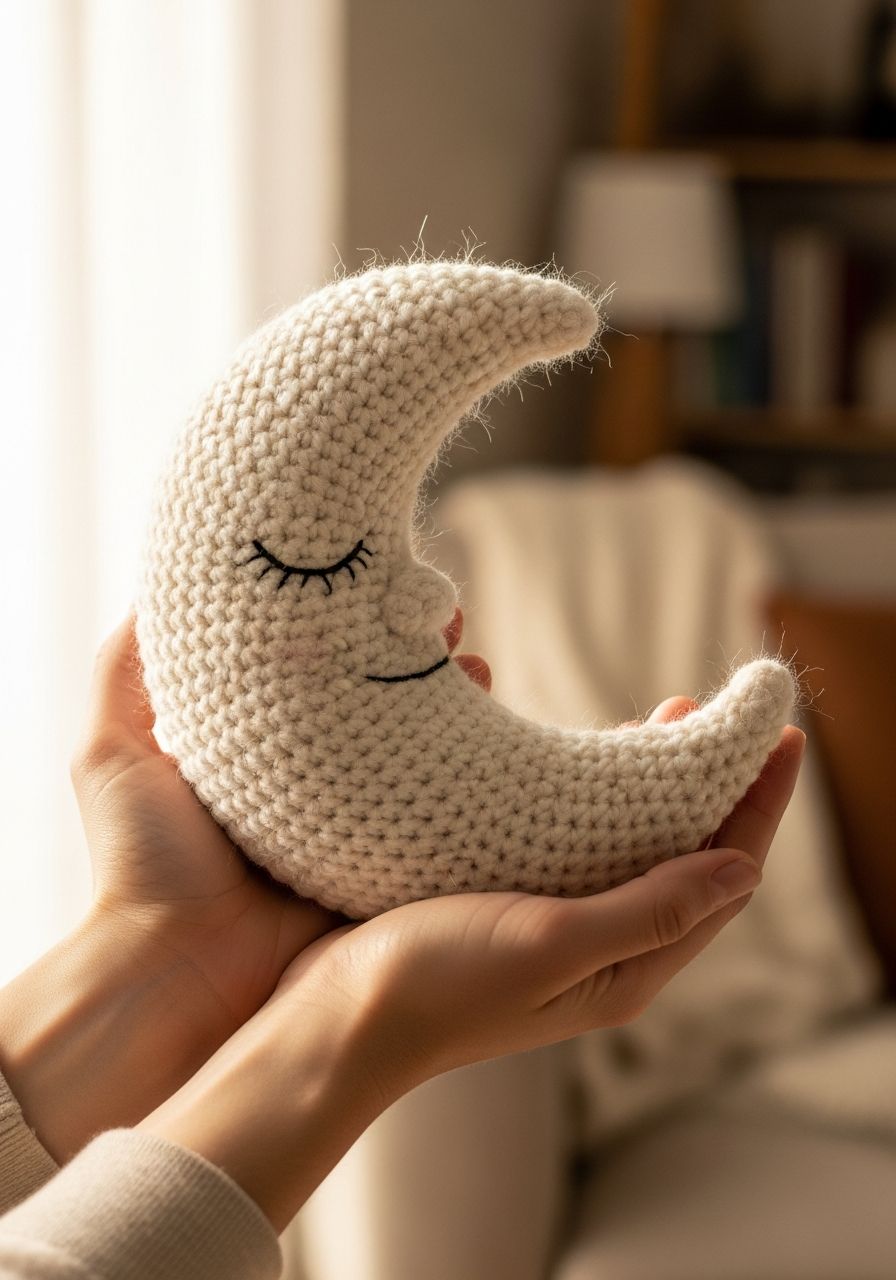
Imagine a gentle glow, a soft companion, a silent watcher in the night, all crafted by your own loving hands. There’s something truly magical about bringing a piece of the cosmos into your home, especially when it’s as cuddly and charming as our new Crochet Moon Amigurumi! This free pattern isn't just about stitches; it's about weaving dreams, creating comfort, and adding a touch of celestial wonder to your world. Get ready to fall in love with every loop and pull as you create a starry-eyed friend that’s perfect for nurseries, thoughtful gifts, or simply to brighten your own space.
Why You'll Love This Pattern
This Crochet Moon Amigurumi pattern is designed with both beginners and experienced crocheters in mind, ensuring a delightful and rewarding crafting experience. Here’s why you’ll be over the moon for it:
- Beginner-Friendly: We use fundamental crochet stitches like single crochet, increases, and decreases, making it accessible even if you're new to amigurumi. Each step is clearly outlined to guide you to success.
- Quick to Create: This project works up relatively fast, perfect for a weekend craft session or when you need a last-minute handmade gift. You’ll be admiring your finished moon in no time!
- Versatile & Customizable: While designed as a charming moon, the basic shape is wonderfully adaptable. You can easily change colors, add sleepy embroidered eyes, rosy cheeks, or even a little hanging loop to turn it into a mobile component.
- Perfect for Gifting: A handmade moon makes an incredibly thoughtful and unique gift for baby showers, birthdays, or anyone who appreciates a touch of whimsy. It’s particularly popular for nursery decor and calming sensory play.
- Uses Scraps: This pattern is a fantastic way to use up those smaller skeins of yarn you have left over from other projects, making it economical and eco-friendly.
Materials Needed
- Yarn: Worsted weight (Aran/10 ply) yarn in a light color (e.g., cream, pale yellow, light gray, white). I used approximately 50-60g for a moon of this size.
- Crochet Hook: 3.5mm (E/4) or a hook size appropriate for your yarn to achieve tight stitches.
- Safety Eyes: 8-10mm safety eyes (optional, if not embroidering).
- Stuffing: Polyester fiberfill.
- Yarn Needle: For weaving in ends and assembly.
- Stitch Marker: Essential for working in continuous rounds.
- Scissors: For cutting yarn.
- Embroidery Floss (optional): For embroidering cheeks or a mouth.
Gauge & Sizing
Gauge: 5 sc and 5 rows = 1 inch (2.5 cm) with your chosen hook and yarn. Achieving exact gauge isn't critical for amigurumi, but aim for tight stitches to prevent stuffing from showing through.
Finished Size: Approximately 6 inches (15 cm) in diameter when made with worsted weight yarn and a 3.5mm hook, though actual size may vary based on your tension and yarn choice.
Abbreviations
- ch: chain
- sc: single crochet
- hdc: half double crochet
- dc: double crochet
- sl st: slip stitch
- inc: increase (2 sc in one stitch)
- dec: decrease (sc2tog - single crochet 2 stitches together)
- MR: magic ring (also known as magic circle or adjustable ring)
- st(s): stitch(es)
- FO: fasten off
- * *: repeat instructions between asterisks
- ( ): stitch count at the end of the round
Step-by-Step Pattern
Main Moon Body (Make 1)
We will be working in continuous rounds. Use a stitch marker to keep track of the beginning of each round.
- MR, 6 sc into ring. (6 sts)
- Inc in each st around. (12 sts)
- *1 sc, inc* around. (18 sts)
- *2 sc, inc* around. (24 sts)
- *3 sc, inc* around. (30 sts)
- *4 sc, inc* around. (36 sts)
- *5 sc, inc* around. (42 sts)
- *6 sc, inc* around. (48 sts)
- *7 sc, inc* around. (54 sts)
- *8 sc, inc* around. (60 sts)
- Sc in each st around. (60 sts)
- Sc in each st around. (60 sts)
- Sc in each st around. (60 sts)
- Sc in each st around. (60 sts)
- Sc in each st around. (60 sts)
- Sc in each st around. (60 sts)
- Sc in each st around. (60 sts)
- Sc in each st around. (60 sts)
- *8 sc, dec* around. (54 sts)
- *7 sc, dec* around. (48 sts)
- *6 sc, dec* around. (42 sts)
- *5 sc, dec* around. (36 sts)
- *4 sc, dec* around. (30 sts)
If using safety eyes, attach them now between Rounds 13 and 14, approximately 6-7 stitches apart. Ensure they are securely fastened before continuing.
Begin stuffing firmly, shaping as you go. - *3 sc, dec* around. (24 sts)
- *2 sc, dec* around. (18 sts)
Continue stuffing firmly. Make sure it's evenly distributed for a smooth shape. - *1 sc, dec* around. (12 sts)
- Dec in each st around. (6 sts)
Cut yarn, leaving a long tail for closing. Sl st to the next st to finish off.
Finishing & Assembly
- Using your yarn needle, weave the tail through the front loop of each remaining 6 stitches. Pull tight to close the hole. Weave in the remaining end securely.
- If you didn't use safety eyes, you can embroider sleepy eyes with black embroidery floss and a small straight stitch, positioned similarly to where safety eyes would go. For cheeks, use pink embroidery floss and make a few small stitches below the eyes.
- Gently shape your moon amigurumi with your hands to ensure an even, plump appearance.
- You can add a loop of chain stitches (ch 15-20, then sl st to the top of the moon) if you wish to hang your moon.
Pro Tips
- Use a Stitch Marker: Always use a stitch marker to mark the first stitch of each round when working in continuous spirals. This prevents you from losing your place and ensures an accurate stitch count.
- Invisible Decrease: For a smoother, less noticeable decrease, use the invisible decrease method (insert hook into front loop of first st, then into front loop of second st, yarn over, pull through both front loops, yarn over, pull through both loops on hook).
- Stuff Evenly and Firmly: The key to a good amigurumi shape is even and firm stuffing. Stuff a little at a time, pushing it into all areas to avoid bumps or hollows. Use a chopstick or the back of your crochet hook to get stuffing into tight spots.
- Tight Stitches: Work with a hook size slightly smaller than what you'd typically use for your yarn to achieve tight stitches. This prevents the stuffing from showing through your work.
- Yarn Choice Matters: While worsted weight is standard, experimenting with different yarn weights (e.g., bulky for a giant moon, sport for a tiny one) and corresponding hook sizes can dramatically change the finished size and feel.
- Don't Be Afraid to Customize: This is your moon! Feel free to add a little embroidered smile, some sparkly yarn for a starry effect, or even tiny attached stars for extra charm.
Frequently Asked Questions
Can I use different types of yarn for this pattern?
Absolutely! While the pattern calls for worsted weight (Aran) yarn, you can certainly use different weights. Just be aware that changing the yarn weight will alter the size of your finished moon. If you use a thicker yarn, your moon will be larger, and if you use a thinner yarn, it will be smaller. Remember to adjust your crochet hook size accordingly to maintain tight stitches and prevent stuffing from showing through. A good rule of thumb is to use a hook 1-2 sizes smaller than what the yarn label recommends for garments.
How can I make my moon bigger or smaller?
To make a bigger moon, you can either use a thicker yarn with a larger hook (as mentioned above) or add more increase rounds at the start of the pattern. For example, after Round 10, you could add a Round 11: *9 sc, inc* (66 sts), and then work more straight rounds before starting the decreases. To make it smaller, you can stop at an earlier increase round (e.g., after Round 8 or 9) and then work fewer straight rounds before beginning the decreases. Always ensure you have a symmetrical number of increase and decrease rounds to maintain a round shape.
What if my moon isn't perfectly round?
Don't worry, it's completely normal for amigurumi to need a little shaping! The most common reasons for an uneven shape are inconsistent tension, uneven stuffing, or accidentally missing/adding stitches. Once your moon is fully stuffed and closed, gently knead and roll it between your hands. Use your fingers to push the fiberfill into any areas that feel less dense. Often, a few minutes of gentle manipulation is all it takes to achieve that perfectly plump, round moon shape. Practice makes perfect, and every handmade item has its own unique charm!
And there you have it, your very own celestial companion, crocheted with love and ready to bring a little bit of the night sky into your home! We hope you enjoyed creating this adorable Crochet Moon Amigurumi. This little project is more than just yarn and stitches; it's a testament to your creativity and a source of gentle comfort. Share your beautiful creations with us – we can't wait to see your unique moons shining bright!