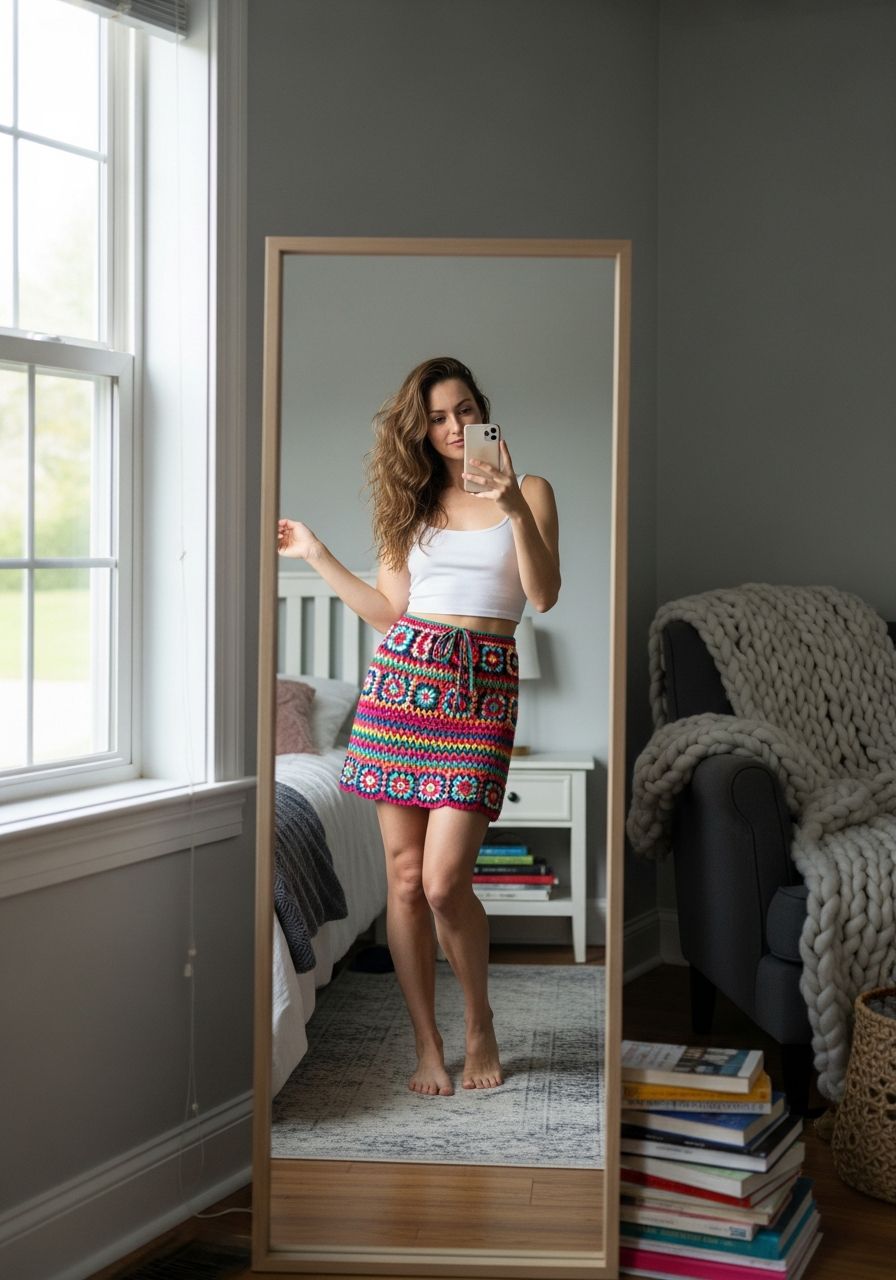
Imagine strolling through a sun-drenched market, feeling the gentle breeze on your legs, or dancing the night away at a summer festival – all while wearing a stylish, handmade garment that perfectly reflects your unique style. That dream can become a reality with our fabulous new free crochet mini skirt pattern! This isn't just a pattern; it's an invitation to create a versatile, chic, and utterly wearable piece that will elevate your wardrobe and bring a joyful sense of accomplishment with every stitch. Get ready to fall in love with your hook all over again and craft a skirt that's bound to turn heads!
Welcome, fellow yarn enthusiasts, to a project that promises both fun and fashion! This detailed guide and free pattern will walk you through creating your very own custom-fit crochet mini skirt. Designed with versatility in mind, this pattern is perfect for crocheters of various skill levels, offering clear instructions for a comfortable, flattering A-line silhouette. Whether you're new to garment making or a seasoned pro looking for a quick and satisfying project, you'll find everything you need to hook up a skirt that's as unique as you are. Let's dive into creating a beautiful, handmade addition to your wardrobe that you'll be proud to wear!
Why You'll Love This Pattern
- Quick to Make: Using a combination of simple stitches and working primarily in the round, this skirt works up surprisingly fast, making it a great weekend project.
- Customizable Fit: The waistband is created with a ribbed technique that stretches to fit comfortably, and the skirt body can be adjusted in length and width to perfectly suit your preferences.
- Fashion-Forward: Mini skirts are a timeless trend, and a handmade crochet version adds a unique, artisanal touch that store-bought items can't replicate.
- Skill Building: Practice essential techniques like working in rows for ribbing, joining to work in the round, increasing stitches for shaping, and weaving in ends neatly.
- Versatile Styling: Pair it with a simple tee and sandals for a casual daytime look, or dress it up with a blouse and heels for an evening out. It's also perfect for layering over swimwear!
- Yarn Play: This pattern is a fantastic opportunity to experiment with different yarn colors and textures, creating multiple skirts for various moods and occasions.
Materials Needed
- Yarn: DK weight (Category 3) cotton or cotton blend yarn. Approximately 400-600 yards (365-550 meters) depending on size and desired length. A cotton blend offers great drape and breathability, perfect for a skirt.
- Crochet Hook: 4.0mm (G-6) or size needed to obtain gauge.
- Tapestry Needle: For weaving in ends.
- Scissors: For cutting yarn.
- Stitch Markers: To mark the beginning of rounds or increase points, especially helpful for beginners.
- Optional: 1 inch (2.5 cm) wide elastic band, cut to your waist measurement minus 2 inches (5 cm), for a more secure waistband.
Gauge & Sizing
Gauge is crucial for garment patterns! Taking the time to make a gauge swatch will ensure your skirt fits as intended. If your swatch is too small, use a larger hook. If it's too large, use a smaller hook.
Gauge Swatch: 16 half double crochet (hdc) stitches and 11 rows = 4 inches (10 cm) square, using a 4.0mm hook.
Sizing Information: This pattern is written for a general fit, with specific instructions on how to customize the waistband to your exact measurements. The overall circumference of the skirt body will naturally flare out from the waistband. For reference, approximate finished waist circumference (unstretched) after creating the waistband:
- XS: 22-24 inches (56-61 cm)
- S: 25-27 inches (63.5-68.5 cm)
- M: 28-30 inches (71-76 cm)
- L: 31-33 inches (79-84 cm)
- XL: 34-36 inches (86.5-91.5 cm)
- 2XL: 37-39 inches (94-99 cm)
- 3XL: 40-42 inches (101.5-106.5 cm)
Remember, the ribbed waistband is stretchy. You want it to be slightly smaller than your actual waist measurement so it fits snugly without sagging.
Abbreviations
- ch: chain
- sl st: slip stitch
- sc: single crochet
- hdc: half double crochet
- dc: double crochet
- st(s): stitch(es)
- BLO: back loop only
- rep: repeat
- rnd(s): round(s)
- inc: increase (usually 2 hdc in the same stitch)
Step-by-Step Pattern
This pattern begins with the waistband, worked in rows to create a ribbed texture, then joined to form a circle. The skirt body is then worked in continuous rounds directly onto the waistband.
Waistband
The waistband is worked in rows of single crochet in the back loop only, which creates a lovely stretchy ribbing. You will determine the length of your waistband by trying it around your waist as you go.
- Foundation Chain: Ch 11. (This determines the height of your waistband. If you want a wider waistband, chain more stitches. If you want a narrower one, chain fewer. Adjust as desired.)
- Row 1: Sc in the 2nd ch from the hook and in each ch across. (10 sc)
- Row 2: Ch 1, turn. Sc in BLO in each st across. (10 sc)
- Repeat Row 2: Continue repeating Row 2 until the piece measures your desired waist circumference when slightly stretched. For example, if your waist measures 28 inches, you'll want the waistband piece to measure about 26-27 inches before joining, as it will stretch comfortably.
- Join Waistband: Once your waistband reaches the desired length, fold the piece in half, bringing the first and last rows together. Sl st through the BLO of the working row and the corresponding loop of the foundation chain to join, forming a seamless circle. Be careful not to twist the band.
- Prepare for Skirt Body: Turn the waistband so the seam is on the inside and the top edge (where you'll start the skirt body) is facing up.
Skirt Body
The skirt body is worked in continuous rounds, starting from the joined waistband. We'll use half double crochet stitches for a nice drape and quick progress.
- Round 1 (Set-up Round): Ch 1 (does not count as a stitch). Work 1 sc into the end of each row around the top edge of the waistband. The number of sc stitches in this round will be equal to the total number of rows you crocheted for your waistband. Make sure the count is an even number. If it's an odd number, adjust by skipping one row end or working two sc into one row end to make it even. Join with a sl st to the first sc. (Example: If you made 78 rows for your waistband, you'll have 78 sc).
- Round 2: Ch 2 (counts as first hdc). Hdc in each st around. Join with a sl st to the top of the beginning ch 2. (Stitch count remains the same as Round 1).
- Round 3 (Increase Round): Ch 2. *Hdc in the next [X] sts, 2 hdc in the next st (inc)*. Repeat from * around to the end of the round. (To calculate X, divide your total stitch count from Round 2 by a number that results in 4-8 increases, e.g., if you have 78 sts, 78/6=13, so X=12 for 6 increases. Or 78/3=26, so X=25 for 3 increases). Join with a sl st to the top of the beginning ch 2. (Example with 78 sts, increasing 6 times: *Hdc in next 12 sts, 2 hdc in next st*. Rep 6 times. Total: 84 hdc).
- Rounds 4-7 (Straight Rounds): Ch 2. Hdc in each st around. Join with a sl st to the top of the beginning ch 2. (Stitch count remains the same as after the increase round).
- Round 8 (Optional Increase Round): Ch 2. *Hdc in the next [Y] sts, 2 hdc in the next st (inc)*. Repeat from * around to the end of the round. (Y will be your current stitch count divided by the number of increases you want, minus one. Keep the number of increases consistent with previous increase rounds for an even flare). Join with a sl st to the top of the beginning ch 2. (Example with 84 sts, increasing 6 times: *Hdc in next 13 sts, 2 hdc in next st*. Rep 6 times. Total: 90 hdc).
- Continue Straight or Increase: Continue working rounds of hdc. You can add another increase round every 5-10 rounds if you want a more pronounced A-line flare, or just work straight rounds to maintain the current width. The key is to try on your skirt as you go to determine if and when you need more increases for your desired fit and shape.
- Length: Continue working hdc rounds until the skirt reaches your desired mini skirt length. Remember to account for a little stretch and drape when worn.
- Final Round: Once your desired length is achieved, work one final round of sl st around the bottom edge for a neat finish, or simply fasten off after the last hdc round.
Finishing
- Weave in Ends: Use your tapestry needle to carefully weave in all loose yarn ends, securing them discreetly into the fabric.
- Optional Elastic Waistband: If you chose to use elastic, thread it through the back loops of the first round of single crochet (Round 1 of the Skirt Body) around the waistband. Overlap the ends of the elastic by about 1 inch (2.5 cm) and securely sew them together. Distribute the fabric evenly around the elastic.
- Blocking (Optional but Recommended): Gently wet your skirt, then lay it flat on a clean surface or blocking mats, shaping it to its intended dimensions. Pin it if necessary. Allow it to air dry completely. Blocking helps to even out stitches, relax the fabric, and enhance the drape of your skirt.
- Try It On! Enjoy your beautiful new handmade crochet mini skirt!
Pro Tips
- Check Your Gauge Religiously: Seriously, for garments, gauge is paramount. A few stitches off can lead to a skirt that's too tight or too baggy.
- Use Stitch Markers: Place a stitch marker at the beginning of each round, especially in the skirt body, to easily keep track of where your rounds start and end. This is also helpful for marking increase stitches.
- Try On As You Go: This is a major advantage of making your own clothes! Periodically try on your skirt as you work, especially during the skirt body section, to ensure the fit and length are exactly what you want. This allows you to adjust increases or length on the fly.
- Choose Your Yarn Wisely: A cotton blend yarn is recommended because it offers good stitch definition, breathability, and a lovely drape that's ideal for skirts. Acrylics can also work, but some may lack the desired drape. Avoid overly heavy or stiff yarns.
- Seamless Joins: Practice invisible joins for your rounds if you want a truly seamless look. A common technique is to pull through the last loop of the last stitch, then insert your hook from back to front into the top of the first stitch of the round (or Ch 2), yarn over, and pull through to the front, then pull through the loop on your hook.
- Customizing Length: To make a knee-length or midi skirt, simply continue adding plain hdc rounds after reaching your desired width from the increase rounds, until you achieve the desired length.
Frequently Asked Questions
Q: Can I make this skirt longer than a mini skirt?
A: Absolutely! This pattern is easily adaptable for different lengths. Once you have completed the increase rounds for the A-line shape and are happy with the width of the skirt, simply continue working additional rounds of hdc (without increases) until you reach your desired length, whether that's knee-length, midi, or even maxi. Remember to account for additional yarn needed if you extend the length significantly.
Q: What kind of yarn is best for this crochet mini skirt?
A: We highly recommend a DK weight (Category 3) cotton or cotton blend yarn. Cotton provides excellent stitch definition, a beautiful drape, and is breathable, making it comfortable to wear, especially in warmer weather. A cotton blend with a bit of acrylic or bamboo can add softness and enhance the drape even further. Avoid very heavy or stiff yarns, as they might not create the desired flowy silhouette.
Q: Is this pattern suitable for beginners?
A: If you're familiar with basic crochet stitches like chain, slip stitch, single crochet, and half double crochet, this pattern is a fantastic next step! The techniques involved (working in rows for ribbing, joining to work in the round, and simple increases) are clearly explained. Beginners might find it helpful to watch video tutorials for these specific techniques before starting, but the step-by-step instructions are designed to be easy to follow.
And there you have it – your very own customizable, stylish, and utterly chic crochet mini skirt! We hope you enjoyed every moment of creating this fantastic garment. It's truly amazing what you can create with a hook and some yarn. Don't be shy; wear your new skirt with pride, knowing you poured your creativity and skill into every stitch. We can't wait to see your unique creations!