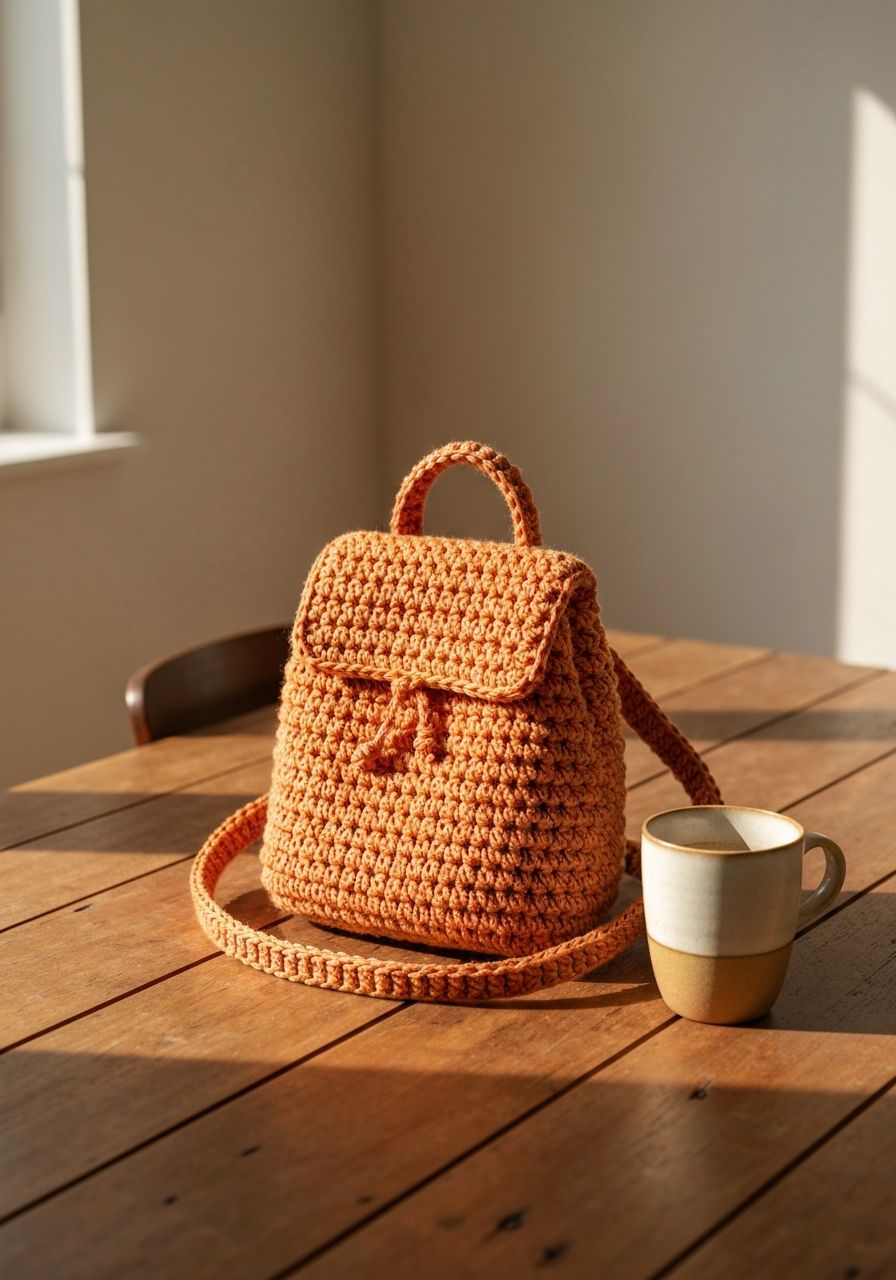
Imagine strolling through your favorite craft fair, coffee shop, or park, hands-free, with a tiny, adorable accessory that holds your essentials and perfectly complements your outfit. That's the magic of a handmade Crochet Mini Backpack! This pattern isn't just about making a bag; it's about crafting a statement piece, a delightful gift, or your next favorite functional accessory that sparks joy with every stitch. Get ready to fall in love with the process and the charming result – a personalized mini backpack that's as unique as you are.
Welcome, fellow yarn enthusiasts, to your next exciting crochet adventure! This comprehensive guide provides a free pattern for a chic and practical crochet mini backpack. Whether you're a seasoned crocheter looking for a quick, satisfying project or an ambitious beginner ready to tackle something new, this pattern is designed to be clear, engaging, and rewarding. We'll walk through every step, from the sturdy base to the stylish flap and adjustable straps, ensuring you create a beautiful mini backpack that you'll be proud to carry.
Why You'll Love This Pattern
- Quick & Rewarding: Mini projects are fantastic for instant gratification! You'll see your backpack take shape quickly, making it a perfect weekend make or a thoughtful last-minute gift.
- Stylish & Versatile: This mini backpack is incredibly fashionable. Use it for quick errands, as a small purse, or even as a cute accessory for a child. Choose any yarn color to match your personal style.
- Perfect for Gifting: Handmade gifts are always cherished. This mini backpack makes an excellent present for friends, family, or even as a unique item for craft markets.
- Skill-Building Project: While straightforward, this pattern incorporates various techniques like working in the round, shaping, and assembly, helping you expand your crochet repertoire.
- Customization Heaven: The basic design is a blank canvas! Add a lining, embroidery, appliqués, or different closures to make it truly your own.
Materials Needed
- Yarn: Approximately 200-250 yards of Worsted Weight (Aran/10-ply) cotton or acrylic yarn. Cotton provides excellent stitch definition and durability; acrylic is lighter and comes in a vast color range. (e.g., Lily Sugar'n Cream, Caron One Pound, Lion Brand 24/7 Cotton)
- Crochet Hook: 4.0mm (G/6) or size needed to obtain gauge.
- Yarn Needle: For weaving in ends and assembly.
- Scissors: For cutting yarn.
- Stitch Markers: Essential for keeping track of rounds, especially when working in a spiral.
- Optional:
- 2 D-rings (1 inch) for adjustable straps.
- 2 Swivel clasps (for detachable straps).
- Magnetic snap closure or button for the flap.
- Fabric for lining (recommended for extra durability and structure).
Gauge & Sizing
Gauge: 16 sc and 18 rows = 4 inches (10 cm) with a 4.0mm hook. Always check your gauge to ensure your finished backpack matches the intended size. If your gauge is too loose, try a smaller hook; if it's too tight, try a larger hook.
Finished Size (approximate): 6 inches wide x 7.5 inches tall x 3 inches deep (excluding straps).
Abbreviations
- ch: chain
- sc: single crochet
- hdc: half double crochet
- dc: double crochet
- sl st: slip stitch
- inc: increase (2 single crochet stitches in the same stitch)
- dec: decrease (single crochet 2 together - sc2tog)
- FO: fasten off
- MR: magic ring
- st(s): stitch(es)
- Rnd: Round
- FSC: foundation single crochet (optional, can substitute with ch + sc in chain)
Step-by-Step Pattern
This pattern is worked in continuous rounds unless otherwise specified. Use a stitch marker to mark the first stitch of each round.
Bottom of the Backpack (Oval)
- Ch 21. Sc in the 2nd ch from hook and in the next 18 chs, 3 sc in the last ch. Working on the opposite side of the chain: sc in the next 18 chs, 2 sc in the last ch. (42 sts)
- Inc in the first st, sc in the next 18 sts, inc in the next 3 sts, sc in the next 18 sts, inc in the next 2 sts. (48 sts)
- Sc in the first st, inc in the next st, sc in the next 18 sts, (sc in the next st, inc in the next st) 3 times, sc in the next 18 sts, (sc in the next st, inc in the next st) 2 times. (54 sts)
- Sc in the first 2 sts, inc in the next st, sc in the next 18 sts, (sc in the next 2 sts, inc in the next st) 3 times, sc in the next 18 sts, (sc in the next 2 sts, inc in the next st) 2 times. (60 sts)
- Sc in the first 3 sts, inc in the next st, sc in the next 18 sts, (sc in the next 3 sts, inc in the next st) 3 times, sc in the next 18 sts, (sc in the next 3 sts, inc in the next st) 2 times. (66 sts)
- Sc in each st around. (66 sts)
Body of the Backpack
- Working in the back loop only (BLO) for this round: sc in each st around. This creates a defined edge for the bottom. (66 sts)
- Working through both loops from now on: sc in each st around. (66 sts)
- Repeat Rnd 2 for a total of 28 more rounds, or until the body measures approximately 7.5 inches from the BLO round. (66 sts per round)
- Sl st into the next stitch, FO. Weave in ends.
Flap
Worked flat, back and forth in rows. Ch 1 and turn at the end of each row.
- Ch 21. Sc in 2nd ch from hook and across. (20 sc)
- Sc in each st across. (20 sc)
- Repeat Rnd 2 for 10 more rows (total of 12 rows).
- Sc in the first st, dec, sc in the next 14 sts, dec, sc in the last st. (18 sc)
- Sc in each st across. (18 sc)
- Sc in the first st, dec, sc in the next 12 sts, dec, sc in the last st. (16 sc)
- Sc in each st across. (16 sc)
- Sc in the first st, dec, sc in the next 10 sts, dec, sc in the last st. (14 sc)
- Sc in each st across. (14 sc)
- Optional buttonhole row: Sc in the first 6 sts, ch 2, skip 2 sts, sc in the last 6 sts. (12 sc, 1 ch-2 space). If not adding a button, simply sc across.
- Sc in each st, working 2 sc into the ch-2 space if made. (14 sc)
- FO, leaving a long tail for sewing.
Strap Tabs (Make 2)
These are for attaching the D-rings and shoulder straps.
- Ch 11. Sc in 2nd ch from hook and across. (10 sc)
- Sc in each st across. (10 sc)
- Repeat Rnd 2 for 4 more rows (total of 6 rows).
- FO, leaving a long tail for sewing.
Drawstring
- Ch 120 (or desired length for a tie closure). Sl st into 2nd ch from hook and across the entire chain. FO. Weave in ends.
Shoulder Straps (Make 2)
These instructions are for simple straps. For adjustable straps, you'll need D-rings/buckles.
- Ch 6. Sc in 2nd ch from hook and across. (5 sc)
- Sc in each st across. (5 sc)
- Repeat Rnd 2 until the strap measures approximately 28-30 inches (or desired length).
- FO, leaving a long tail for sewing.
Assembly
- Attach the Flap: Place the finished flap centered on the back of the backpack body, aligning the straight edge (Row 1 of the flap) with the top edge of the backpack. Using the long tail and your yarn needle, whip stitch or sl st the flap securely to the back of the backpack.
- Attach Strap Tabs: Fold each strap tab in half. Thread a D-ring (if using) through the folded loop. Position the tabs evenly on the bottom sides of the backpack, about 1-1.5 inches up from the base. Sew them securely in place using the long tails.
- Weave in Drawstring: Starting from the center back, weave the drawstring in and out through the stitches of the top round of the backpack (or the round just below the top edge if you want a little lip). Ensure it goes through every 3-4 stitches for an even gather. Tie the ends in a knot or add beads.
- Attach Shoulder Straps:
- For non-adjustable straps: Sew one end of each strap to the top corners of the flap, about 1-2 inches in from the edge. Sew the other end of each strap to the D-rings on the strap tabs, or directly to the base of the backpack if not using D-rings.
- For adjustable straps with D-rings/swivel clasps: Sew one end of each strap to the top corners of the flap. Attach swivel clasps to the other end of each strap. These clasps will then clip onto the D-rings you previously attached.
- Add Closure (Optional): If using a magnetic snap, sew one half to the underside of the flap and the other half to the front of the backpack body, ensuring they align when closed. If using a button, sew it to the backpack body, aligning it with the buttonhole on the flap.
- Weave in all remaining ends: Double-check for any loose tails and weave them in neatly.
Pro Tips
- Stitch Markers are Your Best Friend: Especially when working in continuous rounds, a stitch marker at the beginning of each round will save you from constant re-counting and potential errors.
- Yarn Choice Matters: For a sturdy mini backpack, choose a yarn with good structure like cotton or a cotton blend. Acrylic works well too, but avoid overly soft or fuzzy yarns that might not hold their shape as well.
- Blocking for Perfection: While not always necessary for bags, blocking can help your finished backpack achieve a more polished, even shape and stitch definition. Lightly steam or wet block if desired.
- Customization is Key: Don't be afraid to personalize! Add a fabric lining for extra durability, strength, and to prevent stretching. Embellish with patches, embroidery, or decorative buttons.
- Invisible Seams: When assembling, use a whip stitch or mattress stitch for neat, less visible seams, especially when attaching the flap and straps.
Frequently Asked Questions
Q: Can I use a different yarn weight for this pattern?
A: Yes, you absolutely can! However, keep in mind that using a different yarn weight will affect the finished size of your mini backpack. If you use a heavier yarn (e.g., bulky), your backpack will be larger; a lighter yarn (e.g., sport weight) will result in a smaller bag. You'll also need to adjust your hook size to match the yarn and achieve a firm fabric, which is important for a bag's structure. Always check your gauge to estimate the final dimensions.
Q: How can I make the straps truly adjustable?
A: To make your straps adjustable, you'll need some hardware: two 1-inch D-rings and two 1-inch slider buckles (also known as triglides). Instead of attaching one end of the strap permanently, you'll thread it through the slider buckle, then through a D-ring (which is sewn to the base of the backpack as per the pattern's strap tabs), and back through the slider buckle. This creates a loop that can be easily lengthened or shortened, just like on a store-bought backpack.
Q: What if my mini backpack seems too flimsy or stretches out easily?
A: If your backpack feels too flimsy, there are a few things you can do. First, try using a smaller hook size to achieve a tighter, denser fabric. This will naturally make the bag more rigid. Second, consider lining your backpack with a sturdy fabric like canvas or denim. A well-fitted fabric lining will provide significant structure and prevent stretching, making your crochet mini backpack much more durable and functional for everyday use.
You've now completed your very own handmade Crochet Mini Backpack! Take a moment to admire your hard work and creativity. This charming accessory is a testament to your skills and a perfect example of how a bit of yarn and a hook can create something truly beautiful and practical. We hope you enjoyed this pattern and found the process as delightful as the finished product. Don't forget to share your creations with us – we love seeing your unique interpretations!