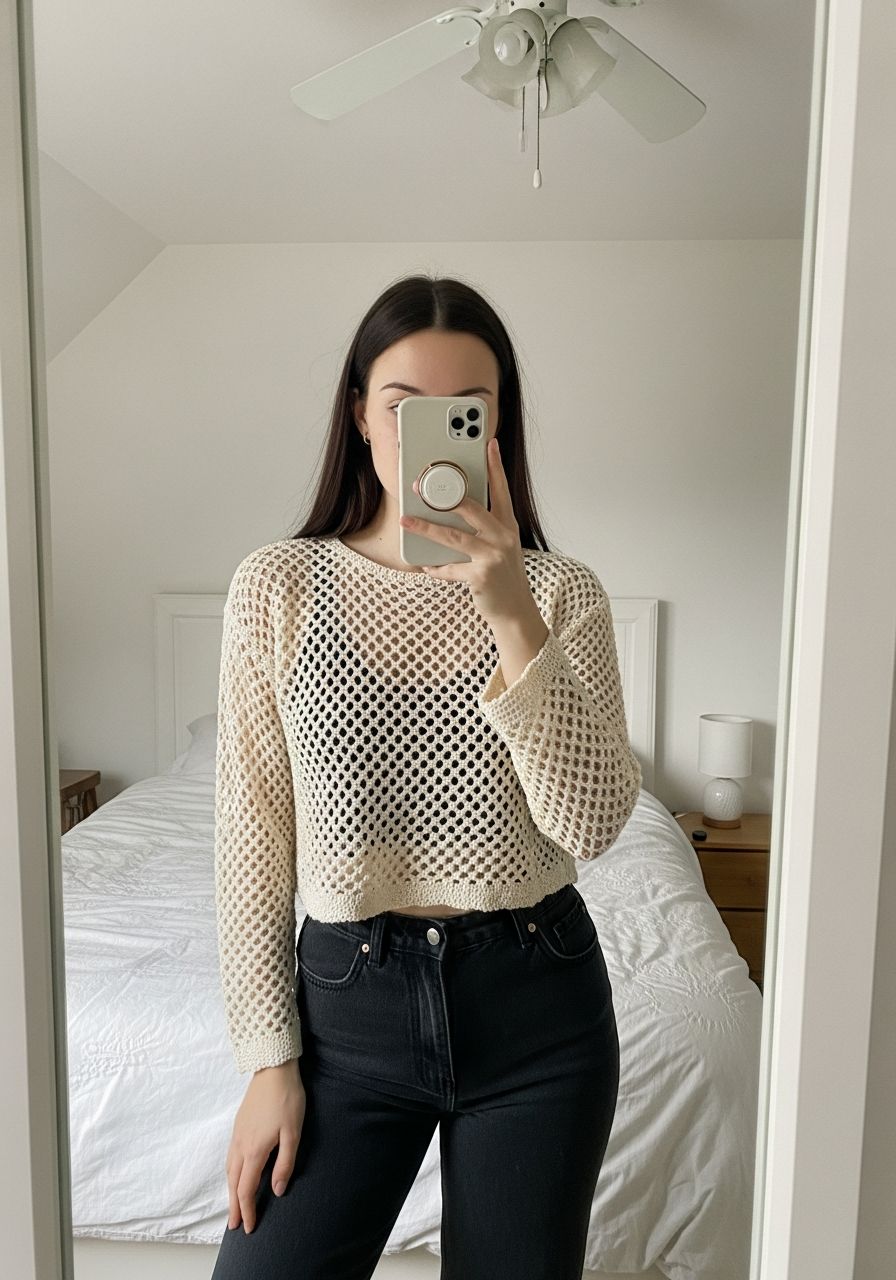
Imagine the soft breeze against your skin, the golden sun on your shoulders, and the undeniable confidence of wearing something beautiful you made with your own hands. That feeling is within reach! Get ready to infuse your wardrobe with effortless, handmade charm with our incredible free pattern for a chic and breezy Crochet Mesh Top. Perfect for sunny days, beach cover-ups, or layering over your favorite bralette, this top is designed to be a staple in your warm-weather collection. Whether you're a seasoned crocheter looking for a quick, satisfying project or a confident beginner ready to tackle a wearable, this pattern will guide you to create a stunning piece that’s as fun to make as it is to wear!
Welcome, fellow makers! If you've been dreaming of a versatile, stylish top that embodies the spirit of summer, you've found it. This article isn't just a pattern; it's your comprehensive guide to crafting a beautiful mesh top that will turn heads and become a go-to in your wardrobe. We'll walk you through every step, from selecting the perfect yarn to finishing touches, ensuring your project is a joy from start to finish. Get ready to hook up some serious style!
Why You'll Love This Pattern
-
Effortlessly Chic: The open mesh design offers a delicate, airy look that's perfect for summer. It's stylish enough for a casual outing yet relaxed enough for lounging.
-
Beginner-Friendly: While creating a wearable might seem daunting, this pattern primarily uses basic stitches (chain, single crochet, double crochet) and repetitive rows, making it highly accessible for crocheters ready to move beyond scarves and blankets.
-
Quick to Make: The open nature of the mesh means fewer stitches per row and faster progress, allowing you to whip up this top in a surprisingly short amount of time.
-
Customizable Sizing: We'll provide guidance on adjusting the pattern to fit various body types, ensuring you can create a top that truly feels custom-made for you.
-
Breathable & Lightweight: Made with cotton or a cotton blend, this top is incredibly comfortable in warm weather, offering excellent breathability.
-
Versatile Styling: Wear it over a bikini at the beach, layer it with a camisole or bralette for a festival look, or pair it with high-waisted shorts for a casual summer ensemble. The possibilities are endless!
Materials Needed
- Yarn: Approximately 400-550 yards (365-500 meters) of Fingering Weight (Category 1) or Sport Weight (Category 2) cotton or cotton blend yarn. We recommend a cotton blend for its drape and breathability. (e.g., Lion Brand 24/7 Cotton, Scheepjes Whirl)
- Crochet Hook: 3.5 mm (E-4) or size needed to obtain gauge.
- Tapestry Needle: For weaving in ends and seaming.
- Scissors: For cutting yarn.
- Stitch Markers: A few to mark key points, especially when seaming.
Gauge & Sizing
Achieving the correct gauge is crucial for wearables, ensuring your finished top matches the intended size and drape. Take the time to make a gauge swatch!
Gauge Swatch Instructions:
- Chain 22.
- Row 1: Dc in 4th ch from hook (counts as 1st dc and ch-1 sp), *ch 1, skip next ch, dc in next ch*. Repeat from * to * across. Turn. (10 dc, 9 ch-1 sps)
- Row 2: Ch 3 (counts as 1st dc), *ch 1, skip ch-1 sp, dc in next dc*. Repeat from * to * across, ending with dc in top of turning ch. Turn. (10 dc, 9 ch-1 sps)
- Repeat Row 2 for a total of 12 rows.
Your finished swatch should measure approximately 4 inches (10 cm) wide and 4 inches (10 cm) tall. If your swatch is too small, try a larger hook. If it's too large, try a smaller hook. Repeat until you match gauge.
Sizing Information:
This pattern is written for a women's size Small/Medium, designed for a relaxed fit with approximately 2-4 inches of positive ease. The finished bust circumference for S/M is approximately 36 inches (91 cm). You can easily adjust the width by adding or subtracting multiples of 2 chains at the beginning (each multiple adds/subtracts one mesh repeat, approx 0.8 inches / 2 cm). To adjust the length, simply add or subtract rows for the front and back panels before seaming. For a snugger fit, consider going down a hook size, or for a looser fit, go up a hook size and/or add more repeats.
- XS: Ch 54 (26 mesh repeats)
- S/M: Ch 62 (30 mesh repeats)
- L/XL: Ch 70 (34 mesh repeats)
- 2X/3X: Ch 78 (38 mesh repeats)
Abbreviations
- ch: Chain
- sl st: Slip stitch
- sc: Single crochet
- dc: Double crochet
- st(s): Stitch(es)
- sp: Space
- sk: Skip
- rep: Repeat
- FO: Fasten off
Step-by-Step Pattern
This top is constructed from two identical rectangular panels (front and back), which are then seamed together and edged.
Front & Back Panels (Make 2 identical)
For size S/M, use a starting chain of 62. Adjust chain count based on your desired size (see 'Sizing Information' above).
- Starting Chain: Ch 62 (or desired chain count).
- Row 1: Dc in 4th ch from hook (this counts as your first dc and ch-1 space). *Ch 1, sk next ch, dc in next ch*. Repeat from * to * across the row. You should end with a dc in the last chain. Turn your work. (You will have 30 dc and 29 ch-1 spaces for S/M).
- Row 2: Ch 3 (this counts as your first dc). *Ch 1, sk next ch-1 sp, dc in next dc*. Repeat from * to * across the row, ending with a dc in the top of the turning chain from the previous row. Turn your work. (You will still have 30 dc and 29 ch-1 spaces for S/M).
- Repeat Row 2: Continue repeating Row 2 until your panel measures approximately 18 inches (46 cm) in length, or your desired length. For S/M, this will be about 27-28 rows, depending on your tension.
- Fasten Off: For the first panel, fasten off and weave in your ends. For the second panel, do not fasten off; you will use this yarn for seaming.
Assembly & Seaming
Once you have both panels completed, it's time to bring your top to life!
- Align Panels: Lay one panel flat with the right side facing up. Place the second panel directly on top, with the right side facing down. Your panels should be perfectly aligned, wrong sides facing out.
- Shoulder Seams: Using a tapestry needle and the yarn tail from one of the panels (or a new piece of yarn), seam the top edges together. Start from the outer edge (armhole side) and seam inwards for about 3 inches (7.5 cm) on each side. This will create your shoulder seams. Leave the central unseamed section (approx. 10 inches / 25 cm) for the neckline opening. Secure and weave in ends.
- Side Seams: Using a tapestry needle and yarn, seam the side edges together. Start from the bottom hem and seam upwards for about 11 inches (28 cm). Leave the remaining unseamed section (approx. 7 inches / 18 cm) at the top for the armholes. Repeat on the other side. Secure and weave in ends.
Edging
Adding a simple single crochet border provides a neat and finished look to your top.
- Neckline Edging: Join your yarn with a slip stitch anywhere along the neckline opening. Ch 1, then work single crochet stitches evenly around the entire neckline. Aim for 1 sc in each dc and 1 sc in each ch-1 sp, or 2 sc per row end, adjusting as needed to keep the edge flat. Join with a sl st to the first sc. Fasten off and weave in ends.
- Armhole Edging (Repeat for both): Join yarn with a sl st anywhere along an armhole opening. Ch 1, then work single crochet stitches evenly around the entire armhole. Aim for roughly 2 sc stitches per row end. Join with a sl st to the first sc. Fasten off and weave in ends.
- Bottom Hem Edging: Join yarn with a sl st anywhere along the bottom hem of the top. Ch 1, then work single crochet stitches evenly around the entire hem. Aim for 1 sc in each dc and 1 sc in each ch-1 sp. Join with a sl st to the first sc. Fasten off and weave in ends.
Pro Tips
- Blocking is Your Friend: After finishing, wet block your top. This will open up the mesh stitches beautifully, enhance the drape, and help the garment settle into its final shape and size.
- Yarn Choice Matters: For a true summer feel, opt for natural fibers like cotton, linen, or bamboo. Acrylic can work but may not offer the same breathability or drape.
- Use Stitch Markers: Place stitch markers at the beginning and end of rows, especially for larger projects, to help keep track of your stitch count and prevent accidental increases or decreases. They are also invaluable for aligning panels before seaming.
- Weave in Ends as You Go: While tedious, weaving in ends after each color change or at the end of each panel saves you a big job at the very end.
- Check Your Tension: Consistent tension is key for an even fabric. If you find your stitches are too tight or too loose, adjust your hook size.
Frequently Asked Questions
Can I use a different yarn weight for this pattern?
Yes, you absolutely can! However, be aware that changing the yarn weight will significantly alter your gauge and therefore the finished size of your top. If you use a heavier yarn (e.g., DK or Worsted), you'll likely need a larger hook and will need to decrease your starting chain and row count to achieve a similar size. Always make a gauge swatch with your chosen yarn and hook, and adjust the number of starting chains (in multiples of 2) and rows accordingly to match your desired measurements.
Is this pattern suitable for complete beginners?
This pattern is suitable for confident beginners who are comfortable with basic crochet stitches (chain, slip stitch, single crochet, double crochet) and know how to read a simple pattern. The mesh stitch itself is very repetitive, making it a great way to practice stitch consistency. If you've made a few scarves or dishcloths and are ready for your first wearable, this is an excellent next step! The clear instructions and guidance on sizing should set you up for success.
How can I make the top longer or shorter?
Adjusting the length of your top is very simple with this pattern. Before you fasten off each panel, simply continue repeating Row 2 until the piece reaches your desired length. If you want a cropped top, stop a few rows earlier. If you prefer a tunic length, add more rows. Just ensure both the front and back panels have the same number of rows for even seaming.
And there you have it – your very own handmade Crochet Mesh Top, ready to make a stylish statement wherever you go! We hope you enjoyed creating this beautiful piece as much as we enjoyed designing it for you. Remember, every stitch tells a story, and yours is one of creativity, patience, and skill. Don't forget to share your finished project with us and the crochet community. Happy hooking!