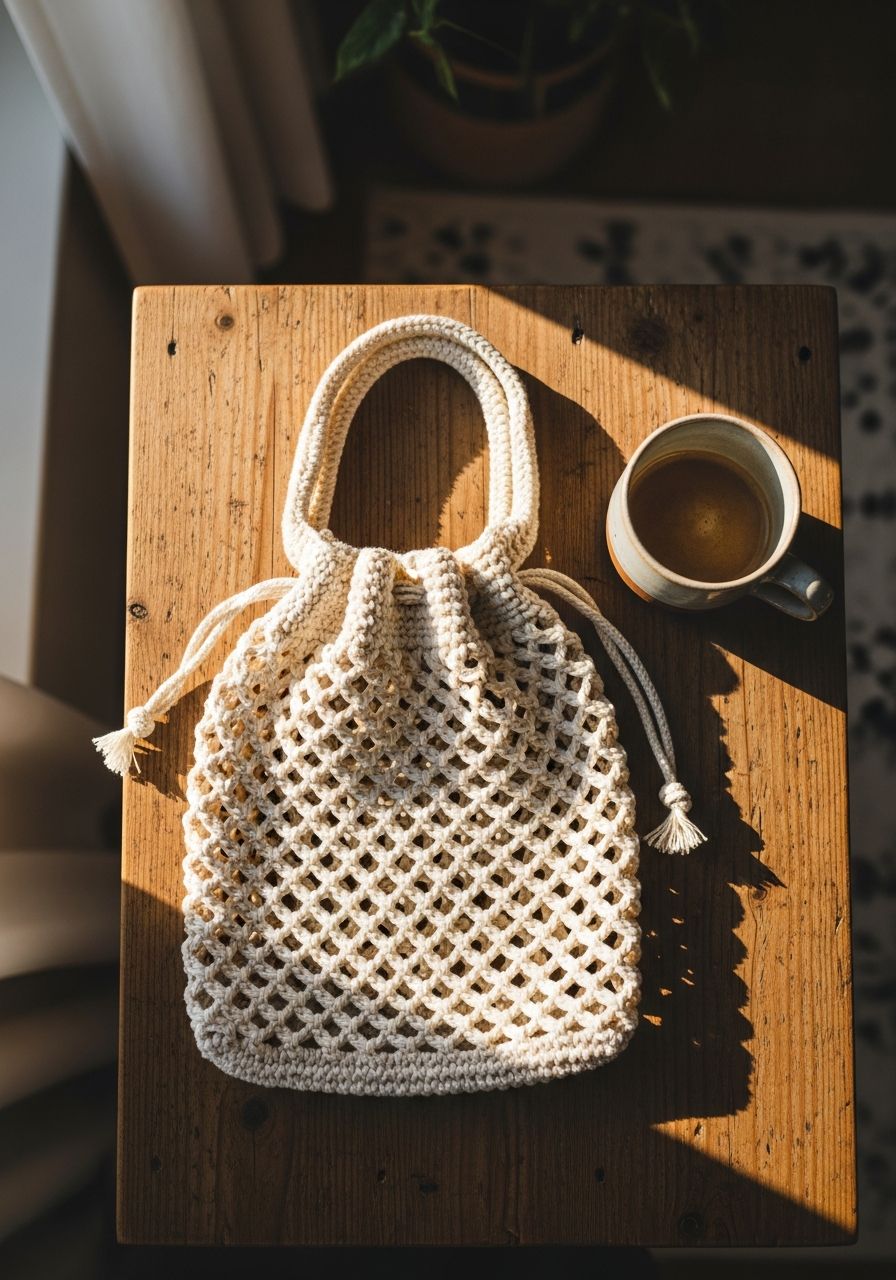
Imagine strolling through the farmer's market, your vibrant, handmade Crochet Mesh Bag overflowing with fresh produce, a testament to your creativity and commitment to sustainable living. Or perhaps you picture it slung over your shoulder at the beach, holding your towel and sunscreen in airy style. This isn't just a bag; it's a statement, a practical accessory, and a truly satisfying project to crochet. Get ready to fall in love with your new favorite make!
Welcome, fellow fiber artists, to a pattern that's as rewarding to create as it is versatile to use. This free Crochet Mesh Bag pattern is designed to be accessible for confident beginners while still offering a delightful rhythm for experienced crocheters. We'll walk you through every step, from the sturdy base to the elegant mesh body and comfortable handles. Ditch the single-use plastic and embrace a sustainable, stylish alternative that you made with your own hands. Let's grab our hooks and yarn, and embark on this wonderful journey!
Why You'll Love This Pattern
This isn't just another bag pattern; it's a gateway to practical, stylish, and eco-conscious crafting. Here’s why this Crochet Mesh Bag will quickly become a favorite:
- Eco-Friendly & Reusable: Say goodbye to plastic bags! This durable cotton bag is perfect for groceries, produce, or anything you need to carry, reducing your environmental footprint with every use.
- Incredibly Versatile: Beyond the market, this bag is fantastic for beach trips (sand sifts right out!), toy storage, laundry delicates, or even a stylish project bag for your next crochet or knitting endeavor.
- Quick & Satisfying: The mesh repeat works up surprisingly fast, making this a gratifying project that you can complete in a weekend or a few evenings. It's perfect for instant gratification!
- Customizable Fun: Choose any color of cotton yarn to match your style. Experiment with stripes, ombre effects, or even a variegated yarn for a unique look. The possibilities are endless!
- Skill-Building for All Levels: Practice essential stitches like chains, single crochet, and double crochet, along with working in the round. It's simple enough for an adventurous beginner but engaging enough for an experienced crocheter.
- A Perfect Handmade Gift: Fill it with fresh fruit, homemade treats, or a small plant, and you have a thoughtful, personalized gift that anyone will appreciate.
Materials Needed
Gathering your supplies is the first exciting step! Here’s what you’ll need to create your beautiful mesh bag:
- Yarn: Approximately 250-300 yards (230-275 meters) of Worsted Weight (Category 4) 100% Cotton Yarn. Cotton is highly recommended for its durability, minimal stretch, and washability, making it ideal for a market bag. (Examples: Dishie by Knit Picks, Lily Sugar'n Cream, Peaches & Creme).
- Crochet Hook: H/8 (5.0mm) or size needed to obtain gauge.
- Scissors: For cutting yarn.
- Yarn Needle: For weaving in ends securely.
- Stitch Marker (optional, but highly recommended): To mark the beginning of your rounds, especially when working in continuous spirals or for joining.
Gauge & Sizing
Gauge is crucial for ensuring your bag turns out the intended size and uses the correct amount of yarn. While a mesh bag is forgiving, checking your gauge for the base will help ensure consistency.
- Gauge for Base: 4 hdc stitches x 3 rounds = 1 inch (2.5 cm).
- Gauge for Mesh: 2 mesh 'squares' (1 dc, ch 1, sk 1) x 2 rounds = 1.5 inches (3.8 cm).
Finished Bag Size: Approximately 14 inches (35.5 cm) wide (laid flat) x 16 inches (40.5 cm) tall (excluding handles). This size is perfect for a trip to the grocery store or carrying essentials. You can easily adjust the size by adding or subtracting rounds from the base and body sections.
Abbreviations
Familiarize yourself with these standard crochet abbreviations used in this pattern:
- ch: chain
- sl st: slip stitch
- sc: single crochet
- hdc: half double crochet
- dc: double crochet
- st(s): stitch(es)
- rep: repeat
- sk: skip
- rnd: round
- MR: Magic Ring (also known as Magic Circle or Adjustable Ring)
- FO: Fasten Off
Step-by-Step Pattern
Let's begin crafting your beautiful and functional Crochet Mesh Bag! We'll start with the sturdy base, build up the airy mesh body, and finish with comfortable, durable handles.
Base of the Bag
The base is worked in the round, creating a flat circle. We will use half double crochets for a solid, firm foundation.
- Rnd 1: Create a MR, ch 2 (counts as 1 hdc). Work 9 hdc into the MR. Join with a sl st to the top of the initial ch 2. (10 hdc)
- Rnd 2: Ch 2, work 2 hdc in each st around. Join with a sl st to the top of the initial ch 2. (20 hdc)
- Rnd 3: Ch 2, *hdc in the next st, 2 hdc in the next st*. Repeat from * to * around. Join with a sl st to the top of the initial ch 2. (30 hdc)
- Rnd 4: Ch 2, *hdc in the next 2 sts, 2 hdc in the next st*. Repeat from * to * around. Join with a sl st to the top of the initial ch 2. (40 hdc)
- Rnd 5: Ch 2, *hdc in the next 3 sts, 2 hdc in the next st*. Repeat from * to * around. Join with a sl st to the top of the initial ch 2. (50 hdc)
- Rnd 6: Ch 2, *hdc in the next 4 sts, 2 hdc in the next st*. Repeat from * to * around. Join with a sl st to the top of the initial ch 2. (60 hdc)
- Rnd 7 (Transition Round): Ch 1, sc in each st around. Join with a sl st to the first sc. (60 sc) This round creates a crisp edge before transitioning to the mesh.
Body of the Bag (Mesh Pattern)
Now we'll build the mesh body, working in a simple repeat that creates the open, airy fabric.
- Rnd 8: Ch 4 (counts as 1 dc + ch 1), sk next st, dc in next st. *Ch 1, sk next st, dc in next st*. Repeat from * to * around. Ch 1, sk the last st, join with a sl st to the 3rd ch of the initial ch 4. (30 dc, 30 ch-1 spaces)
- Rnd 9: Ch 4 (counts as 1 dc + ch 1), dc in the next dc (not the ch-1 space). *Ch 1, dc in the next dc*. Repeat from * to * around. Ch 1, join with a sl st to the 3rd ch of the initial ch 4. (30 dc, 30 ch-1 spaces)
- Rnds 10-37 (or desired height): Repeat Rnd 9 for a total of 28 more rounds, or until your bag body measures approximately 14-15 inches (35.5-38 cm) from the base. You can adjust the height by adding or subtracting repeat rounds here. For a taller bag, add more rounds; for a shorter bag, do fewer.
Top Edge & Handles
We'll finish the bag with a sturdy top edge and two comfortable handles.
- Rnd 38 (Strengthening Top Edge): Ch 1, sc in each dc and each ch-1 space around. Join with a sl st to the first sc. (60 sc) This round closes the mesh and creates a solid foundation for the handles.
- Rnd 39: Ch 1, sc in each sc around. Join with a sl st to the first sc. (60 sc)
- Rnd 40 (Creating Handle Loops): Ch 1, sc in the first 10 sts. Ch 40 (this will form your first handle loop). Sk the next 20 sts (this forms the handle opening). Sc in the next 20 sts. Ch 40 (this forms your second handle loop). Sk the last 20 sts. Join with a sl st to the first sc. (40 sc + 80 ch)
- Rnd 41 (Strengthening Handles): Ch 1, sc in each of the 10 sc stitches (front segment). Work 40 sc around the ch-40 handle loop (crochet directly into the chain, not into individual chain stitches, for a denser handle). Sc in each of the 20 sc stitches (back segment). Work 40 sc around the ch-40 handle loop. Join with a sl st to the first sc. (120 sc)
- Rnd 42 (Finishing Top Edge): Ch 1, sc in each st around. Join with a sl st to the first sc. (120 sc) This final round of single crochet adds a nice, firm finish to the handles and top edge.
- FO and weave in all loose ends securely with your yarn needle. Give your bag a gentle tug and shape to set the stitches.
Pro Tips
Enhance your crocheting experience and get the best results with these expert tips:
- Yarn Choice Matters: While cotton is recommended for its strength and washability, you can experiment with other fibers. However, be aware that acrylic may stretch more when holding heavy items, and wool might felt if not carefully washed.
- Don't Skip the Gauge Swatch (Especially for the Base): While mesh is forgiving, ensuring your base is the correct size will set your bag up for success. A few stitches off can make a big difference in the final diameter.
- Use a Stitch Marker: When working in the round, especially with join-and-chain methods, a stitch marker in the first stitch of the round can save you from constantly recounting and ensures you join in the correct place every time.
- Blocking for Perfection: While not strictly necessary for a mesh bag, a light wet block can help even out your stitches, relax the fabric, and give your bag a more professional, finished look.
- Customize Your Handles: If you prefer longer or shorter handles, simply adjust the number of chains in Rnd 40. For wider handles, add an extra round or two of single crochet around the chain loops in Rnd 41.
- Add a Pop of Color: Don't be afraid to change colors! A contrasting color for the base, handles, or even a few stripes in the mesh can add a unique touch to your bag.
- Secure Those Ends: Cotton yarn can sometimes be slippery. Take extra time to weave in your ends securely using a yarn needle, going in multiple directions to prevent unraveling.
Frequently Asked Questions
Can I use a different yarn weight?
Yes, absolutely! You can certainly use a different yarn weight, but be aware that it will significantly alter the finished size and drape of your bag. If you use a thicker yarn (e.g., bulky weight), your bag will be larger and perhaps sturdier; you'll likely need a larger hook size. If you use a thinner yarn (e.g., sport or DK weight), your bag will be smaller and more delicate, requiring a smaller hook. Always make sure to check your gauge with your chosen yarn and hook to estimate the final size, and adjust the number of base and body rounds as needed.
How do I make the bag larger or smaller?
Adjusting the size of your bag is quite straightforward! To make the bag larger, continue increasing the base for a few more rounds before starting the mesh (e.g., Rnd 7 could be: Ch 2, *hdc in next 5 sts, 2 hdc in next st* rep around for 70 hdc). For a smaller bag, simply stop increasing the base earlier. To adjust the height, add or subtract rounds from the mesh body section (Rnds 10-37). If you alter the circumference, remember to adjust your handle chain length accordingly, as the number of skipped stitches for the handle opening will also change.
Is this pattern suitable for beginners?
Yes, this pattern is absolutely suitable for confident beginners! While it involves working in the round and combining a few basic stitches, the mesh repeat is very simple and repetitive, making it easy to learn and memorize. It's a fantastic project for practicing chaining, single crochet, double crochet, and joining rounds. The step-by-step instructions break down each section, so you can confidently follow along and build your skills with a practical and beautiful finished item.
Congratulations on completing your beautiful Crochet Mesh Bag! You've not only created a practical and stylish accessory, but you've also contributed to a more sustainable lifestyle. We hope you enjoyed every stitch of this project. Don't forget to share your finished bag with us and your fellow crocheters – we love to see your unique creations! Happy crocheting, and may your new bag serve you well on many adventures to come.