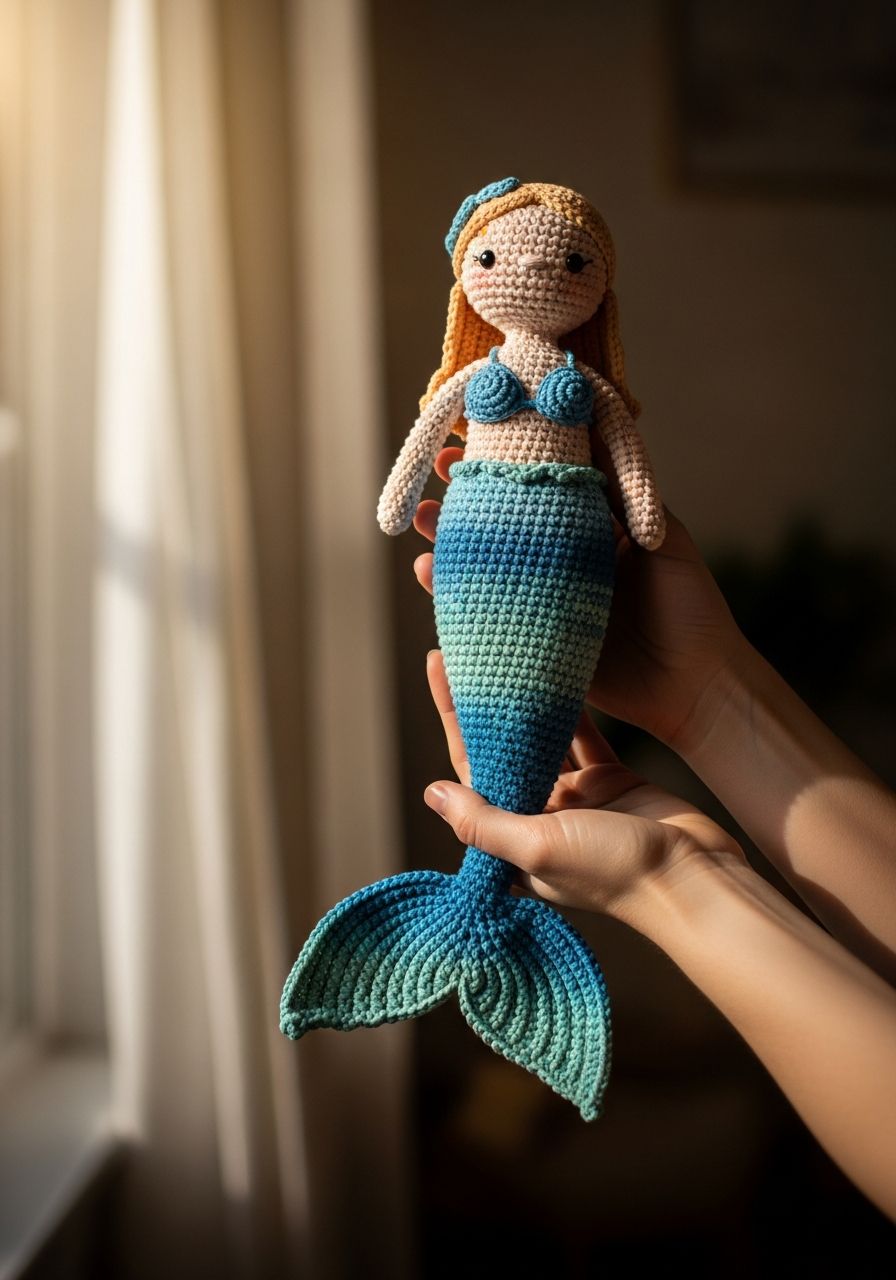
Imagine the gentle lapping of waves, the shimmer of iridescent scales, and the enchanting melodies from beneath the sea. Now, imagine bringing that magic to life with your own hands! This free pattern for a Crochet Mermaid Amigurumi isn't just about creating a toy; it's about crafting a beloved companion, a story starter, and a tangible piece of oceanic wonder. Get ready to hook your way to an adorable mermaid friend that will capture hearts and ignite imaginations!
Welcome, fellow crochet enthusiasts, to a pattern that promises whimsy and delight! Mermaids hold a special place in our hearts, symbolizing beauty, mystery, and the allure of the unknown. This pattern allows you to create your very own miniature guardian of the deep, perfect for gifting to a special child, adding a touch of fantasy to your home decor, or simply enjoying the meditative process of bringing an amigurumi to life. With clear instructions and helpful tips, even those new to amigurumi can confidently embark on this charming adventure.
Why You'll Love This Pattern
- Beginner-Friendly Elements: While some shaping is involved, the core stitches are simple, making it accessible for adventurous beginners.
- Customizable Fun: Experiment with different yarn colors for hair, tail, and top to create a truly unique mermaid.
- Perfect for Gifting: A handmade mermaid makes an incredibly thoughtful and cherished present for birthdays, baby showers, or just because.
- Portable Project: This amigurumi is small enough to be a great take-along project for crafting on the go.
- Adorable Result: You'll end up with a super cute, huggable mermaid doll that sparks joy and imagination.
- Skill Building: Practice your magic ring, increases, decreases, and seamless joining techniques.
Materials Needed
- Worsted Weight (Aran/10-ply) Yarn in:
- Skin Tone (e.g., beige, peach) - approx. 50g
- Tail Color (e.g., teal, purple) - approx. 60g
- Bikini Top Color (e.g., pink, white) - approx. 10g
- Hair Color (e.g., yellow, brown, red) - approx. 30g
- 2.5mm or 3.0mm Crochet Hook (choose based on your tension and desired fabric density)
- 6mm or 8mm Safety Eyes (or embroidery floss for embroidered eyes)
- Polyester Fiberfill for stuffing
- Tapestry Needle
- Stitch Markers
- Scissors
- Optional: Pink blush or embroidery floss for cheeks
Gauge & Sizing
Gauge is not strictly critical for amigurumi, but maintaining a consistent, tight tension is important to prevent stuffing from showing through. If your stitches are too loose, go down a hook size. When completed with worsted weight yarn and a 2.5mm hook, your mermaid should stand approximately 8-9 inches (20-23 cm) tall from head to tail tip.
Abbreviations
- ch: chain
- sc: single crochet
- hdc: half double crochet
- dc: double crochet
- sl st: slip stitch
- inc: increase (2 sc in one stitch)
- dec: decrease (sc2tog - single crochet 2 stitches together)
- mr: magic ring / magic circle
- st(s): stitch(es)
- rnd(s): round(s)
- fo: fasten off
- blo: back loop only
Step-by-Step Pattern
Work in continuous rounds unless otherwise specified. Use a stitch marker to mark the first stitch of each round.
Head (Skin Tone Yarn)
- Rnd 1: 6 sc in a mr (6)
- Rnd 2: [Inc] x6 (12)
- Rnd 3: [Sc, inc] x6 (18)
- Rnd 4: [Sc in next 2 sts, inc] x6 (24)
- Rnd 5: [Sc in next 3 sts, inc] x6 (30)
- Rnd 6-10: Sc in each st around (30) (5 rounds)
- Rnd 11: [Sc in next 3 sts, dec] x6 (24)
- Rnd 12: [Sc in next 2 sts, dec] x6 (18)
- Insert safety eyes between Rnd 9 and 10, approx. 5-6 stitches apart. Begin stuffing the head firmly.
- Rnd 13: [Sc, dec] x6 (12)
- Rnd 14: [Dec] x6 (6)
- Fasten off, weave in end, and finish stuffing.
Body (Skin Tone Yarn)
The body is worked separately and then joined to the tail.
- Rnd 1: 6 sc in a mr (6)
- Rnd 2: [Inc] x6 (12)
- Rnd 3: [Sc, inc] x6 (18)
- Rnd 4: [Sc in next 2 sts, inc] x6 (24)
- Rnd 5-10: Sc in each st around (24) (6 rounds)
- Rnd 11: [Sc in next 2 sts, dec] x6 (18)
- Fasten off, leave a long tail for sewing. Stuff lightly.
Tail (Tail Color Yarn)
- Rnd 1: 6 sc in a mr (6)
- Rnd 2: [Inc] x6 (12)
- Rnd 3: [Sc, inc] x6 (18)
- Rnd 4: Sc in each st around (18)
- Rnd 5: [Sc in next 2 sts, inc] x6 (24)
- Rnd 6-8: Sc in each st around (24) (3 rounds)
- Rnd 9: [Sc in next 2 sts, dec] x6 (18)
- Rnd 10-12: Sc in each st around (18) (3 rounds)
- Rnd 13: [Sc in next 7 sts, dec] x2 (16)
- Rnd 14-16: Sc in each st around (16) (3 rounds)
- Rnd 17: [Sc in next 6 sts, dec] x2 (14)
- Rnd 18-20: Sc in each st around (14) (3 rounds)
- Rnd 21: [Sc in next 5 sts, dec] x2 (12)
- Rnd 22: Sc in each st around (12)
- Stuff the tail firmly.
- Rnd 23: [Dec] x6 (6)
- Do not fasten off. Continue directly to Fin.
Fin (Continue with Tail Color Yarn)
- Ch 1, turn. Work the fin in rows.
- Row 1: 2 sc in first st, sc in next 2 sts, 2 sc in next st, ch 1, turn (6)
- Row 2: 2 sc in first st, sc in next 4 sts, 2 sc in last st, ch 1, turn (8)
- Row 3: Sc in each st across (8)
- Row 4: Sc in each st across (8)
- Row 5: Dec, sc in next 4 sts, dec, ch 1, turn (6)
- Row 6: Sc in each st across (6)
- Row 7: Dec, sc in next 2 sts, dec, ch 1, turn (4)
- Row 8: [Dec] x2 (2)
- Fasten off, weave in ends.
Bikini Top (Bikini Top Color Yarn)
Make two cups.
- Cup 1: Ch 5.
- Row 1: Sc in 2nd ch from hook, hdc in next ch, dc in next ch, (3 dc) in last ch. Working along the other side of the chain: dc in next ch, hdc in next ch, sc in last ch. Sl st to join. Fasten off. (9 sts)
- Cup 2: Repeat for second cup. Do not fasten off after the second cup. Instead, sl st into the first stitch of the first cup to join them. Leave a long tail for sewing.
Arms (Make 2 - Skin Tone Yarn)
- Rnd 1: 6 sc in a mr (6)
- Rnd 2-10: Sc in each st around (6) (9 rounds)
- Stuff the very end of the arm lightly. Flatten the opening and sc across to close (3 sc).
- Fasten off, leave a long tail for sewing.
Hair Cap (Hair Color Yarn)
- Rnd 1: 6 sc in a mr (6)
- Rnd 2: [Inc] x6 (12)
- Rnd 3: [Sc, inc] x6 (18)
- Rnd 4: [Sc in next 2 sts, inc] x6 (24)
- Rnd 5: [Sc in next 3 sts, inc] x6 (30)
- Rnd 6-8: Sc in each st around (30) (3 rounds)
- Fasten off, leave a long tail for sewing.
Assembly
- Attach Head to Body: Using the tail from the Body, sew the opening of the body to the bottom of the head. Stuff the body firmly as you sew.
- Attach Body to Tail: Using the tail from the Body (if you left one), or a new piece of skin tone yarn, sew the bottom of the body to the top of the tail, making sure the fin faces forward. Stuff firmly.
- Attach Hair Cap: Position the hair cap on the head and sew it securely around.
- Add Hair Strands (Optional): Cut strands of hair yarn about 8-10 inches long. Fold a strand in half, insert your hook into a stitch on the hair cap, pull through the loop, then pull the two ends of the yarn through the loop and tighten to form a knot. Repeat this process, adding strands as densely as desired. You can also embroider a fringe.
- Attach Arms: Sew the flattened top of each arm to the sides of the body, just below the neck.
- Attach Bikini Top: Position the joined bikini cups on the front of the body and sew them in place.
- Embroider Cheeks/Mouth: If desired, use a small amount of pink blush on the cheeks or embroider a small mouth with pink embroidery floss.
Pro Tips
- Stitch Markers are Your Best Friend: Especially when working in continuous rounds, a stitch marker will prevent you from losing your place.
- Stuffing Technique: Stuff firmly and evenly, using small pieces of fiberfill, especially for smaller parts like the arms. This helps maintain shape and prevents a lumpy appearance.
- Invisible Decreases: For a cleaner finish in amigurumi, use invisible decreases (insert hook into front loop of first stitch, then front loop of second stitch, yarn over, pull through both loops, yarn over, pull through remaining two loops).
- Yarn Choice Matters: While worsted weight is recommended, you can use any yarn weight with an appropriately sized hook. Just remember your mermaid's size will change.
- Embroidered Eyes for Babies: If making for a very young child, embroider the eyes instead of using safety eyes for complete safety.
- Weave in Ends as You Go: This makes for a much neater finished product and saves time at the end.
Frequently Asked Questions
Can I use a different yarn weight for this pattern?
Yes, absolutely! You can use any yarn weight you prefer. Just be sure to adjust your hook size accordingly. A general rule is to use a hook size 1-2mm smaller than what is recommended on the yarn label to achieve tight stitches, which is ideal for amigurumi to prevent stuffing from showing through. Keep in mind that using a different yarn weight will alter the final size of your mermaid.
How can I customize my mermaid's hair?
There are many ways to make your mermaid's hair unique! Instead of just attaching strands, you can braid them, tie them into pigtails, or even create a simple bun. You can also cut the strands to different lengths to create layers. For a different texture, try using a brushed acrylic yarn or even a fine, fluffy mohair for a softer look.
Is this pattern suitable for complete beginners?
While this pattern uses fundamental crochet stitches (single crochet, slip stitch, chain), it does involve working in continuous rounds, increasing, and decreasing to create shape, and assembly. If you're a complete beginner, we recommend practicing these basic techniques first. However, with patience and attention to the stitch counts, an adventurous beginner can certainly complete this charming mermaid!
You've now completed your very own magical mermaid! We hope you enjoyed every stitch of this enchanting project. May your handmade mermaid bring joy and a splash of ocean wonder wherever she goes. Don't forget to share your finished creation with us!