Imagine slipping into leggings that feel like a second skin, perfectly tailored to your body, infused with the warmth of your own handcrafted love. Forget ill-fitting, mass-produced garments; today, you're going to unlock the secret to creating your very own, exceptionally comfortable, and undeniably stylish crochet leggings! This isn't just a pattern; it's an invitation to embrace ultimate comfort and showcase your unique style, one stitch at a time. Get ready to crochet a piece that will become your new favorite wardrobe staple!
Welcome, fellow yarn enthusiasts, to a guide that will revolutionize your comfort wear. Crocheting garments can seem daunting, but with this detailed, step-by-step pattern, you'll find that making your own custom-fit leggings is not only achievable but incredibly rewarding. Whether you're lounging at home, running errands, or simply seeking that extra layer of warmth and coziness, these leggings are designed to be versatile, comfortable, and uniquely yours. Let's dive into the world of wearable crochet!
Why You'll Love This Pattern
- Custom Fit: Say goodbye to awkward gaps or tight spots. This pattern includes guidance on how to adjust for your specific measurements, ensuring a perfect, flattering fit.
- Unbeatable Comfort: Choose your favorite soft, stretchy yarn, and you'll create leggings that feel amazing against your skin, providing warmth without bulk.
- Unique Style Statement: Stand out from the crowd with a handmade garment that showcases your creativity and skill. You can choose any color or fiber blend to match your personal aesthetic.
- Sustainable Fashion: Embrace slow fashion by crafting your own clothes, reducing waste, and knowing exactly what goes into your wardrobe.
- Skill Building: This pattern introduces techniques like working in the round, increasing and decreasing, and creating a comfortable waistband, perfect for expanding your crochet repertoire.
- Versatility: Wear them as loungewear, yoga pants (depending on yarn choice), an extra layer under skirts and dresses, or even as cozy sleepwear.
Materials Needed
- Yarn: Approximately 1000-1400 yards of DK (light worsted) weight yarn (#3), preferably a blend with some elasticity (e.g., acrylic/wool blend, cotton/bamboo blend). Amount will vary based on size and desired length. (Example: I used 4 skeins of Lion Brand Comfy Cotton Blend for a size S/M.)
- Crochet Hook: 4.0 mm (G/6) or size needed to obtain gauge.
- Elastic: 1-inch wide elastic, cut to your waist measurement minus 2 inches, plus 1 inch for overlap.
- Stitch Markers: Essential for marking rounds and specific stitches.
- Tapestry Needle: For weaving in ends and seaming the waistband elastic.
- Scissors: For cutting yarn.
- Measuring Tape: Crucial for checking gauge and measurements.
Gauge & Sizing
Gauge is absolutely critical for garments! Taking the time to check your gauge will ensure your leggings fit as intended. If your gauge is off, your leggings will be too big or too small.
Gauge Swatch: With your 4.0 mm hook, chain 22. Work in Half Double Crochet (hdc) for 20 rows. Your swatch should measure 4 inches by 4 inches (10 cm x 10 cm). If your swatch is too small, try a larger hook. If it's too large, try a smaller hook.
Sizing Information: This pattern is written for a Women's Size Small/Medium (S/M), fitting hips approximately 36-38 inches. Instructions are given for how to adjust stitch counts for larger or smaller sizes, but remember to adjust your starting chain and increase rounds accordingly. Always measure your work against your body as you go!
Abbreviations
- ch: Chain
- sl st: Slip Stitch
- sc: Single Crochet
- hdc: Half Double Crochet
- dc: Double Crochet
- inc: Increase (work 2 stitches into the same stitch)
- dec: Decrease (work 2 stitches together)
- FLO: Front Loop Only
- BLO: Back Loop Only
- st(s): Stitch(es)
- rnd(s): Round(s)
- PM: Place Marker
Step-by-Step Pattern
This pattern is worked from the top down, starting with the waistband, then the body, separating for the legs, and finishing each leg individually.
The Waistband
- Foundation Chain: Ch 86 (or a multiple of 2 that fits snugly around your waist, stretching slightly). Join with a sl st to the first ch, being careful not to twist.
- Rnd 1: Ch 1, sc in each ch around. Join with a sl st to the first sc. (86 sc)
- Rnds 2-8: Ch 1, sc in BLO of each sc around. Join with a sl st to the first sc. (86 sc) This creates a ribbed waistband. Adjust the number of rounds for your desired waistband height.
The Body
- Rnd 9: Ch 2 (does not count as a st), hdc in each sc around, working into the top of the sc from Rnd 8. Join with a sl st to the first hdc. (86 hdc)
- Rnd 10: Ch 2, hdc in each hdc around. Join with a sl st. (86 hdc)
- Rnd 11 (Increase Rnd): Ch 2, hdc in first 4 sts, inc in next st. *Hdc in next 9 sts, inc in next st.* Repeat from * to * 7 more times. Hdc in last 4 sts. Join with a sl st. (95 hdc) Place markers at the side seams (approx. midway between front/back increases) to help keep track.
- Rnds 12-14: Ch 2, hdc in each hdc around. Join with a sl st. (95 hdc)
- Rnd 15 (Increase Rnd): Ch 2, hdc in first 5 sts, inc in next st. *Hdc in next 9 sts, inc in next st.* Repeat from * to * 7 more times. Hdc in last 5 sts. Join with a sl st. (104 hdc)
- Rnds 16-18: Ch 2, hdc in each hdc around. Join with a sl st. (104 hdc)
- Rnd 19 (Increase Rnd): Ch 2, hdc in first 6 sts, inc in next st. *Hdc in next 9 sts, inc in next st.* Repeat from * to * 7 more times. Hdc in last 6 sts. Join with a sl st. (113 hdc)
- Rnds 20-22: Ch 2, hdc in each hdc around. Join with a sl st. (113 hdc)
- Rnd 23 (Increase Rnd): Ch 2, hdc in first 7 sts, inc in next st. *Hdc in next 9 sts, inc in next st.* Repeat from * to * 7 more times. Hdc in last 7 sts. Join with a sl st. (122 hdc)
- Rnds 24-28: Ch 2, hdc in each hdc around. Join with a sl st. (122 hdc) Continue increasing every 3-4 rounds as needed until the body section comfortably fits around your hips. End on a round with no increases. Your final stitch count should be even. For S/M, 122 hdc should be good for hip circumference.
Leg Separation
- Rnd 29 (Crotch Ch): Ch 2, hdc in next 61 sts (half of the total stitches for S/M). Ch 4 (this creates the crotch space – adjust this chain for a wider crotch if needed). Skip the remaining 61 sts. Join with a sl st to the first hdc of the round, forming the first leg opening. (61 hdc + 4 ch = 65 sts for Leg 1)
Leg 1
- Rnd 1: Ch 2, hdc in each of the 61 hdc sts. Work 1 hdc into each of the 4 ch sts of the crotch chain. Join with a sl st to the first hdc. (65 hdc)
- Rnds 2-5: Ch 2, hdc in each hdc around. Join with a sl st. (65 hdc)
- Rnd 6 (Decrease Rnd - optional for shaping calf): Ch 2, hdc in first 30 sts, hdc dec, hdc in remaining 33 sts. Join with a sl st. (64 hdc) Repeat a decrease round every 10-15 rounds as needed to shape the leg to your ankle, trying on as you go.
- Continue Straight or Decreasing: Work even hdc rounds, or incorporate decrease rounds periodically (e.g., hdc dec every 30 sts, or 2 decs per round) until your leg reaches your desired length and circumference at the ankle. For S/M, aim for approx. 50-55 hdc around the ankle.
- Ankle Ribbing (Optional): Once desired leg length is reached, ch 1, sc in BLO of each st around for 5-7 rounds. Join with a sl st. Fasten off and weave in ends.
Leg 2
- Reattach yarn with a sl st to the first skipped hdc st from Rnd 29 of the body section (this is where you skipped stitches to form Leg 1). Make sure you are joining on the 'inside' of the crotch area.
- Rnd 1: Ch 2, hdc in each of the 61 skipped hdc sts. Working into the underside of the 4 crotch ch sts, work 1 hdc into each ch st. Join with a sl st to the first hdc. (65 hdc)
- Repeat steps 2-5 of Leg 1 for the second leg.
- Fasten off and weave in ends.
Finishing
- Waistband Elastic Insertion: Using your tapestry needle, weave the 1-inch elastic through the top edge of your waistband (the ch 1, sc row). Overlap the ends of the elastic by 1 inch and securely sew them together.
- Once the elastic is sewn, stretch the waistband gently to distribute the fabric evenly around the elastic.
- Weave in any remaining loose ends securely.
- Blocking (Recommended): Gently wash your leggings according to yarn care instructions. Pin them to your desired measurements on a flat surface or use a garment steamer to shape and relax the stitches. This will greatly improve the drape and fit.
Pro Tips for Perfect Crochet Leggings
- Yarn Choice Matters: For comfortable leggings, choose a yarn with good drape and some natural elasticity. Acrylic, wool blends, or cotton blends with a bit of spandex are excellent choices. Avoid stiff, non-stretchy fibers.
- Try On as You Go: This is crucial for garments! Periodically try on your work, especially after increase sections and before separating for legs, to ensure a good fit.
- Adjust for Length: The pattern can be easily adjusted for petite or tall individuals by adding or subtracting rounds in the leg sections.
- Seamless Look: Always join your rounds with a slip stitch and start the next round with a chain to maintain a neat, continuous look.
- Read Ahead: Always read through the entire pattern before you start to familiarize yourself with the construction and potential challenges.
- Invisible Decreases: For a smoother decrease, use an invisible hdc dec: yo, insert hook into next st, yo, pull up a loop (3 loops on hook), insert hook into next st, yo, pull up a loop (5 loops on hook), yo and pull through all 5 loops.
Frequently Asked Questions
Can I make these leggings in a different size or with a different yarn weight?
Absolutely! This pattern is a great starting point. To adjust for size, you'll need to modify the initial chain length for the waistband (ensure it's a multiple of your increase repeat, if applicable, and fits your waist) and adjust the number of increase rounds in the body section to match your hip circumference. For a different yarn weight, you MUST make a new gauge swatch with your chosen yarn and hook. Then, calculate your stitch count based on your new gauge to achieve the desired measurements. You might need to adjust your hook size accordingly.
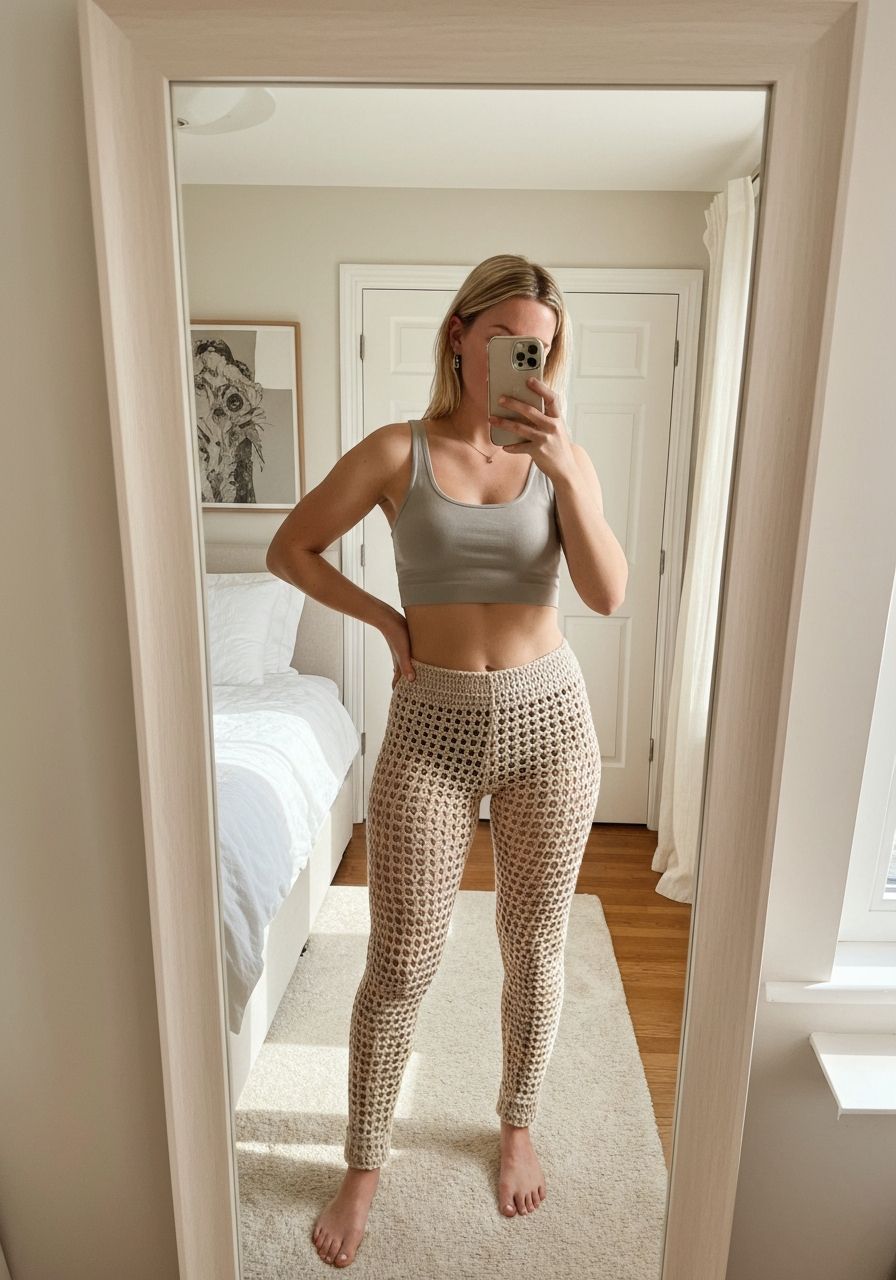
Will these crochet leggings be see-through?
The transparency of your crochet leggings largely depends on your yarn choice, hook size, and stitch density. Using a tighter stitch (like hdc) and a slightly smaller hook than recommended for your yarn can create a denser fabric. Choosing a non-variegated, medium-to-dark colored yarn also helps. If transparency is a major concern, consider wearing them over another pair of leggings or a slip, or experimenting with a lining fabric.
How durable are crochet leggings, and how should I care for them?
The durability of your crochet leggings will depend heavily on the fiber content of your yarn and how you care for them. Yarns with good resilience (like wool or acrylic) tend to hold up well. To maximize durability, always follow the care instructions for your specific yarn. Generally, hand washing in cold water and laying flat to dry is recommended for most crochet garments to prevent stretching, shrinking, or damage. Avoid harsh detergents or machine drying, which can damage the fibers and alter the shape.
And there you have it – your very own, custom-made crochet leggings! This project is more than just creating a piece of clothing; it's about investing time in yourself, learning new skills, and ultimately, wrapping yourself in handmade comfort. We can't wait to see your unique creations. Happy crocheting!