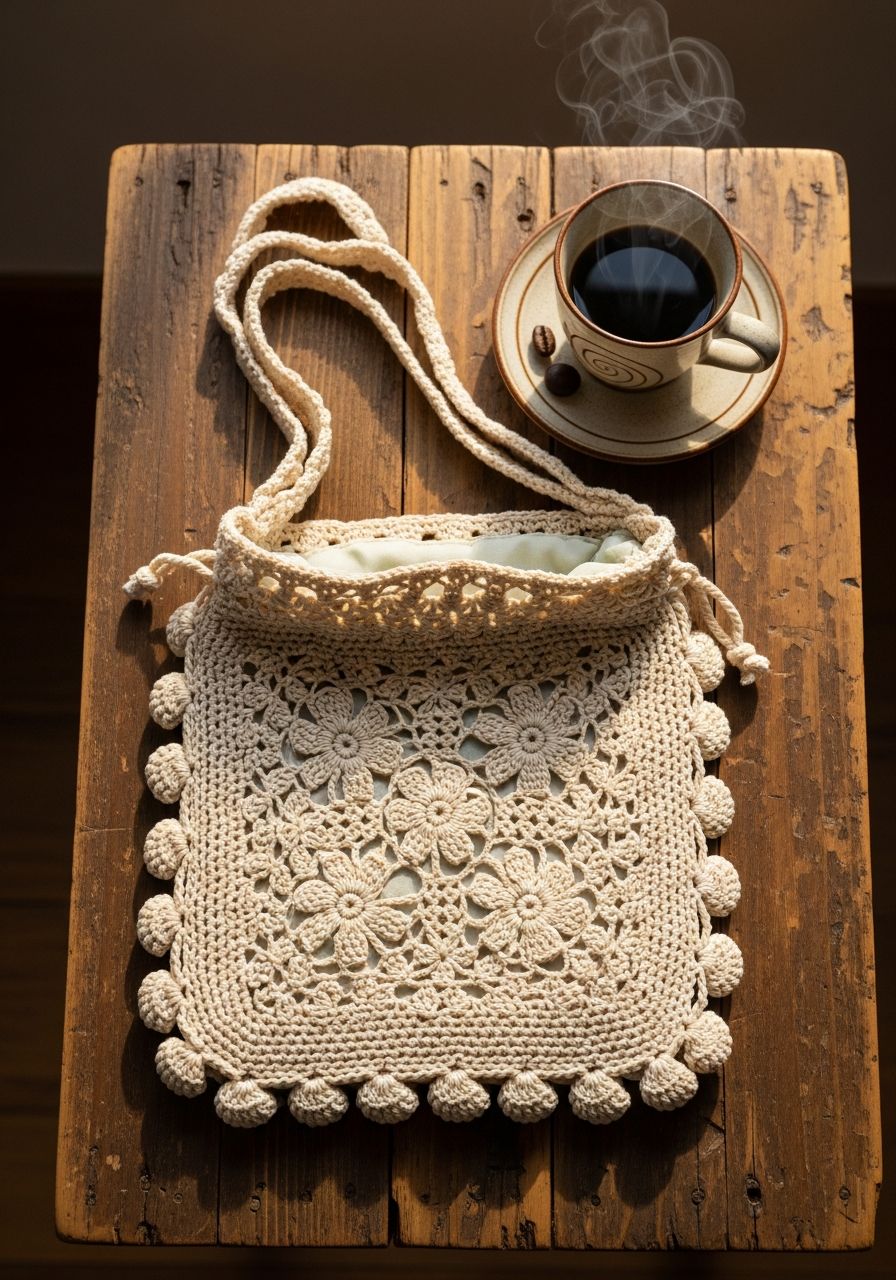
Imagine feeling the gentle breeze on a warm day, your handcrafted Crochet Lace Bag swinging lightly by your side, a delicate accessory that speaks volumes about your style. This isn't just a bag; it's a whisper of bohemian charm, a touch of elegance, and a testament to your creative spirit. Get ready to fall in love with every stitch as you transform simple yarn into a stunning, airy piece perfect for market strolls, beach days, or simply adding a touch of handmade beauty to your everyday ensemble. You’re about to embark on a delightful journey that culminates in a truly unique, personal treasure!
Welcome, fellow yarn enthusiasts, to a truly enchanting project! This free crochet pattern and guide will walk you through creating a beautiful lace bag that's both practical and exquisitely delicate. Whether you're new to lace work or a seasoned pro looking for a satisfying new project, this pattern is designed to be clear, engaging, and rewarding. We'll cover everything from selecting the perfect yarn to mastering the simple lace repeat that gives this bag its signature charm. Let's gather our supplies and crochet something beautiful together!
Why You'll Love This Pattern
- Elegant & Versatile: The delicate lace design makes this bag perfect for a variety of occasions, from casual outings to more dressed-up events. It adds a touch of sophistication without being overly formal.
- Beginner-Friendly Lace: While it looks intricate, the lace pattern uses basic stitches and a simple repeat, making it an excellent project for those new to lace crochet.
- Customizable: Easily adjust the length of the strap or add a lining to personalize your bag even further.
- Quick to Make: Using a medium-weight yarn, this bag works up relatively quickly, making it a satisfying project for instant gratification.
- Perfect Gift: Handmade gifts are always cherished. This lace bag makes a thoughtful and beautiful present for friends and family.
Materials Needed
- Approximately 200-250 yards (180-230 meters) of DK weight (Category 3) cotton yarn. Cotton provides excellent stitch definition and drape for lace. (e.g., Lion Brand 24/7 Cotton, Paintbox Yarns Cotton DK)
- 4.0 mm (G/6) crochet hook, or size needed to obtain gauge.
- Yarn needle for weaving in ends.
- Scissors.
- Optional: Fabric lining and sewing needle/thread for added durability and to prevent small items from falling through lace.
Gauge & Sizing
Gauge: 16 dc and 8 rows = 4 inches (10 cm) in double crochet stitch.
It's crucial to check your gauge to ensure your bag turns out the intended size. If your gauge swatch is smaller, use a larger hook; if it's larger, use a smaller hook.
Finished Bag Dimensions (approximate):
- Base: 10 inches (25 cm) long x 3 inches (7.5 cm) wide
- Height: 12 inches (30 cm)
- Strap Length: 40 inches (100 cm) (customizable)
Abbreviations
- ch: chain
- sl st: slip stitch
- sc: single crochet
- hdc: half double crochet
- dc: double crochet
- sk: skip
- st(s): stitch(es)
- sp: space
- inc: increase (work 2 stitches into the same stitch)
- Fsc: Foundation single crochet (optional for base)
- V-st: V-stitch (dc, ch 1, dc in the same stitch/space)
Step-by-Step Pattern
Base of the Bag
The base is worked in continuous rounds, then joined for the body.
- Ch 29.
- Round 1: Sc in 2nd ch from hook, sc in next 26 chs, 3 sc in last ch. Now working on the other side of the chain: sc in next 26 chs, 2 sc in last ch. Join with sl st to first sc. (58 sc)
- Round 2: Ch 1 (does not count as st here and throughout), sc in first st, sc in next 26 sts, 3 sc in next st, sc in next 26 sts, 3 sc in next st. Join with sl st to first sc. (62 sc)
- Round 3: Ch 1, sc in first 2 sts, sc in next 26 sts, (sc, ch 1, sc) in next st, sc in next 2 sts, (sc, ch 1, sc) in next st, sc in next 26 sts, (sc, ch 1, sc) in next st, sc in next 2 sts, (sc, ch 1, sc) in next st. Join with sl st to first sc. (66 sc, 4 ch-1 sps) This creates a slightly more defined oval.
- Round 4: Ch 1, sc in each st around, working 1 sc into each ch-1 sp. Join with sl st to first sc. (70 sc)
Lace Body
The lace pattern is worked in joined rounds. You will now work with a stitch count that is a multiple of 4.
- Round 5: Ch 3 (counts as first dc), dc in next st. *Ch 1, sk 2 sts, V-st (dc, ch 1, dc) in next st, ch 1, sk 2 sts, dc in next st.* Repeat from * to * around. Ch 1, sk 2 sts, V-st in next st, ch 1, sk 2 sts. Join with sl st to top of beg ch 3. (10 V-sts, 10 dc, 20 ch-1 sps) Note: If your base stitch count isn't exactly 70, you may need to adjust the number of skipped stitches slightly in the first repeat of this round to get to a multiple of 7 stitches per repeat to accommodate the pattern (dc, ch1, sk2, V-st, ch1, sk2, dc) which is 7 stitches per repeat. For 70 sts, that's 10 repeats.
- Round 6: Ch 3 (counts as first dc), dc in next ch-1 sp. *Ch 1, V-st in ch-1 sp of next V-st, ch 1, dc in next ch-1 sp, dc in next dc.* Repeat from * to * around, ending with dc in next ch-1 sp. Join with sl st to top of beg ch 3. (10 V-sts, 20 dc, 20 ch-1 sps)
- Rounds 7-26 (or until desired height): Repeat Round 6.
Top Edging
This section provides stability and a clean finish to the bag opening.
- Round 27: Ch 1, sc in each dc and each ch-1 sp around. Join with sl st to first sc. (70 sc)
- Round 28: Ch 1, hdc in each sc around. Join with sl st to first hdc. (70 hdc)
- Round 29: Ch 1, sc in each hdc around. Join with sl st to first sc. (70 sc)
- Round 30: Ch 1, hdc in each sc around. Join with sl st to first hdc. Fasten off. (70 hdc)
Strap
This creates a sturdy, comfortable strap for your bag.
- Ch 101 (or desired length for your strap).
- Row 1: Sc in 2nd ch from hook and in each ch across. (100 sc)
- Row 2: Ch 1, turn. Sc in each sc across. (100 sc)
- Rows 3-6: Repeat Row 2. Fasten off, leaving a long tail for sewing.
- Attach the strap: Lay your bag flat. Position one end of the strap to the inside top edge of the bag, roughly 3-4 inches from the side seam (or where the rounds joined). Use your yarn needle and the long tail to securely sew the strap end to the bag using whip stitch or mattress stitch. Repeat for the other side of the strap, ensuring it is not twisted.
Pro Tips
- Weave in ends as you go: Especially with lace patterns, weaving in tails after each color change (if any) or section can save a lot of time and frustration at the end.
- Blocking is key: For lace projects, blocking significantly enhances the drape, opens up the lace pattern, and helps the bag hold its shape. Gently wet your finished bag, shape it to the desired dimensions, and let it air dry.
- Consider a lining: A simple fabric lining will prevent small items from slipping through the lace holes and add extra durability to your bag. You can sew a basic pouch shape and hand-stitch it to the inside of the bag's top edging.
- Yarn choice matters: While cotton is recommended for its stitch definition and durability, linen or a cotton blend can also create beautiful results with a similar drape. Avoid overly fuzzy yarns as they can obscure the lace pattern.
- Adjusting strap length: Before fastening off the strap, hold it up to yourself to determine your preferred length. Add or subtract chains in Row 1 as needed.
Frequently Asked Questions
How do I make my bag bigger or smaller?
To make the bag wider, you'll need to adjust the starting chain for the base. For every 2 stitches you add to the starting chain (and thus to your initial round), you'll add approximately 1 inch to the bag's circumference. Ensure your final stitch count for the base remains a multiple of 7 for the lace pattern. To adjust the height, simply add or subtract repeats of the Lace Body (Round 6) until you reach your desired height.
Can I use a different type of yarn?
Yes, you can, but be mindful of the yarn weight and fiber content. If you use a heavier weight yarn (e.g., worsted weight), your bag will be larger and might require a larger hook. Lighter weight yarns (e.g., fingering weight) will result in a smaller bag. The lace pattern looks best with yarns that have good stitch definition, like cotton, linen, or bamboo. Acrylic can work but may not have the same drape. Always make a gauge swatch if changing yarn to ensure your bag's dimensions are what you expect.
My lace pattern isn't lining up correctly, what should I do?
Lace patterns often require precise stitch counts. Double-check your stitch count at the end of the base rounds and at the start of the lace body. Ensure you are consistently skipping the correct number of stitches and placing your V-stitches in the designated spaces. Sometimes, a simple stitch marker placed in the first stitch of each round can help you keep track. If you find yourself consistently off, unraveling back to the last correctly aligned round and recounting can save you frustration.
Congratulations, you've now completed your stunning Crochet Lace Bag! Wear it with pride, knowing that every loop and pull of yarn was a step in creating something truly unique and beautiful with your own hands. This bag is more than just an accessory; it's a statement of your creativity and a testament to the joy of handmade craftsmanship. We hope you enjoyed this journey and will cherish your new bag for years to come!