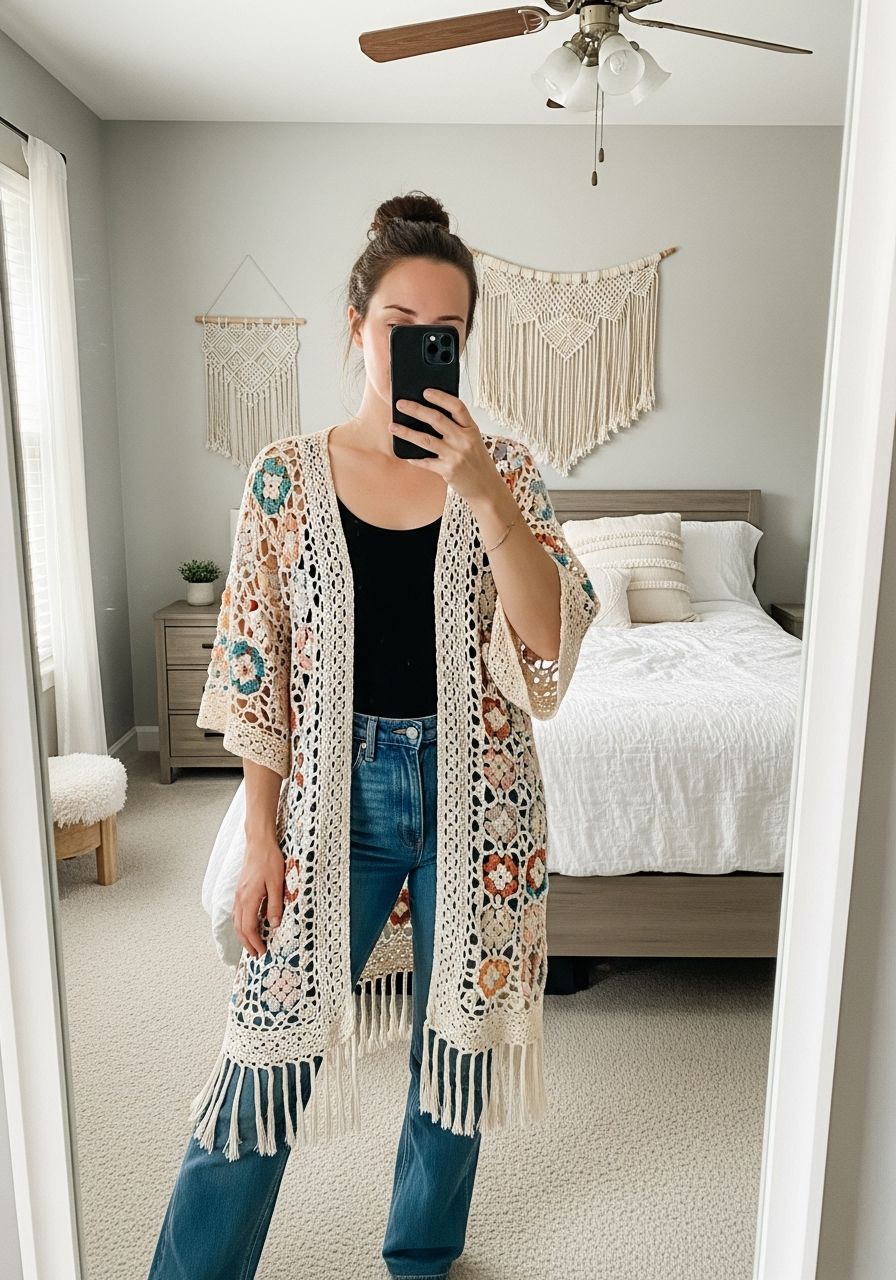
Imagine drifting through your day wrapped in effortless elegance, a garment that feels like a gentle hug and looks like a piece of wearable art. That's the magic of a handmade Crochet Kimono – a versatile, chic layering piece that elevates any outfit, from casual jeans to a sophisticated dress. Get ready to transform your yarn stash into your new favorite wardrobe staple with our free pattern!
Welcome, fellow yarn enthusiasts! Today, we're diving into the delightful world of wearable crochet with a project that's as stylish as it is simple: a beautifully draped crochet kimono. This pattern is designed to be accessible for crocheters of all skill levels, especially those new to garment making. With its straightforward construction, primarily using half double crochet stitches, you'll be amazed at how quickly you can create a piece that looks incredibly sophisticated.
Why You'll Love This Pattern
- Effortlessly Chic: A kimono instantly adds a touch of bohemian flair and elegance to any ensemble, making it perfect for layering over tank tops, dresses, or even swimwear.
- Beginner-Friendly: Constructed from simple rectangles, this pattern avoids complex shaping, making it ideal for those new to garment crochet. If you can hdc, you can make this!
- Customizable: Easily adjust the length, width, and sleeve dimensions to create a kimono that perfectly fits your unique style and body.
- Versatile Wear: Wear it casually, dress it up, or use it as a stylish cover-up. Its open front and relaxed fit make it suitable for various occasions and seasons.
- Quick to Make: Using primarily half double crochet (hdc), this project works up surprisingly fast, giving you a satisfying sense of accomplishment in a shorter timeframe.
- Great for Gifting: Handmade kimonos make thoughtful and cherished gifts for friends and family, offering a personal touch that store-bought items can't match.
Materials Needed
- Yarn: Approximately 1100-1300 yards (1000-1200 meters) of Weight 3 DK (Light Worsted) or Weight 4 Worsted (Medium) yarn. A soft acrylic, cotton blend, or bamboo blend will provide beautiful drape. (For reference, size M/L will use about 1200 yards.)
- Crochet Hook: 5.0 mm (H/8) or size needed to obtain gauge.
- Yarn Needle: For weaving in ends and seaming.
- Scissors: For cutting yarn.
- Stitch Markers: (Optional but recommended) Useful for marking seams and keeping track of rows.
Gauge & Sizing
Achieving the correct gauge is crucial for your kimono to turn out the intended size and drape beautifully. Please make a gauge swatch before beginning!
Gauge: 13 hdc stitches and 10 rows = 4 inches (10 cm) using a 5.0 mm hook, worked in hdc.
To check your gauge, chain 15, then hdc in the 2nd ch from hook and across (14 hdc). Work in hdc for 12 rows. Measure the center 4 inches of your swatch. If you have more stitches or rows than specified, try a larger hook. If you have fewer, try a smaller hook.
This pattern is written for a women's size M/L, designed for an oversized, relaxed fit. Instructions for customizing size are included in the Pro Tips and FAQ sections. For a smaller size (S/M), you may want to reduce your initial chain count and number of rows. For larger sizes (XL/2XL, 3XL+), you will increase the initial chain count and number of rows accordingly.
Abbreviations
- ch: chain
- sl st: slip stitch
- sc: single crochet
- hdc: half double crochet
- dc: double crochet
- st(s): stitch(es)
- rep: repeat
- sk: skip
- sp: space
- FO: Fasten Off
Step-by-Step Pattern
Construction Notes
This kimono is constructed from two main rectangular panels that form the back and front, and two smaller rectangular panels for the sleeves. These pieces are then seamed together. This simple construction makes it an excellent project for beginners and a relaxing make for experienced crocheters.
Main Panels (Make 2)
These two panels will form the main body of your kimono. The length of your initial chain will determine the width of your kimono (from wrist to wrist, across the back). The number of rows will determine the overall length of the kimono.
- Initial Chain: Ch 102. (This will give a finished panel width of approx. 31 inches / 79 cm, suitable for M/L. Adjust for desired width.)
- Row 1: Hdc in the 2nd ch from hook and in each ch across. (101 hdc sts)
- Row 2: Ch 2 (counts as 1 hdc), turn. Hdc in each st across. (101 hdc sts)
- Repeat Row 2: Continue repeating Row 2 until your panel measures approximately 30 inches (76 cm) in length, or your desired length. For M/L, this will be around 75 rows.
- Finish: FO, leaving a long tail for seaming.
Sleeve Panels (Make 2)
These two panels will form the sleeves of your kimono. The initial chain length determines the circumference of your armhole and sleeve cuff, and the number of rows determines the sleeve length.
- Initial Chain: Ch 52. (This will give a finished panel width of approx. 16 inches / 41 cm. Adjust for desired armhole circumference.)
- Row 1: Hdc in the 2nd ch from hook and in each ch across. (51 hdc sts)
- Row 2: Ch 2 (counts as 1 hdc), turn. Hdc in each st across. (51 hdc sts)
- Repeat Row 2: Continue repeating Row 2 until your panel measures approximately 12 inches (30 cm) in length, or your desired sleeve length. For M/L, this will be around 30 rows.
- Finish: FO, leaving a long tail for seaming.
Assembly
Now it’s time to bring your kimono to life! Lay your two main panels flat, side by side, oriented vertically. Lay your two sleeve panels horizontally.
- Shoulder Seams: Fold each main panel in half lengthwise. Place one main panel on top of the other, aligning the top edges. Using your yarn needle and the long tails, seam the top edges together for approximately 8 inches (20 cm) in from each outer edge. This will leave an unseamed opening in the center for your neck (approx. 15 inches / 38 cm). Secure and weave in ends.
- Attach Sleeves: Lay the main body flat with the shoulder seams aligned. Find the center point of the top edge of one sleeve panel. Align this center point with the shoulder seam of the main body. Using your yarn needle, seam the sleeve panel along the side edge of the main body, ensuring it’s centered. Repeat for the second sleeve.
- Side & Sleeve Seams: Fold the entire piece in half so that the front and back edges of the sleeves and the side edges of the main body align. Starting from the cuff of one sleeve, seam down the length of the sleeve until you reach the armpit. Continue seaming down the side of the main body, from the armpit down to the bottom hem, leaving an opening for the armhole. Repeat for the other side. Secure and weave in all remaining ends.
Edging (Optional but Recommended)
Adding an edge can give your kimono a more finished and polished look.
- Main Opening Edging: Attach yarn with a sl st to any bottom corner of the kimono's front opening. Ch 1, then work sc stitches evenly around the entire front opening and neck edge. Work 1 sc into the side of each hdc row and 1 sc into each hdc stitch along the neck. When you reach your starting point, sl st to the first sc to join. FO.
- Sleeve Cuff Edging: Attach yarn with a sl st to the seam of one sleeve cuff. Ch 1, then work sc stitches evenly around the cuff. Sl st to the first sc to join. FO. Repeat for the other sleeve cuff.
Pro Tips
- Blocking is Your Friend: After assembly, wet block your kimono. This crucial step relaxes the fibers, evens out your stitches, and enhances the drape, giving your kimono a professional finish.
- Yarn Choice Matters: For the best drape, choose a yarn with good fluidity, such as acrylic, cotton, bamboo, or a blend. Yarns with too much stiffness will result in a less flowing garment.
- Stitch Markers for Precision: Use stitch markers to align your panels perfectly before seaming. This ensures even seams and prevents your kimono from becoming lopsided.
- Seamless Joins: When joining new skeins of yarn, consider using a Russian join or a magic knot to create nearly invisible joins, especially if your yarn has a tendency to fray.
- Customizing Length: To make your kimono longer or shorter, simply add or subtract rows from your main panels before fastening off.
- Customizing Width: To make your kimono wider or narrower, adjust your initial chain count for the main panels. Remember to keep an even number of stitches if you plan on adding ribbing or other stitch patterns later.
Frequently Asked Questions
Q: Can I use a different yarn weight?
A: Yes, absolutely! You can use a lighter or heavier yarn weight, but be aware that this will significantly impact your gauge and the overall size and drape of the kimono. If you change yarn weight, you will need to adjust your hook size accordingly and likely modify the initial chain counts and number of rows for both the main panels and sleeves to achieve your desired dimensions. Always make a gauge swatch with your chosen yarn and hook!
Q: Is this pattern suitable for beginners?
A: Yes, this pattern is highly suitable for beginners! It primarily uses the half double crochet stitch, which is a fundamental stitch. The construction method involves creating simple rectangles and then seaming them, avoiding complex shaping or advanced techniques. If you're comfortable with basic stitches and counting, you can definitely make this kimono!
Q: How do I make my kimono longer/shorter or wider/narrower?
A: To adjust the length, simply add or subtract rows from your two main body panels. To adjust the width (and therefore the overall arm-span of the kimono), increase or decrease the initial chain count for your main body panels. For sleeve length, add or subtract rows to the sleeve panels. For sleeve circumference, adjust the initial chain count for the sleeve panels. Remember to keep stitch counts consistent across both main panels and both sleeve panels.
Congratulations, you've just created a stunning, handmade Crochet Kimono! This versatile piece is more than just a garment; it's a testament to your creativity and skill. Whether you wear it to lounge at home, out for a casual brunch, or as a chic beach cover-up, you'll love the unique touch it adds to your wardrobe. Don't forget to share your beautiful creations with us – we love seeing your finished projects!