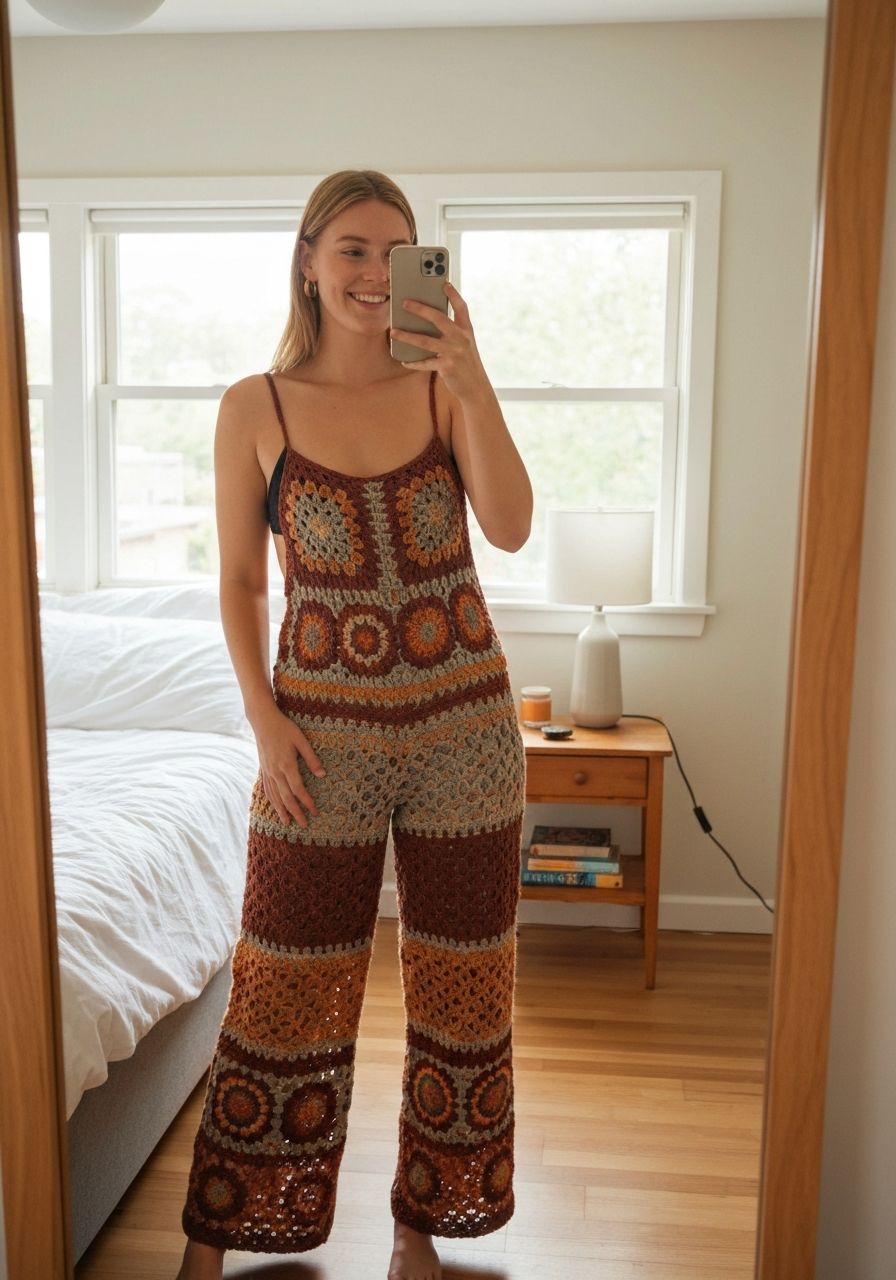
Imagine slipping into a garment that feels like a warm, comforting hug, drapes beautifully, and turns heads wherever you go. That's the magic of a handmade crochet jumpsuit! Forget stiff, uncomfortable outfits; this pattern will guide you step-by-step to create a soft, stylish, and incredibly versatile piece that's perfect for lounging, brunches, or even a chic evening out. Get ready to fall in love with your new favorite wardrobe staple – the ultimate blend of comfort and handmade elegance awaits!
Welcome, fellow yarn enthusiasts! Today, we're diving into the exciting world of garment crochet with a project that promises both style and supreme comfort: a chic crochet jumpsuit. This isn't just another pattern; it's an invitation to create a statement piece that reflects your unique flair. Designed with a relaxed fit and customizable options, this jumpsuit is perfect for those sunny days, cozy evenings, or anytime you want to feel effortlessly put-together. Grab your hook, pick your favorite yarn, and let's create something truly beautiful together!
Why You'll Love This Pattern
- Ultimate Comfort: Made with soft yarn, this jumpsuit feels amazing against your skin, providing all-day comfort without sacrificing style.
- Stylish & Versatile: Dress it up with accessories and heels or keep it casual with sneakers and a denim jacket. It's perfect for a variety of occasions!
- Customizable Fit: The pattern is designed to be easily adjustable in length and width, ensuring a perfect, flattering fit for your unique body shape.
- Unique Wardrobe Addition: Stand out from the crowd with a handmade garment that showcases your crafting skills and personal style.
- Skill-Building Project: While beginner-friendly, this pattern introduces you to garment construction, helping you grow your crochet repertoire.
Materials Needed
- Yarn: Worsted Weight (Category 4) cotton blend or acrylic yarn. Approximately 1800-2200 yards for a Medium/Large size. (Suggested: Lion Brand Comfy Cotton Blend, Bernat Softee Cotton)
- Crochet Hook: 5.0mm (H/8) or size needed to obtain gauge.
- Tapestry Needle: For weaving in ends and seaming.
- Scissors: For cutting yarn.
- Stitch Markers: Essential for marking stitch counts and sections.
- Measuring Tape: Crucial for checking gauge and sizing.
Gauge & Sizing
Achieving the correct gauge is absolutely critical for garment projects to ensure your jumpsuit fits as intended. Take the time to make a gauge swatch!
Gauge: 14 half-double crochet (hdc) stitches x 10 rows = 4 inches (10 cm) square, using a 5.0mm hook.
To check your gauge, chain 16, then work 12 rows of hdc. Measure the center of your swatch. If your swatch is larger than 4 inches, try a smaller hook. If it's smaller, try a larger hook. Repeat until you match the gauge.
This pattern is written for a general Women's Medium/Large size (approx. 38-40 inch bust, 40-42 inch hip), with notes for adjusting. Please refer to your own body measurements and the gauge to customize. The jumpsuit is designed with a comfortable amount of positive ease (extra room).
Abbreviations
- ch: Chain
- sc: Single Crochet
- hdc: Half Double Crochet
- dc: Double Crochet
- sl st: Slip Stitch
- st(s): Stitch(es)
- sk: Skip
- inc: Increase (work 2 sts into the same stitch)
- dec: Decrease (hdc2tog - Half Double Crochet 2 Together)
- FO: Fasten Off
- RS: Right Side
- WS: Wrong Side
Step-by-Step Pattern
This jumpsuit is constructed in pieces: two bodice panels (front and back), which are then seamed. The pants portion is worked directly from the bottom edge of the joined bodice.
Bodice (Make 2 - Front & Back Panels)
We will create two identical rectangular panels. One will be for the front, one for the back. For a size M/L, this will fit approximately a 38-40 inch bust.
- Foundation Chain: Ch 65. (Approximately 18.5 inches wide. For smaller/larger, adjust by multiples of 2, adding/subtracting 7 sts for every 2 inches).
- Row 1 (WS): Hdc in 2nd ch from hook and in each ch across. (64 hdc). Ch 1, turn.
- Row 2 (RS): Hdc in each st across. (64 hdc). Ch 1, turn.
- Repeat Row 2: Continue working Row 2 until your panel measures 16 inches from the foundation chain, or desired bodice length from shoulder to natural waist. (Approximately 40 rows).
- FO, leaving a long tail (approx. 20 inches) for seaming one side.
Joining the Bodice
Lay your two panels flat with RS facing each other.
- Shoulder Seams: Using a tapestry needle and one of the long tails, seam the top 12 stitches of each panel together along both shoulders. This leaves an opening for the neck. Weave in ends.
- Side Seams: Using the remaining long tail from one panel, seam up the side from the bottom edge for 8 inches. Repeat on the other side, using a new piece of yarn if needed. This creates the armholes.
Waistband & Body
Now we will work in the round from the bottom edge of the joined bodice.
- Round 1: Attach yarn with a sl st to any side seam at the bottom edge of the bodice. Ch 1. Work 64 hdc evenly around the bottom edge of the front panel, and 64 hdc evenly around the back panel. Join with a sl st to the first hdc. (128 hdc).
- Round 2: Ch 1, hdc in each st around. Join with a sl st. (128 hdc).
- Increase for Hips: Ch 1, (hdc in next 15 sts, inc) around. Hdc in last 8 sts. Join with a sl st. (136 hdc). (Adjust increase frequency based on your hip measurement; you want the total circumference to match your hip measurement plus desired ease).
- Body Length: Repeat Round 2 (hdc in each st around) until the body measures 12 inches from the bottom edge of the bodice, or until it reaches just above your crotch level when trying it on. (Approximately 12-15 rounds after increase round, depending on your torso length). Use stitch markers to mark the center front and center back of your work.
Dividing for Legs (Crotch)
We'll now create the crotch and separate the leg openings.
- Round 1 (Divide): Ch 1, hdc in the first 68 sts (front half). Sk the remaining 68 sts. Join with a sl st to the first hdc of this half, creating the first leg opening. (68 hdc for first leg).
- Crotch Gusset (Optional, for more room): If you desire more crotch room, ch 4-6 sts and sl st to the opposite side's first stitch instead of skipping. Then pick up hdc along these chains in the next leg round. For simplicity, we'll continue with the skipped stitches method.
The Legs (Make 2)
You will now work each leg individually in the round.
Leg 1
- Round 1: Ch 1, hdc in each of the 68 sts around. Join with a sl st. (68 hdc).
- Round 2: Ch 1, hdc in each st around. Join with a sl st. (68 hdc).
- Continue: Repeat Round 2 until the leg measures your desired length from the crotch to the ankle/hem. (Approximately 25-30 inches for full-length pants, or shorter for capris/shorts).
- Hem (Optional): For a neat hem, work 3-5 rounds of sc in each st around.
- FO and weave in ends.
Leg 2
- Re-attach Yarn: Attach yarn with a sl st to any of the unworked 68 stitches from the dividing round.
- Repeat Leg 1 Instructions: Follow steps 1-5 from Leg 1 to complete the second leg.
Finishing Touches
- Neckline Edging: Attach yarn with a sl st to the neckline edge. Ch 1, work sc evenly around the entire neckline. Join with a sl st. FO.
- Armhole Edging: Repeat the neckline edging process for each armhole.
- Weave in Ends: Use your tapestry needle to carefully weave in all remaining loose ends.
- Blocking (Optional but Recommended): Gently wash your jumpsuit and lay it flat to dry, shaping it to your desired dimensions. This will help even out stitches and improve drape.
Pro Tips
- Yarn Choice Matters: For the best drape and comfort, choose a yarn with good stitch definition and softness, like a cotton blend or bamboo blend. Avoid stiff acrylics for garments unless you block them rigorously.
- Try It On: Don't be afraid to try on your jumpsuit as you go! This is the best way to ensure the length and fit are perfect for your body. You can easily adjust the number of body or leg rounds.
- Stitch Markers are Your Friends: Use them to mark the beginning of rounds, increase/decrease points, and especially when dividing for the legs.
- Seamless Look: When joining rounds, always use a slip stitch to the first stitch of the round, then chain up. This creates a neater seam.
- Blocking for Professional Finish: Blocking your finished garment will dramatically improve its drape, evenness of stitches, and overall look. It's like magic for crochet garments!
Frequently Asked Questions
Can I adjust this pattern for different sizes, or to make it shorter/longer?
Absolutely! This pattern is highly adaptable. For width adjustments, modify the initial chain of the bodice panels in multiples of 2. For length, simply add or subtract rows in the bodice panels, and add or subtract rounds in the body section and each leg section until you reach your desired measurements. Always try it on as you go to ensure the best fit!
What's the best yarn weight for a crochet jumpsuit?
Worsted weight (Category 4) is a great all-rounder, offering a good balance of warmth, drape, and stitch definition. However, you could use a lighter DK weight (Category 3) for a more airy, summer-friendly jumpsuit, or a slightly heavier Aran weight (Category 4/5) for a cozier feel. Just remember to adjust your hook size and gauge accordingly to maintain the desired drape and fit.
How can I make the neckline or armholes more customized?
For a deeper V-neck, you could shape the front bodice panel by decreasing stitches towards the center front over several rows. For a wider neck, simply seam fewer stitches at the shoulders. Armholes can be made deeper by seaming less along the sides of the bodice panels, or you can add a few extra single crochet rounds to the edging for a slightly smaller opening.
There you have it! Your very own, handcrafted crochet jumpsuit. We are so excited to see the beautiful creations you'll bring to life with this pattern. Remember, every stitch tells a story, and this jumpsuit will be a testament to your creativity and skill. Don't be afraid to experiment with colors, add pockets, or embellish it to truly make it your own. Happy hooking!