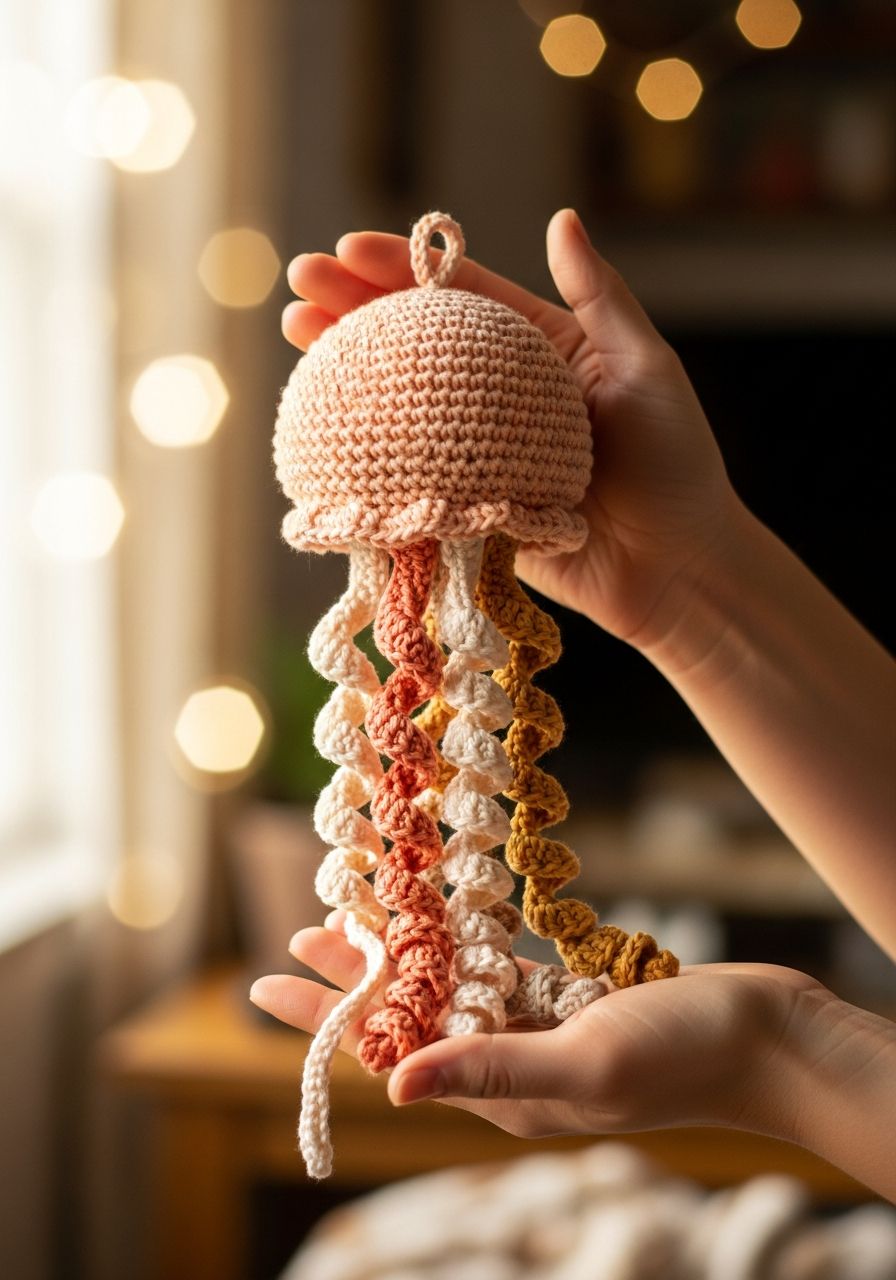
Imagine a gentle, undulating creature floating gracefully in the deep blue, its ethereal beauty captivating all who gaze upon it. Now, picture bringing that serene magic into your home, not from the ocean depths, but from your very own crochet hook! With our delightful and completely free Crochet Jellyfish Amigurumi pattern, you can craft an enchanting, squishy friend that’s sure to bring a smile to anyone’s face. Perfect for decorating a nursery, gifting to a marine-loving friend, or simply adding a touch of whimsical charm to your space, this project is as relaxing to make as it is joyful to behold. Get ready to embark on a delightful undersea adventure, stitch by adorable stitch!
Welcome, fellow yarn enthusiasts, to a truly enchanting crochet journey! Today, we're diving headfirst into the world of amigurumi to create an absolutely irresistible jellyfish. This isn't just another pattern; it's an invitation to craft a charming companion that embodies the wonder of the ocean. Whether you're a seasoned crocheter looking for a quick and fun project or a curious beginner eager to try amigurumi for the first time, this pattern is designed with you in mind. It uses fundamental stitches, clear instructions, and offers plenty of room for creative customization. So grab your hook, choose your favorite yarn colors, and let's bring a little piece of the ocean's tranquility to life!
Why You'll Love This Pattern
- Beginner-Friendly: Uses basic stitches like single crochet, increases, and decreases, making it accessible for those new to amigurumi.
- Quick to Make: The main body and tentacles work up relatively fast, perfect for last-minute gifts or when you need a quick crafting fix.
- Customizable: Easily change yarn colors, add embroidered details, or vary the length and number of tentacles to create a unique jellyfish every time.
- Adorable & Charming: The curly tentacles give it a playful, whimsical look that's universally loved.
- Perfect for Gifting: Handmade amigurumi makes thoughtful and cherished gifts for birthdays, baby showers, or just because.
- Stash Buster: A great project for utilizing leftover yarn scraps, especially for the colorful tentacles.
- Stress-Relieving: The repetitive motion of crochet can be incredibly meditative and a wonderful way to unwind.
Materials Needed
- Yarn: Worsted weight (Aran/10-ply) 100% cotton or acrylic yarn in two main colors: one for the bell (approx. 50g) and one or more for the tentacles (approx. 20-30g total). Choose vibrant, contrasting colors for a fun effect!
- Crochet Hook: 3.5mm (E/4) or 4.0mm (G/6) – choose a hook size that gives you tight stitches with no gaps for stuffing.
- Safety Eyes: 8mm or 9mm safety eyes (or embroider eyes for a child-safe option).
- Stuffing: Polyester fiberfill.
- Tapestry Needle: For weaving in ends and assembly.
- Scissors: For cutting yarn.
- Stitch Marker: Essential for working in continuous rounds.
Gauge & Sizing
Gauge isn't strictly critical for this project, as long as your stitches are tight enough to prevent stuffing from showing through. However, for reference, working with a 3.5mm hook and worsted weight yarn, 5 single crochet stitches and 5 rounds should measure approximately 1 inch (2.5 cm).
Finished Size: When completed, your jellyfish amigurumi will stand approximately 5-6 inches (12-15 cm) tall (excluding tentacles) and have a bell diameter of about 3.5-4 inches (9-10 cm), depending on your yarn and hook choice and how firmly you stuff it.
Abbreviations
- ch: chain
- sl st: slip stitch
- sc: single crochet
- hdc: half double crochet
- dc: double crochet
- inc: increase (work 2 sc in the same stitch)
- dec: decrease (sc2tog - single crochet 2 stitches together)
- FO: fasten off
- MR: magic ring (or magic circle)
- st(s): stitch(es)
- [ ] or ( ): repeat instructions in brackets/parentheses the specified number of times
Step-by-Step Pattern
We'll start by crocheting the bell (body) of the jellyfish, then move on to the playful ruffle, followed by the curly and straight tentacles. Finally, we'll assemble all the pieces to bring our underwater friend to life!
The Bell (Body) - Main Color
- Round 1: Start with a MR, sc 6 into the ring. (6 sts)
- Round 2: Inc in each st around. (12 sts)
- Round 3: [Sc 1, inc] around. (18 sts)
- Round 4: [Sc 2, inc] around. (24 sts)
- Round 5: [Sc 3, inc] around. (30 sts)
- Round 6: [Sc 4, inc] around. (36 sts)
- Round 7: [Sc 5, inc] around. (42 sts)
- Round 8: [Sc 6, inc] around. (48 sts)
- Rounds 9-16: Sc in each st around. (48 sts for 8 rounds)
- Round 17: [Sc 6, dec] around. (42 sts)
- Round 18: [Sc 5, dec] around. (36 sts)
- Round 19: [Sc 4, dec] around. (30 sts)
Place safety eyes between Rounds 11 and 12, about 6-7 stitches apart. Begin stuffing firmly. Continue stuffing as you go.
- Round 20: [Sc 3, dec] around. (24 sts)
- Round 21: [Sc 2, dec] around. (18 sts)
- Round 22: [Sc 1, dec] around. (12 sts)
- Round 23: Dec around. (6 sts)
FO, leaving a long tail. Weave the tail through the front loop of the remaining 6 stitches and pull tight to close. Weave in end.
The Ruffle - Main Color (or a contrasting color)
This ruffle is worked directly into the bottom edge of the bell, where your first round of straight single crochet (Round 9) begins. You'll be working into the front loops of the stitches from Round 8.
- Attach yarn with a sl st to the front loop of any stitch from Round 8.
- Row 1: Ch 2 (counts as first hdc), then work [2 hdc in next st, 1 hdc in next st] around, ending with 2 hdc in the last st. Join with a sl st to the top of the initial ch 2. (72 hdc)
- Row 2: Ch 3 (counts as first dc), then work [2 dc in next st, 1 dc in next st] around, ending with 2 dc in the last st. Join with a sl st to the top of the initial ch 3. (108 dc)
- FO and weave in ends. This creates a beautiful, wavy ruffle.
The Tentacles (Curly) - Tentacle Color 1 (Make 4-6)
These tentacles are made by working back into a chain, creating a spiral.
- Ch 35.
- Starting in the 2nd ch from hook, work 3 sc in each chain st across. (102 sc)
- FO, leaving a long tail for attaching.
The Tentacles (Curly) - Tentacle Color 2 (Make 4-6)
Repeat the instructions for Tentacles (Curly) using a different tentacle color.
The Oral Arms (Straight) - Tentacle Color 3 (Make 2-4)
These are simpler, straight tentacles, often positioned centrally.
- Ch 25.
- Starting in the 2nd ch from hook, sc in each chain st across. (24 sc)
- FO, leaving a long tail for attaching.
Assembly
- Attach Eyes: If you haven't already, carefully insert the safety eyes between rounds 11 and 12, roughly 6-7 stitches apart, and secure the washers on the inside. If embroidering, use black yarn to stitch two simple French knots or 'V' shapes for eyes.
- Stuff the Bell: Continue to stuff the bell firmly, shaping it as you go. Ensure it’s evenly filled to maintain its round shape. Close the bottom opening as instructed in the Bell section.
- Attach Tentacles: Using your tapestry needle and the long tails, attach the tentacles to the bottom opening of the bell. Arrange them symmetrically or randomly – it’s your jellyfish! Start with the straight oral arms in the very center, then alternate the curly tentacles around them. Weave the tails through the bottom stitches of the bell and secure with a knot on the inside before weaving in the remaining end. Ensure they are securely fastened so they don't pull out with play.
- Finishing Touches: Give your jellyfish a gentle squeeze and shape. Make sure all ends are securely woven in.
Pro Tips
- Use a Stitch Marker: When working in continuous rounds, a stitch marker is your best friend! Place it in the first stitch of each round to keep track of your progress and avoid miscounting.
- Stuff Firmly but Evenly: For a well-shaped amigurumi, stuff your jellyfish firmly but ensure the fiberfill is distributed evenly to avoid lumps or bumps. Use small pieces of stuffing to fill tight spots.
- Invisible Decrease: For a cleaner look, especially on the bell, consider using the invisible decrease (insert hook into front loop of first stitch, then front loop of second stitch, yarn over, pull through both front loops, yarn over, pull through both loops on hook).
- Yarn Choice Matters: While worsted weight acrylic is common, cotton yarn creates a firmer, more defined stitch which can be great for amigurumi. Experiment to see what you prefer!
- Child Safety: If making for a young child or baby, embroider the eyes instead of using safety eyes, as they can be a choking hazard.
- Customization is Key: Don't be afraid to experiment with different yarn weights (adjusting hook size accordingly), adding more or fewer tentacles, or using a wider variety of colors. This is your creation!
Frequently Asked Questions
Q: What kind of yarn is best for amigurumi?
A: For amigurumi, generally, a yarn that holds its shape well and doesn't split easily is ideal. Worsted weight (Aran/10-ply) acrylic yarn is a very popular choice due to its wide color range, affordability, and ease of use. It's soft, durable, and readily available. Cotton yarn, particularly mercerized cotton, is another excellent option; it provides great stitch definition, has a slight sheen, and creates a firmer, more structured finished object. It's also often preferred for baby items due to being natural and hypoallergenic. Avoid very fuzzy or loosely plied yarns if you're a beginner, as they can make it harder to see your stitches.
Q: How do I make my jellyfish stand up or hang straight?
A: This particular jellyfish design is meant to be a soft, squishy toy that can be held or gently placed. Its bell shape and floppy tentacles mean it won't stand upright on its own. If you wish for it to hang, you could sew a small loop of fishing line or a matching yarn strand to the very top center of the bell. Ensure the loop is securely attached with a strong knot on the inside of the bell before closing. For added weight and stability at the bottom if you want it to sit a certain way, you could consider adding a small pouch of poly pellets or rice (sealed in a fabric bag) inside the very bottom of the bell before stuffing, but this will change the squishy feel and is not recommended for toys for very young children.
Q: Can I use different hook sizes than recommended?
A: Absolutely, but be aware it will affect the finished size and fabric density of your jellyfish. Using a smaller hook than recommended for your yarn weight will create a tighter fabric, which is great for amigurumi as it prevents stuffing from showing through, but it will result in a smaller jellyfish. A larger hook will create a looser fabric and a larger jellyfish. The key is to ensure your stitches are tight enough that the stuffing doesn't peek out. Always make a small swatch if you're unsure, or simply experiment with your chosen yarn and hook to see what works best for you!
There you have it – your very own magical crocheted jellyfish, ready to float its way into hearts and homes! This pattern is a testament to the joy and creativity that crochet brings, allowing us to craft tangible pieces of wonder with just a hook and some yarn. We hope you enjoyed every stitch of this oceanic adventure. Don't forget to share your finished jellyfish creations with us – we absolutely love seeing your unique interpretations! Happy crocheting, and may your days be filled with endless yarn possibilities!