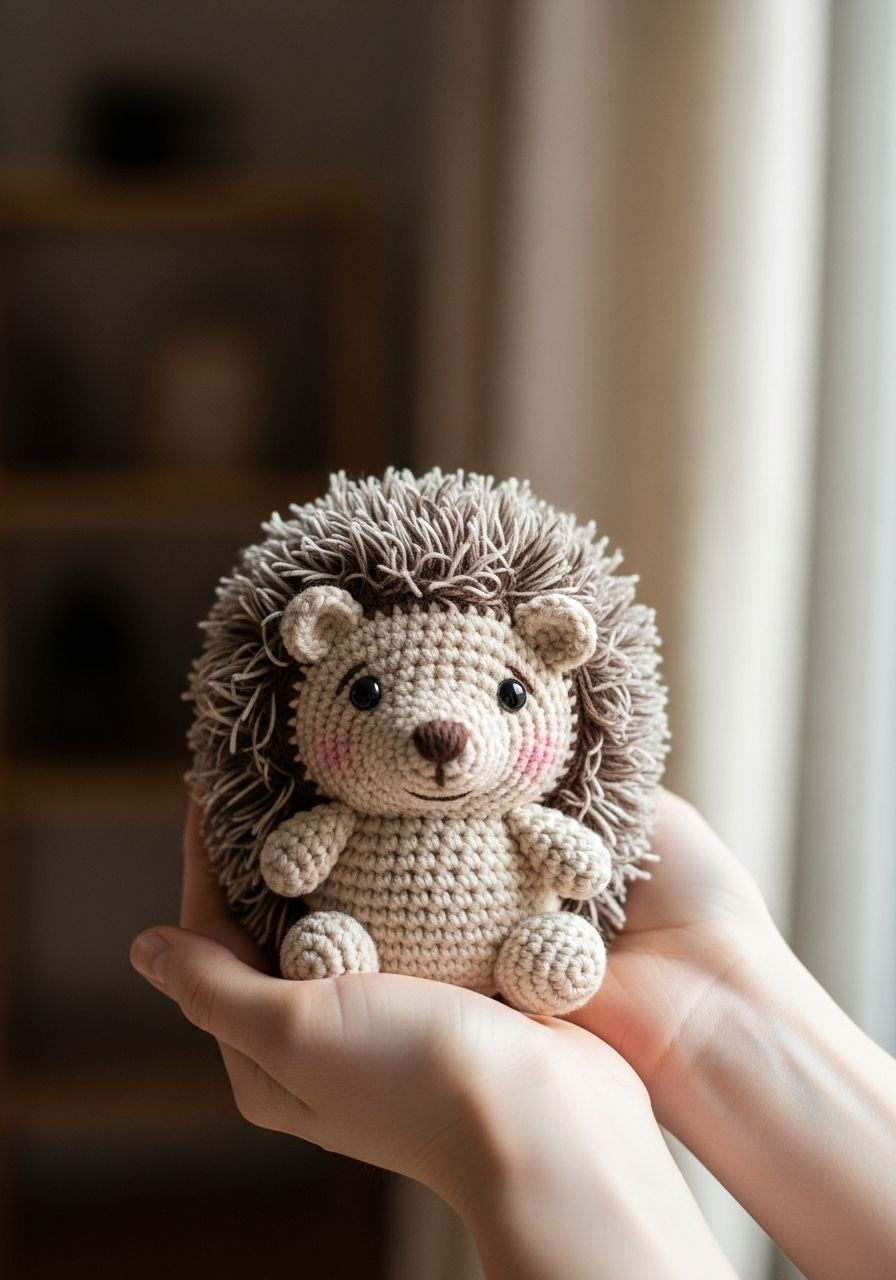
Imagine a tiny, spiky bundle of cuteness nestled in the palm of your hand, its little button nose twitching with silent curiosity. That's the magic you're about to create with your very own hands! This delightful Crochet Hedgehog Amigurumi pattern is designed to bring a smile to anyone's face, whether it's a gift for a loved one, a new companion for your desk, or a charming addition to a nursery. Get ready to fall in love with every stitch as you transform simple yarn into an utterly irresistible creature that's full of personality!
Welcome, fellow yarn enthusiasts, to a pattern that's as heartwarming as a cozy autumn day. Hedgehogs have a special way of captivating us with their endearing charm, and now you can capture that charm in crochet form! This free pattern is perfect for amigurumi lovers of all skill levels, offering clear, step-by-step instructions to guide you through crafting your very own prickly (but soft!) friend. We'll cover everything from the magic ring start to the final adorable details, ensuring your hedgehog turns out perfectly huggable.
Why You'll Love This Pattern
-
Beginner-Friendly: While it looks intricate, this pattern uses fundamental crochet stitches, making it accessible for those new to amigurumi. Experienced crafters will also appreciate its quick and satisfying nature.
-
Quick & Rewarding: This little hedgehog works up relatively fast, giving you that wonderful sense of accomplishment in a short amount of time. It’s perfect for last-minute gifts or when you need a creative pick-me-up.
-
Perfect for Gifting: Handmade amigurumi make incredibly thoughtful and unique gifts. A crochet hedgehog is ideal for birthdays, baby showers, or just to show someone you care. Everyone loves a cute, cuddly companion!
-
Customizable: Experiment with different yarn colors and weights to create a whole family of hedgehogs! Add personal touches like tiny scarves, hats, or even embroidered blush for extra charm.
-
Skill Builder: Practice essential amigurumi techniques like working in the round, increasing, decreasing, and seamless joining. You'll gain confidence with every successful stitch.
Materials Needed
- Worsted Weight Yarn (Category 4):
- Approx. 50g in Beige or Light Brown (for face/belly)
- Approx. 70g in Dark Brown or Grey (for back/spikes)
- Small amount of Black yarn for embroidery (nose/eyebrows)
- Crochet Hook: 3.5mm (E/4) – or size to achieve a tight fabric
- Safety Eyes: 8mm (or embroidered eyes for babies/toddlers)
- Polyester Fiberfill Stuffing
- Yarn Needle (Tapestry Needle)
- Stitch Marker
- Scissors
- Optional: Wire Pet Brush for a 'fuzzy' spiky effect
Gauge & Sizing
Gauge is not strictly critical for amigurumi, but maintaining a consistent, tight tension is important to prevent stuffing from showing through. Your stitches should be snug! When made with worsted weight yarn and a 3.5mm hook, your finished hedgehog will measure approximately 4-5 inches (10-12.5 cm) long from nose to tail, and about 3 inches (7.5 cm) tall. Adjust your hook size if necessary to achieve a firm fabric.
Abbreviations
- ch: chain
- sc: single crochet
- hdc: half double crochet
- dc: double crochet
- sl st: slip stitch
- inc: increase (2 sc in one stitch)
- dec: decrease (sc 2 stitches together, use an invisible decrease for best results)
- MR: magic ring (or magic circle)
- FO: fasten off
- st(s): stitch(es)
- Rnd(s): Round(s)
- BLO: back loop only
Step-by-Step Pattern
Part 1: The Body (Head & Back)
We'll create the body as one seamless piece, starting with the face color and then changing to the back color for the textured 'spikes'. Work in continuous rounds unless otherwise stated. Use a stitch marker to keep track of your first stitch in each round.
-
With Beige/Light Brown Yarn (Face Color):
Rnd 1: Start with a MR, sc 6 into the ring. (6 sts) -
Rnd 2: Inc in each st around. (12 sts)
-
Rnd 3: [Sc 1, inc] x 6 times. (18 sts)
-
Rnd 4: [Sc 2, inc] x 6 times. (24 sts)
-
Rnd 5: [Sc 3, inc] x 6 times. (30 sts)
-
Rnd 6: [Sc 4, inc] x 6 times. (36 sts)
-
Rnd 7-10: Sc in each st around. (36 sts) (4 rounds)
-
Change to Dark Brown/Grey Yarn (Back Color):
Rnd 11: Sc in each st around. (36 sts) (When changing color, complete the last yarn over of the last stitch of Rnd 10 with the new color.) -
Rnd 12-18: Sc in each st around. (36 sts) (7 rounds)
-
Rnd 19: [Sc 4, dec] x 6 times. (30 sts)
-
Rnd 20: [Sc 3, dec] x 6 times. (24 sts)
-
Rnd 21: [Sc 2, dec] x 6 times. (18 sts)
-
Insert Safety Eyes: Place 8mm safety eyes between Rnds 8 and 9 (in the beige section), approximately 5-6 stitches apart. Secure the washers firmly. If making for a baby or small child, embroider the eyes with black yarn instead.
-
Rnd 22: [Sc 1, dec] x 6 times. (12 sts)
-
Begin Stuffing: Firmly stuff the body with fiberfill, shaping it as you go. Continue to stuff as you close the opening.
-
Rnd 23: [Dec] x 6 times. (6 sts)
-
FO, leaving a long tail. Use your yarn needle to weave the tail through the front loop of each remaining 6 stitches. Pull tight to close the hole, then weave in the end.
Part 2: Ears (Make 2)
With Beige/Light Brown Yarn.
-
Rnd 1: Start with a MR, sc 6 into the ring. (6 sts)
-
Rnd 2: Inc in each st around. (12 sts)
-
Sl st to the first sc to join. FO, leaving a long tail for sewing.
Part 3: Nose (Embroidered)
With a length of black yarn and your yarn needle, embroider a small triangular or oval shape at the tip of the hedgehog's snout (Rnd 1-2 area). Make several small stitches until it's filled in and nicely shaped.
Part 4: Assembly & Finishing Touches
-
Attach Ears: Position the ears on the head, folded slightly in half. Sew them securely to the top/sides of the beige head section, between Rnds 9 and 10, just above the eyes. Weave in any loose ends.
-
Embroider Eyebrows (Optional): For extra expression, use a small piece of black yarn to embroider tiny eyebrows just above the safety eyes.
-
Create Spiky Texture (Optional but Recommended): For a more realistic 'spiky' look, gently brush the dark brown back section of your hedgehog with a wire pet brush. This will pull up the fibers of the yarn, creating a soft, fuzzy texture that mimics hedgehog quills. Be gentle to avoid damaging the stitches. Brush until you achieve your desired level of fluffiness.
-
Tidy Up: Weave in any remaining loose ends to complete your adorable hedgehog!
Pro Tips for Your Hedgehog Amigurumi
-
Invisible Decrease: For seamless amigurumi, learn the invisible decrease (insert hook through the front loop of the first stitch, then the front loop of the second stitch, yarn over, pull through both front loops, yarn over, pull through remaining two loops). This creates a much neater decrease.
-
Tight Stitches are Key: Always aim for tight, even stitches. This prevents the stuffing from showing through and helps your amigurumi hold its shape better. If your stitches are too loose, go down a hook size.
-
Stuffing Technique: Stuff firmly and evenly. Use small pieces of fiberfill to avoid lumps and bumps. Pay extra attention to the snout and around the eyes to ensure good shaping.
-
Magic Ring Alternative: If you struggle with the magic ring, you can chain 2 and then work the specified number of single crochets into the second chain from the hook. This will create a small hole, but it's a good alternative.
-
Yarn Choice: While worsted weight is standard, you can use bulkier yarn with a larger hook for a bigger hedgehog, or finer yarn with a smaller hook for a tiny friend. Just ensure your hook size matches your yarn weight to maintain tight stitches.
-
Adding Feet: For tiny feet, you can crochet small flat circles (MR 6 sc, sl st, FO) and sew them onto the underside of the body. Keep them small to maintain the hedgehog's round shape.
Frequently Asked Questions
Can I use different types of yarn for this pattern?
Absolutely! While worsted weight yarn (Category 4) is recommended for the stated size and texture, you can certainly experiment. Cotton yarn will give a denser, more defined stitch, while a chenille or blanket yarn would create a much softer, squishier hedgehog (you'd also need a larger hook). Just remember that changing yarn type and weight will affect the finished size and potentially the brushing effect for the 'spikes'. Always match your hook size to your yarn to maintain a tight fabric.
Is this pattern suitable for complete beginners to crochet?
This pattern is designed to be beginner-friendly for those who have a basic understanding of single crochet and working in the round. If you know how to make a chain, single crochet, and are willing to learn the magic ring, increases, and decreases, you'll do great! The detailed instructions and tips aim to guide you every step of the way. If you're completely new, I recommend watching a few tutorial videos on these basic techniques first.
How can I make my hedgehog larger or smaller?
To make a larger hedgehog, simply use a bulkier yarn (e.g., chunky or super bulky) and a proportionally larger crochet hook. To make a smaller hedgehog, use a lighter weight yarn (e.g., sport or fingering weight) and a smaller hook. The stitch counts for the pattern remain the same; it's the yarn and hook size that dictate the final dimensions.
There you have it – your very own charming Crochet Hedgehog Amigurumi, ready to bring joy wherever it goes! This little project is more than just a pattern; it's an opportunity to create something truly special with your hands, to practice your skills, and to share a piece of your heart. Whether you followed the pattern exactly or added your unique twist, I hope you enjoyed every moment of bringing this adorable creature to life. Happy crocheting!