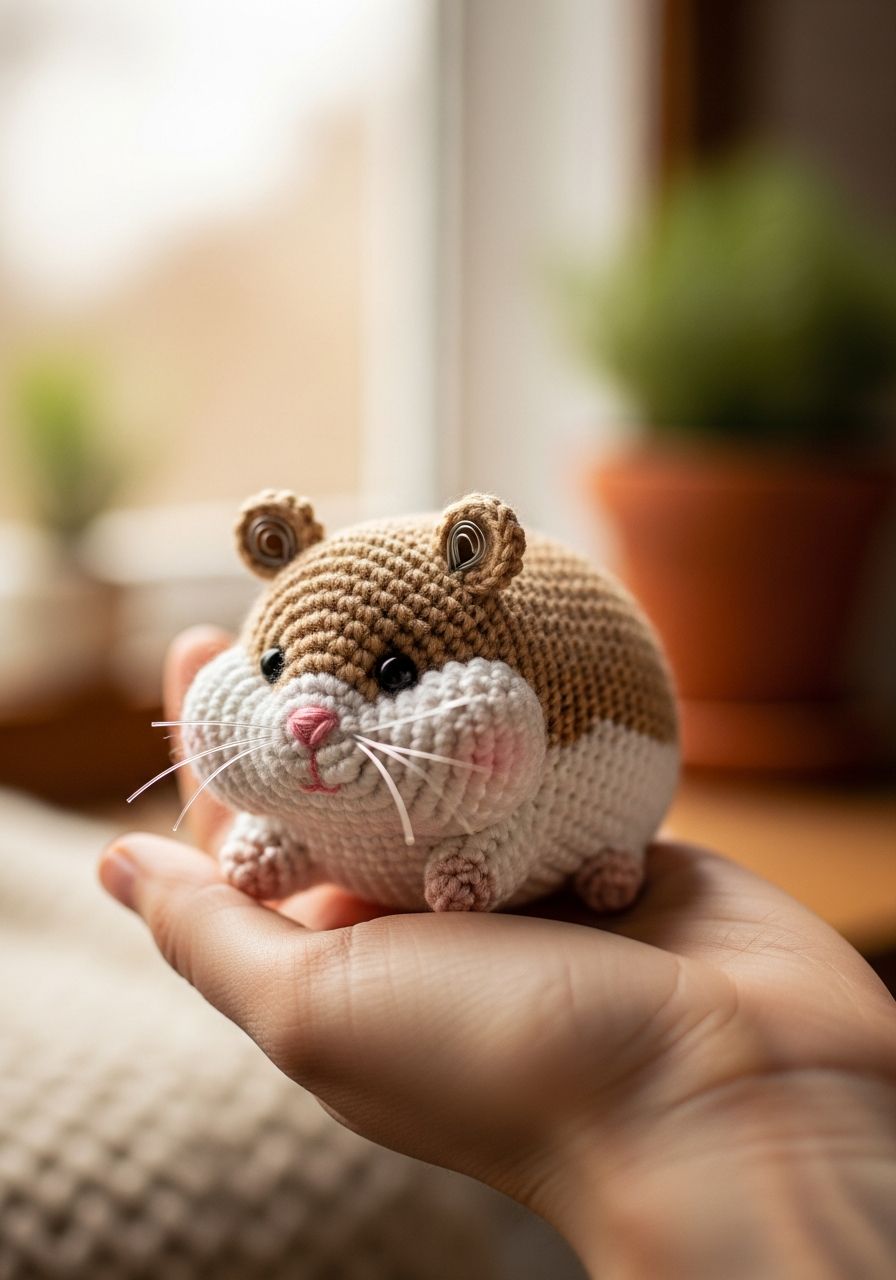
Imagine the pure joy of holding a tiny, soft, and utterly irresistible creature in the palm of your hand – a creature you made yourself with love and yarn! Today, we're diving into the delightful world of amigurumi to bring you a pattern that's sure to melt hearts: our adorable Crochet Hamster Amigurumi. This little buddy is quick to make, perfect for using up scrap yarn, and promises to be your next favorite desk companion, keychain charm, or thoughtful handmade gift. Get ready to crochet a burst of cuteness!
Welcome, fellow yarn enthusiasts, to a pattern that celebrates the charm of one of the animal kingdom's most beloved tiny pets! Hamsters, with their chubby cheeks and busy little paws, are undeniably adorable, and now you can capture that charm in crochet form. Whether you're a seasoned amigurumi artist or just picking up your hook for the first time, this free pattern is designed to be straightforward, fun, and incredibly rewarding. We'll guide you through every stitch, from creating the perfectly plump body to adding those characteristic little ears and an embroidered face that brings your hamster to life.
Why You'll Love This Pattern
- Beginner-Friendly: We've broken down each step with clear instructions, making it accessible even if you're new to amigurumi. You'll master essential techniques like the magic ring, single crochet, and basic increases/decreases.
- Quick & Satisfying: This project works up relatively fast, making it perfect for a weekend craft session or a last-minute gift. You'll see your little hamster take shape in no time!
- Customizable: Experiment with different yarn colors to create a variety of hamster breeds – from golden to Syrian to dwarf. You can even add tiny accessories like a bow or a scarf!
- Perfect for Gifting: Hand-crocheted gifts carry a special warmth. This little hamster makes a wonderful present for children, animal lovers, or anyone who appreciates a touch of handmade charm.
- Portable Pal: Once finished, your hamster will be the perfect size to sit on a shelf, adorn a desk, or even become a unique keychain.
Materials Needed
- Worsted weight (Aran/10-ply) yarn in your main color (approx. 50g) – e.g., light brown, cream, grey.
- Small amount of contrasting color for the cheeks/belly (optional) – e.g., white, cream.
- Small amount of black or dark brown yarn for embroidering details (nose, mouth, eyes if not using safety eyes).
- 2.5mm or 3.0mm crochet hook (adjust to achieve tight stitches with your chosen yarn).
- 6mm safety eyes (or embroider them for younger children).
- Polyester fiberfill for stuffing.
- Yarn needle (tapestry needle) for weaving in ends and assembly.
- Scissors.
- Stitch marker (highly recommended for working in continuous rounds).
Gauge & Sizing
Gauge is not critical for this project, but it's important to keep your stitches tight enough so that the stuffing does not show through. If your stitches are too loose, go down a hook size. Using a 2.5mm hook with worsted weight yarn, your finished hamster will be approximately 3.5 inches (9 cm) tall from base to top of head, and about 2.5 inches (6.5 cm) wide.
Abbreviations
- ch: chain
- sl st: slip stitch
- sc: single crochet
- hdc: half double crochet
- dc: double crochet
- inc: increase (2 sc in the next stitch)
- dec: decrease (sc2tog - single crochet two together)
- [...]: repeat instructions in brackets
- (...): stitch count at the end of the round
- MR: magic ring (or magic circle)
- FLO: front loop only
- BLO: back loop only
Step-by-Step Pattern
Body (Main Color)
- Rnd 1: Start with MR, 6 sc into the ring. (6)
- Rnd 2: [Inc] around. (12)
- Rnd 3: [Sc, inc] around. (18)
- Rnd 4: [Sc 2, inc] around. (24)
- Rnd 5: [Sc 3, inc] around. (30)
- Rnd 6: [Sc 4, inc] around. (36)
- Rnd 7-12: Sc in each stitch around. (36) (6 rounds)
- Rnd 13: [Sc 4, dec] around. (30)
- Rnd 14: Sc in each stitch around. (30)
- Rnd 15: [Sc 3, dec] around. (24)
- Rnd 16: Sc in each stitch around. (24)
- Rnd 17: [Sc 2, dec] around. (18)
- Rnd 18: Sc in each stitch around. (18)
- Start stuffing firmly and continue to stuff as you go.
- Insert safety eyes between Rnd 11 and Rnd 12, about 6-7 stitches apart.
- Rnd 19: [Sc, dec] around. (12)
- Rnd 20: [Dec] around. (6)
- Fasten off, leaving a long tail for closing. Weave the tail through the front loop of the remaining 6 stitches and pull tight to close. Weave in the end.
Ears (Make 2 - Main Color)
- Rnd 1: Start with MR, 6 sc into the ring. (6)
- Rnd 2: [Inc] around. (12)
- Rnd 3: Sc in each stitch around. (12)
- Fasten off, leaving a long tail for sewing. Do not stuff. Flatten the ear.
Snout (Contrasting Color, optional, or Main Color)
This creates a small, slightly protruding snout for character.
- Rnd 1: Start with MR, 6 sc into the ring. (6)
- Rnd 2: [Sc, inc] around. (9)
- Rnd 3: Sc in each stitch around. (9)
- Fasten off, leaving a long tail for sewing. Lightly stuff or leave unstuffed.
Tail (Main Color)
- Ch 4.
- Starting in the second chain from hook, sl st in each ch across. (3 sl st)
- Fasten off, leaving a long tail for sewing.
Assembly
- Attach Ears: Position the flattened ears on top of the hamster's head, around Rnd 16-17 of the body, equidistant from the eyes. Sew them securely in place using the tail left on the ears.
- Attach Snout: Pin the snout onto the hamster's face, centered below the eyes, around Rnd 12-14. Sew it securely. Lightly stuff if desired before closing completely.
- Embroider Details:
- Using black or dark brown yarn and your yarn needle, embroider a small triangular nose at the tip of the snout.
- From the bottom point of the nose, embroider a short vertical line down, then two small curved lines outward for the mouth.
- If you opted not to use safety eyes, you can embroider small French knots or satin stitches for the eyes instead.
- For added cuteness, you can embroider small blush spots on the cheeks using a tiny bit of pink yarn or even actual blush/fabric paint.
- Attach Tail: Sew the tiny tail onto the back of the hamster's body, near the bottom center, around Rnd 2-3 of the body.
- Weave in all remaining ends securely. Give your hamster a gentle squeeze and fluff to even out the stuffing.
Pro Tips
- Tight Stitches are Key: For amigurumi, you want your stitches to be tight to prevent stuffing from showing through. If you find your stitches are loose, try going down a hook size.
- Use a Stitch Marker: When working in continuous rounds, it's incredibly easy to lose your place. A stitch marker (or even a scrap piece of yarn) placed in the first stitch of each round will save you a lot of headaches.
- Stuffing Smart: Stuff your amigurumi firmly and evenly. Use small pieces of fiberfill to avoid lumps. For the head, ensure it's well-stuffed to maintain its shape. Use the blunt end of your crochet hook or a chopstick to push stuffing into tight spots.
- Invisible Decrease: While the pattern specifies 'dec' (sc2tog), an invisible decrease (insert hook into FLO of first st, then FLO of second st, yarn over, pull through both loops, yarn over, pull through remaining two loops) creates a much cleaner, less noticeable decrease line.
- Yarn Tails for Sewing: Always leave a long tail (at least 12-15 inches) when fastening off pieces that need to be sewn onto the main body. This saves you from having to attach new yarn for assembly.
- Safety Eye Placement: Before securing safety eyes, insert them and step back to check the placement. A slight adjustment can dramatically change your amigurumi's expression. Once secured, they are very difficult to remove.
Frequently Asked Questions
Can I use different yarn weights for this pattern?
Absolutely! You can use any yarn weight you prefer, but be sure to adjust your crochet hook size accordingly. For lighter yarns (like sport or fingering weight), use a smaller hook (e.g., 2.0mm) to maintain tight stitches, and your hamster will turn out smaller. For bulkier yarns (like chunky), use a larger hook (e.g., 4.0mm) and your hamster will be larger. Just remember that changing yarn weight will alter the finished size and potentially the amount of stuffing needed.
How can I make my hamster bigger or smaller?
To make a bigger hamster, you can either use a bulkier yarn with a larger hook (as mentioned above) or you can try increasing the stitch count of the body and head rounds. For example, instead of stopping at 36 stitches, you could add another increase round to 42 stitches, then work more straight rounds. Conversely, to make it smaller, use a finer yarn and smaller hook, or stop increasing earlier in the body/head rounds and start decreasing sooner.
What if I don't have safety eyes or prefer not to use them?
No problem at all! For a softer, child-friendly finish, you can easily embroider the eyes using black or dark brown yarn. French knots make lovely small, round eyes, or you can use a few small straight stitches to create a simple eye shape. This is especially recommended for babies and toddlers, as safety eyes can be a choking hazard for very young children.
And there you have it – your very own adorable Crochet Hamster Amigurumi, ready to bring a smile to anyone's face! We hope you enjoyed creating this little bundle of joy as much as we enjoyed designing the pattern for you. Remember that every stitch you make adds to the unique character of your handmade creation. Don't be afraid to personalize your hamster with different colors or embroidered details. Happy crocheting, and may your hook always find its way to the next delightful project!