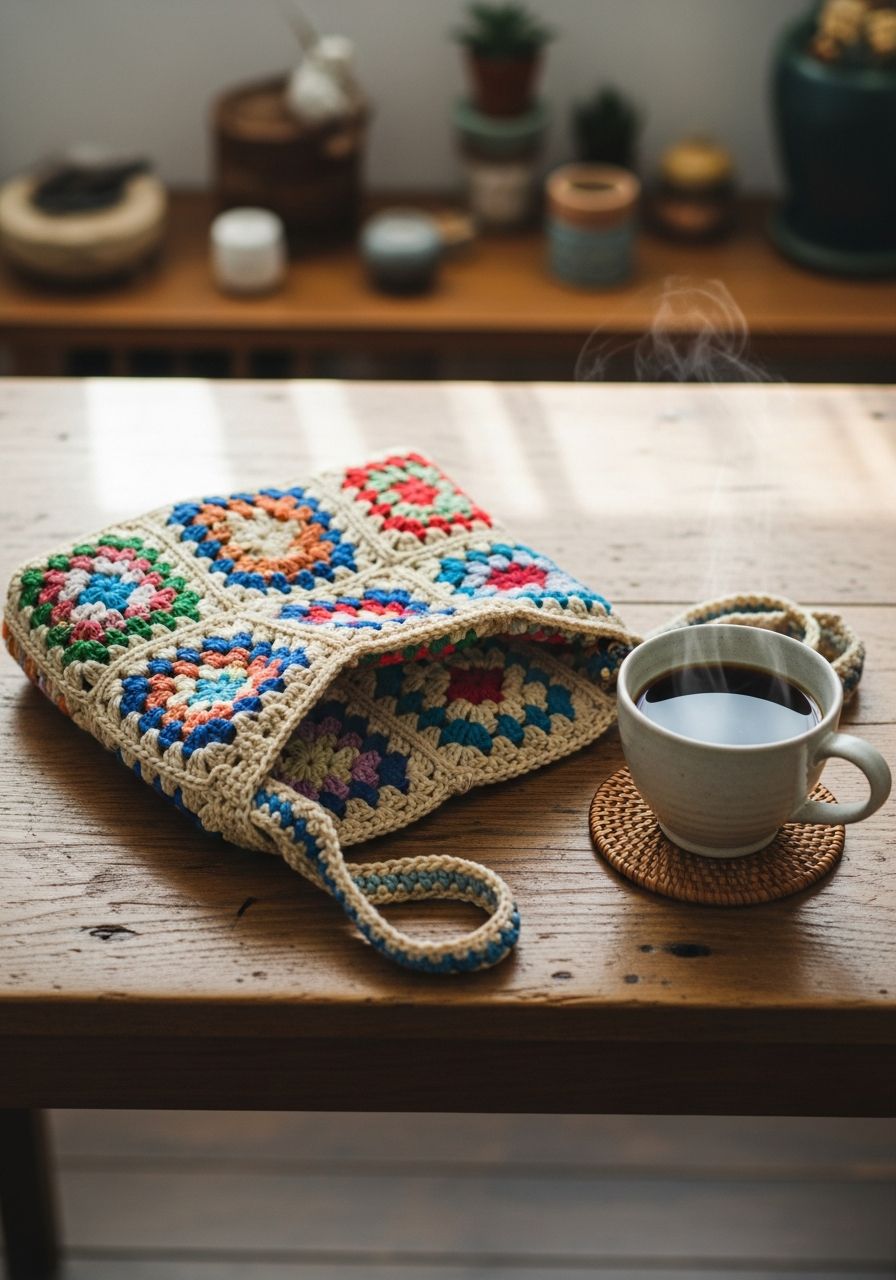
Imagine stepping out with a unique, handmade accessory that perfectly expresses your style – a vibrant, eye-catching bag that holds your essentials and sparks joy with every glance. That's the magic of creating your own Crochet Granny Square Bag! This isn't just a pattern; it's an invitation to weave a piece of your personality into a functional work of art. Get ready to fall in love with the rhythmic click of your hook as you transform simple yarn into a stunning, one-of-a-kind statement piece that will have everyone asking, “Where did you get that?”
Why You'll Love This Pattern
The granny square is a timeless crochet motif, beloved for its versatility and charming aesthetic. This pattern takes that classic appeal and transforms it into a practical, fashionable bag perfect for everyday use, market trips, or a stylish carry-all. Here’s why you’ll adore making this bag:
- Beginner-Friendly: While the finished bag looks intricate, it's made up of simple granny squares, making it accessible for crocheters of all skill levels, even enthusiastic beginners.
- Customizable: Play with countless color combinations! Use up your yarn scraps for a bohemian vibe, or choose a cohesive palette for a more sophisticated look.
- Portable Project: Each granny square is a small, portable project, perfect for crocheting on the go.
- Quick to Work Up: Once you get the hang of the squares, they work up surprisingly fast, and assembly is satisfyingly quick.
- Sustainable Style: Create a durable, reusable bag that's both eco-friendly and stylish.
Materials Needed
- Yarn: Worsted weight (Aran/10-ply) cotton or acrylic yarn. Approximately 400-500 yards total. (Consider 3-4 colors for your squares: A, B, C, and one main color for joining/border/strap).
- Crochet Hook: 5.0 mm (H/8) or size needed to obtain gauge.
- Yarn Needle: For weaving in ends and seaming.
- Scissors: For cutting yarn.
- Stitch Markers (Optional): Helpful for marking corners or specific stitches.
Gauge & Sizing
Gauge: One 3-round granny square should measure approximately 4.5 x 4.5 inches (11.5 x 11.5 cm).
To check gauge: Work a 3-round granny square according to the pattern below. If your square is larger, try a smaller hook. If it's smaller, try a larger hook. Consistent gauge is important for the squares to fit together correctly.
Finished Bag Size: Approximately 13.5 inches (34 cm) wide x 10.5 inches (26.5 cm) tall (excluding strap), once assembled and blocked.
Abbreviations
- ch: chain
- sl st: slip stitch
- sc: single crochet
- hdc: half double crochet
- dc: double crochet
- st(s): stitch(es)
- sp: space
- MC: magic circle (or magic ring)
- rep: repeat
- sk: skip
Step-by-Step Pattern
The Classic Granny Square (Make 13)
We'll use three colors (A, B, C) for each square for a vibrant look. Adjust as desired.
- Round 1 (Color A): Make a MC. Ch 3 (counts as 1st DC), 2 DC into ring, Ch 2. (3 DC into ring, Ch 2) 3 times. Sl st to top of beg Ch 3 to join. Fasten off Color A. (12 DC, 4 Ch 2 spaces)
- Round 2 (Color B): Join Color B with a Sl st into any Ch 2 corner space. Ch 3 (counts as 1st DC), (2 DC, Ch 2, 3 DC) into the same Ch 2 space. *Ch 1, (3 DC, Ch 2, 3 DC) into the next Ch 2 corner space*. Rep from * 2 more times. Ch 1. Sl st to top of beg Ch 3 to join. Fasten off Color B. (8 x 3DC clusters, 4 Ch 2 spaces, 4 Ch 1 spaces)
- Round 3 (Color C): Join Color C with a Sl st into any Ch 2 corner space. Ch 3 (counts as 1st DC), (2 DC, Ch 2, 3 DC) into the same Ch 2 space. *Ch 1, 3 DC into the next Ch 1 space. Ch 1, (3 DC, Ch 2, 3 DC) into the next Ch 2 corner space*. Rep from * 2 more times. Ch 1, 3 DC into the next Ch 1 space. Ch 1. Sl st to top of beg Ch 3 to join. Fasten off Color C, leaving a long tail for weaving. (12 x 3DC clusters, 4 Ch 2 spaces, 8 Ch 1 spaces)
Prepping for Assembly
- Weave in Ends: Before joining, weave in all loose ends on the back of each granny square. This makes assembly much neater.
- Blocking (Optional but Recommended): For a more polished and uniform bag, gently block your squares to ensure they are all the same size and lie flat.
Joining Your Granny Squares (Using Main Color)
We will join the squares using a simple slip stitch method, working through the back loops only (BLO) or through both loops for a more pronounced seam, whichever you prefer. For neatness, use the main color yarn.
- Front Panel (3 Squares): Lay 3 squares in a row. Join them along the long edges using a sl st. Hold two squares with wrong sides together. Insert hook into the corresponding corner ch-1 space of both squares, sl st. Then sl st into the BLO of each corresponding st across to the next corner ch-1 space. Repeat for the other join.
- Back Panel (3 Squares): Repeat step 1 to create another 3-square panel.
- Side Panel A (3 Squares): Join 3 squares in a row for the first side.
- Side Panel B (3 Squares): Join 3 squares in a row for the second side.
- Bottom Panel (1 Square): This square will be joined last to form the base.
Assembling the Bag Body
- Attach Side Panels to Front: Lay out your Front Panel. Take Side Panel A and align its long edge with one side of the Front Panel. Sl st them together. Repeat for Side Panel B on the other side of the Front Panel.
- Attach Side Panels to Back: Now, align Side Panel A with one side of the Back Panel, and Sl st them together. Repeat for Side Panel B and the other side of the Back Panel. You should now have an open box shape, with the Front, Back, and two Side Panels connected.
- Attach Bottom Panel: Take the single Bottom Square. Align one edge with the bottom edge of the Front Panel and Sl st them together. Continue to Sl st the remaining three edges of the Bottom Square to the bottom edges of the Side Panels and the Back Panel. This will close off the bottom of your bag.
Adding the Top Border
Using your main color, join yarn with a sl st to any stitch at the top opening of your bag.
- Round 1: Ch 1, sc evenly around the entire top opening of the bag. When you reach a seam where two squares meet, make sure to sc into the joined stitch to secure it. Sl st to first sc to join.
- Round 2: Ch 1, sc in each sc around. Sl st to first sc to join.
- Round 3: Ch 1, hdc in each sc around. Sl st to first hdc to join.
- Round 4: Ch 1, hdc in each hdc around. Sl st to first hdc to join.
- Round 5: Ch 1, sc in each hdc around. Sl st to first sc to join. Fasten off.
Creating the Strap
Using your main color, the strap will be a simple, sturdy strip of single crochet.
- Row 1: Ch 11. Sc in 2nd ch from hook and in each ch across. (10 sc)
- Row 2: Ch 1, turn. Sc in each sc across. (10 sc)
- Repeat Row 2: Continue repeating Row 2 until your strap measures approximately 28-32 inches (71-81 cm), or your desired length. For a cross-body bag, you might want it longer (45-50 inches).
- Fasten Off: Leave a long tail (approx. 12-15 inches) for sewing.
Finishing Touches
- Attach Strap: Lay your bag flat. Position one end of the strap to the inside top corner of one side of the bag, approximately 1 inch below the top edge. Using your yarn needle and the long tail, securely sew the strap to the bag. Repeat for the other end of the strap on the opposite side of the bag.
- Weave in All Remaining Ends: Double-check for any loose ends and weave them in securely.
- Final Blocking (Optional): If desired, you can give the entire bag a final block to shape it nicely.
Pro Tips
- Yarn Choice Matters: Cotton yarn offers great stitch definition and creates a sturdy bag. Acrylic is also a good, more affordable option with a wider range of colors.
- Color Planning: Lay out your yarn colors before you start to visualize your scheme. A random assortment can be charming, or a planned gradient can be stunning.
- Consistent Tension: Try to maintain consistent tension throughout your squares and joining stitches for a cohesive look.
- Invisible Joins: For a neater finish, learn the 'invisible join' or 'fake stitch' method for closing rounds instead of a traditional sl st.
- Add a Lining: For extra durability and to prevent small items from falling through, consider sewing a fabric lining into your finished bag. This is a great project for beginner sewers!
- Embellish: Add tassels, fringe, or even a cute button closure to make your bag truly unique.
Frequently Asked Questions
Q: Can I use different yarn weights?
A: Yes, you absolutely can! Just be aware that using a different yarn weight (e.g., DK or Chunky) will change the size of your granny squares and, consequently, the finished size of your bag. You'll also need to adjust your hook size accordingly to achieve a fabric you like. Always make a test square to check your gauge and desired fabric.
Q: How do I make my bag bigger or smaller?
A: There are a few ways! To make it bigger, you can either make more rounds on each granny square (e.g., 4 or 5 rounds) or simply make more squares and adjust the assembly layout. To make it smaller, you could use fewer squares (e.g., a 2x2 front/back with smaller side panels) or use a lighter weight yarn and a smaller hook, resulting in smaller individual squares.
Q: What's the best way to line my bag?
A: The simplest way is to create a basic fabric pouch that fits snugly inside your crocheted bag. Measure the dimensions of your finished bag, then cut two pieces of fabric for the main body and one for the bottom, adding seam allowances. Sew them together, hem the top edge, and then hand-stitch or machine-stitch the lining into the top border of your crocheted bag.
And there you have it – your very own handmade Crochet Granny Square Bag! This project is more than just a pattern; it's a journey of creativity and skill. Every stitch you've made tells a story, and the finished bag is a testament to your dedication and passion. Enjoy carrying your beautiful creation, knowing you poured your heart into every loop and chain. Happy crocheting!