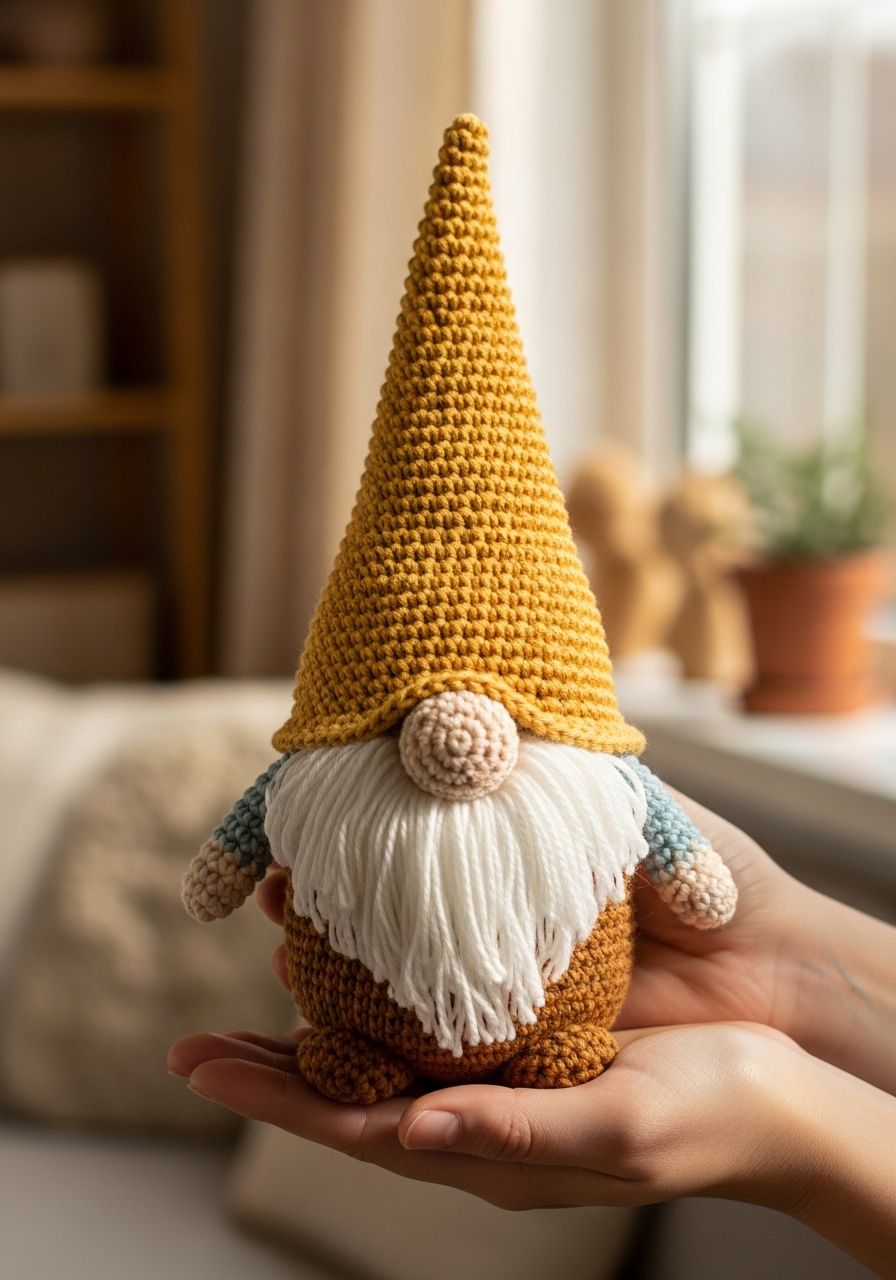
Imagine the cozy warmth and whimsical charm a little guardian of your home could bring, nestled amongst your books, perched on a shelf, or peeking out from a festive display! These enchanting creatures, with their tall hats and bushy beards, capture hearts instantly, and now you can bring that magic to life with your own hands. Get ready to embark on a delightful crafting journey as we dive into creating an irresistible crochet gnome amigurumi – a free pattern that promises joy with every stitch and a finished friend that’s sure to spark smiles and warmth wherever it goes.
Gnomes have long been symbols of good luck and protection, making them a beloved motif in home decor and gifts, especially during the colder months or holidays. This pattern is designed to be accessible for crocheters of all skill levels, from adventurous beginners to seasoned pros looking for a quick and satisfying project. We'll walk you through each step, ensuring your gnome emerges perfectly charming and full of personality.
Why You'll Love This Pattern
- Beginner-Friendly: We've broken down each step with clear, concise instructions, making it perfect for those new to amigurumi. You'll master essential techniques in no time!
- Quick & Satisfying: This project works up relatively fast, offering instant gratification. You can easily make a gnome in a weekend, or even an afternoon once you get the hang of it.
- Customizable: Play with different yarn colors, add unique embellishments, or vary the beard style to create a gnome that truly reflects your personal flair.
- Perfect Gift: Handmade gnomes make incredibly thoughtful presents for birthdays, holidays, housewarmings, or just because. Everyone loves a gnome!
- Stash Buster: Utilize those leftover skeins of yarn from previous projects. Gnomes are small enough that you can mix and match colors from your stash to create truly unique characters.
- Boost Your Skills: While beginner-friendly, this pattern introduces you to fundamental amigurumi techniques like working in the round, increasing, and decreasing, which are valuable skills for any crochet enthusiast.
Materials Needed
- Yarn: Worsted weight (Aran/10-ply) acrylic or cotton yarn in your chosen colors.
- Color A: (e.g., Green, Red, Blue) for the body/outfit. Approximately 50g.
- Color B: (e.g., White, Grey, Contrasting Color) for the hat. Approximately 40g.
- Color C: (e.g., Skin Tone - Peach, Tan) for the nose. Small amount.
- Color D: (e.g., White, Grey, Brown) for the beard. Small amount.
- Crochet Hook: 3.5mm (E/4) or 4.0mm (G/6), depending on your tension. Choose a hook size that creates tight stitches to prevent stuffing from showing through.
- Stuffing: Polyester fiberfill.
- Stitch Marker: Essential for working in continuous rounds.
- Tapestry Needle: For sewing parts together and weaving in ends.
- Scissors: For cutting yarn.
- Optional: Rice, plastic pellets, or poly-pellets for adding weight to the base (helps the gnome stand).
Gauge & Sizing
For amigurumi, exact gauge isn't as critical as for garments, but maintaining a consistent tension is key to a well-formed project. We want tight stitches to ensure the stuffing doesn't show through. If your stitches are too loose, go down a hook size. If they're too tight and hard to work with, go up a hook size. When completed with worsted weight yarn and a 3.5mm hook, your finished gnome will stand approximately 7-8 inches tall (including the hat).
Abbreviations
- ch: chain
- sc: single crochet
- hdc: half double crochet
- dc: double crochet
- sl st: slip stitch
- inc: increase (2 single crochet stitches in the same stitch)
- dec: decrease (single crochet 2 stitches together)
- mr / magic ring: magic ring / magic circle
- fo: fasten off
- st / sts: stitch / stitches
- (X): indicates the stitch count at the end of the round
Step-by-Step Pattern
This pattern is worked in continuous rounds unless otherwise specified. Use a stitch marker to keep track of the beginning of each round.
Gnome Body (Color A)
- Start with a magic ring, 6 sc into ring. (6)
- Inc in each st around. (12)
- (1 sc, inc) x 6. (18)
- (2 sc, inc) x 6. (24)
- (3 sc, inc) x 6. (30)
- (4 sc, inc) x 6. (36)
- Sc in each st around for 4 rounds. (36)
- (4 sc, dec) x 6. (30)
- Sc in each st around for 2 rounds. (30)
- (3 sc, dec) x 6. (24)
- Sc in each st around for 2 rounds. (24)
- (2 sc, dec) x 6. (18)
- Start stuffing firmly. If using weighted pellets, place them at the bottom before adding fiberfill.
- Sc in each st around. (18)
- (1 sc, dec) x 6. (12)
- Sc in each st around. (12)
- Dec x 6. (6)
- FO, leaving a long tail for sewing. Weave the tail through the front loop of the remaining 6 stitches and pull tight to close. Hide the end.
Gnome Hat (Color B)
- Start with a magic ring, 4 sc into ring. (4)
- (1 sc, inc) x 2. (6)
- Sc in each st around. (6)
- (2 sc, inc) x 2. (8)
- Sc in each st around. (8)
- (3 sc, inc) x 2. (10)
- Sc in each st around. (10)
- (4 sc, inc) x 2. (12)
- Sc in each st around for 2 rounds. (12)
- (1 sc, inc) x 6. (18)
- Sc in each st around for 2 rounds. (18)
- (2 sc, inc) x 6. (24)
- Sc in each st around for 2 rounds. (24)
- (3 sc, inc) x 6. (30)
- Sc in each st around for 2 rounds. (30)
- (4 sc, inc) x 6. (36)
- Sc in each st around for 3 rounds. (36)
- Sl st to the next stitch, FO, leaving a long tail for sewing.
Gnome Nose (Color C)
- Start with a magic ring, 6 sc into ring. (6)
- Inc in each st around. (12)
- Sc in each st around for 2 rounds. (12)
- Dec x 6. (6)
- Lightly stuff the nose.
- FO, leaving a long tail for sewing. Weave the tail through the front loop of the remaining 6 stitches and pull tight to close.
Gnome Beard (Color D)
- Cut several strands of yarn (Color D) approximately 8-10 inches long. The number of strands depends on how thick you want the beard to be.
- Using your crochet hook, insert it into a stitch on the front of the gnome's body, just below where the hat will sit.
- Fold a yarn strand in half, creating a loop. Hook the loop with your crochet hook and pull it partially through the stitch.
- Insert your hook through the loop you just pulled through. Grab the two loose ends of the yarn strand and pull them through the loop. Pull tight to secure (this is a lark's head knot).
- Repeat steps 2-4, attaching strands side-by-side to create a full, bushy beard. You can create a V-shape or a more rounded beard line.
- Once all strands are attached, trim and shape the beard to your desired length and style.
Assembly
- Attach the Hat: Position the hat on top of the gnome's body. The brim of the hat should sit just above the top of the body where you closed it off. Using the long tail from the hat and your tapestry needle, sew the hat securely to the body. Stitch all the way around, ensuring a neat join.
- Attach the Nose: Place the stuffed nose on the body, centered below the hat brim. The hat should slightly overlap the top of the nose. Using the long tail from the nose, sew it firmly to the body.
- Final Touches: Weave in any remaining loose ends. Gently shape your gnome and fluff the beard. You can optionally add a small pompom or a bell to the tip of the hat for extra flair!
Pro Tips
- Invisible Decrease (invdec): For a cleaner finish in amigurumi, use the invisible decrease method. Insert your hook into the front loop of the first stitch, then immediately into the front loop of the second stitch, yarn over, pull through both front loops (2 loops on hook), yarn over, and pull through both loops on hook.
- Stuffing Firmly & Evenly: Don't be shy with the stuffing! Firm stuffing helps your gnome maintain its shape and avoids a lumpy appearance. Use small pieces of fiberfill to avoid bulges, especially when stuffing smaller parts like the nose.
- Stitch Marker is Your Best Friend: Always use a stitch marker to mark the first stitch of each round when working in continuous spirals. This prevents you from losing your place and helps maintain an accurate stitch count.
- Yarn Tails for Sewing: Always leave long tails (at least 12-15 inches) when fastening off pieces that need to be sewn together. It saves you from having to join new yarn later.
- Color Changes: When changing colors, work the last yarn over of the last stitch of the old color with the new color. This creates a smoother transition.
- Pom-Pom Power: Consider adding a small pom-pom to the tip of your gnome's hat for an extra touch of cuteness. You can make one with a pom-pom maker or by hand with two cardboard circles.
Frequently Asked Questions
Q: Can I use different yarn weights for this pattern?
A: Absolutely! This pattern is very adaptable. If you use a thinner yarn (like sport or DK weight), your gnome will be smaller, and you'll likely need to go down a hook size (e.g., 2.5mm or 3.0mm) to maintain tight stitches. Conversely, if you use a bulkier yarn (like chunky or super bulky), your gnome will be larger, and you'll need a larger hook (e.g., 5.0mm or 6.0mm). Just remember to adjust your hook size to match the yarn weight to avoid gaps in your fabric.
Q: How do I make my gnome stand up straight without falling over?
A: The key to a stable gnome is to add weight to its base. Before you fully stuff the body with fiberfill, place a small baggie of rice, plastic pellets, or poly-pellets at the very bottom. You can secure this baggie with a bit more fiberfill around it before continuing to stuff the rest of the body. This extra weight will give your gnome a low center of gravity, preventing it from toppling.
Q: I don't like the idea of a yarn beard. Are there other options?
A: Yes! While the yarn strand beard is popular for its fluffy texture, you could also crochet a beard piece. To do this, you might crochet a half-circle or a triangular shape in a beard color, starting with a chain and working rows of single crochet or half double crochet, increasing to create the desired shape, and then sewing it onto the body. For an even simpler look, you could forgo the beard entirely and just have the hat and nose!
There you have it – your very own magical crochet gnome, brought to life by your skillful hands! These little guys are more than just decorations; they're tiny bundles of joy, symbols of home, and testaments to the beauty of handmade creations. We hope you enjoyed crafting your gnome as much as we enjoyed sharing this pattern with you. Feel free to experiment, personalize, and most importantly, have fun. Happy crocheting!