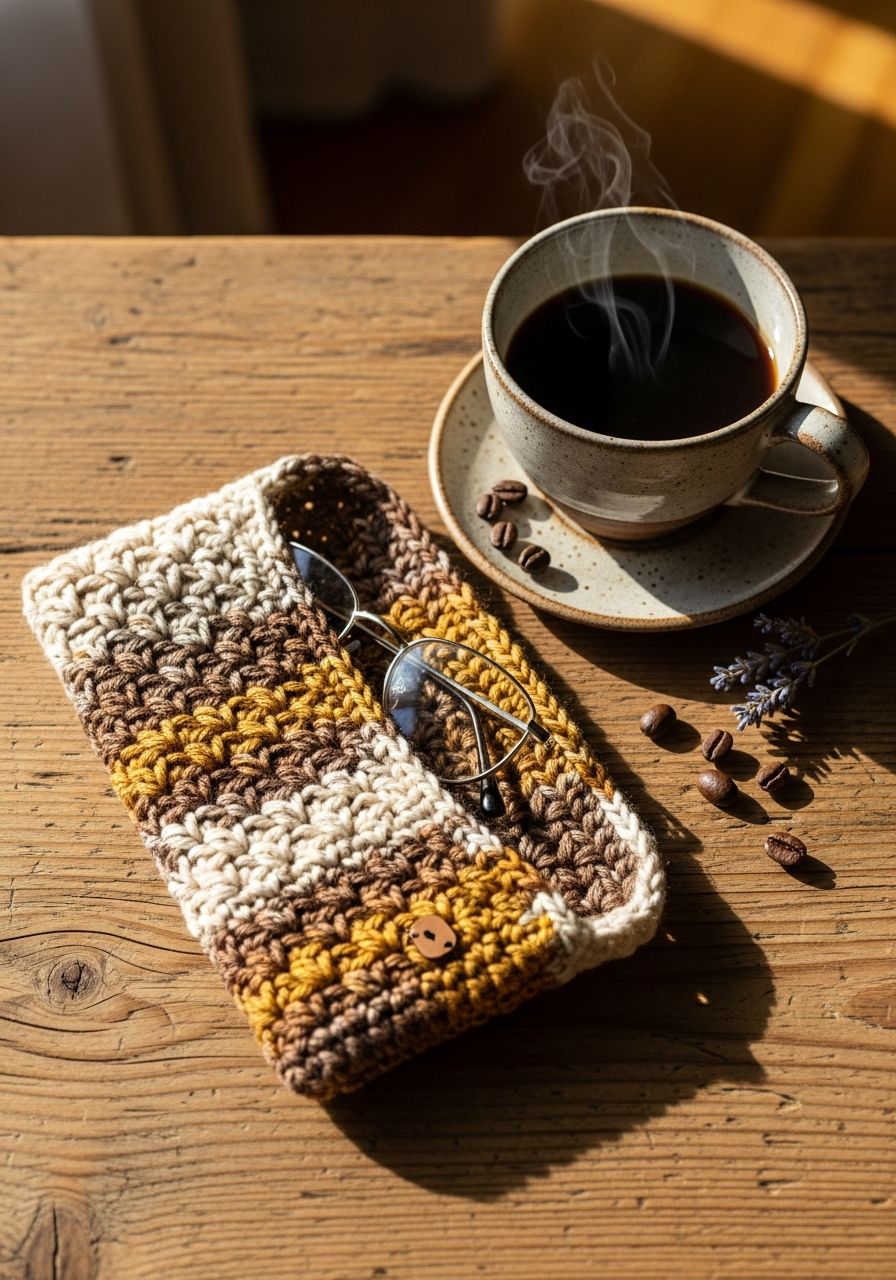
Do you ever find yourself fumbling for your glasses, only to discover them nestled precariously in your bag, lenses scratched and frames vulnerable? Imagine the peace of mind knowing your beloved spectacles, readers, or sunglasses are always safe, snug, and stylishly protected in a handmade haven. This isn't just another project; it's an invitation to create a beautiful, practical accessory that reflects your personal flair or makes a deeply thoughtful gift. Get ready to fall in love with making your very own Crochet Glasses Case – a quick, satisfying project that combines functionality with handmade charm!
Whether you're safeguarding your everyday readers, keeping sunglasses pristine for your next adventure, or simply want a dedicated spot for your eyewear, this crochet glasses case pattern is your perfect solution. It's designed to be simple enough for beginners to tackle with confidence, while offering seasoned crocheters a delightful, quick-win project. We'll walk you through every stitch, from creating a sturdy base to adding a practical flap, ensuring your finished case is both durable and chic. Plus, it's a fantastic stash-buster!
Why You'll Love This Pattern
- Quick & Satisfying: This project works up surprisingly fast, making it perfect for instant gratification or last-minute gifts. You might even finish it in an evening!
- Beginner-Friendly: Utilizing basic crochet stitches like single crochet and half double crochet, this pattern is accessible for those new to the craft. We'll guide you through each step.
- Customizable: Play with different yarn colors, add stripes, embroidery, or unique buttons to make each case truly one-of-a-kind.
- Practical & Protective: The dense fabric created by the stitches offers good protection against scratches and minor bumps, keeping your lenses clear and frames intact.
- Eco-Friendly Gift: Handmade gifts are always cherished. This case is a thoughtful, sustainable present for friends, family, or teachers.
- Stash Buster: It requires relatively small amounts of yarn, making it ideal for using up those leftover skeins from previous projects.
Materials Needed
- Yarn: Approximately 70-80 yards of Worsted Weight (Category 4) cotton or acrylic yarn. Cotton yarn provides a nice structure and durability, while acrylic offers a softer feel and wider color range. Choose a yarn that isn't too 'fuzzy' to avoid leaving fibers on your lenses.
- Crochet Hook: H/8 (5.0mm) or size needed to obtain gauge.
- Yarn Needle: For weaving in ends.
- Scissors: For cutting yarn.
- Stitch Marker: Highly recommended, especially for working in continuous rounds.
- Button (Optional): Approximately 0.75" – 1" (2-2.5 cm) for the flap closure.
Gauge & Sizing
Gauge: 14 sc and 16 rows = 4 inches (10 cm) with H/8 (5.0mm) hook, worked in single crochet in the round.
Achieving the correct gauge is crucial for ensuring your glasses case turns out the intended size and your glasses fit snugly. If your gauge is too loose, your case will be larger; if it's too tight, it will be smaller. Take a moment to create a small swatch!
Finished Size: Approximately 3.5" (9 cm) wide x 7" (18 cm) tall (excluding flap).
Abbreviations
- ch: chain
- sc: single crochet
- hdc: half double crochet
- dc: double crochet
- sl st: slip stitch
- inc: increase (2 sc in the same stitch)
- dec: single crochet 2 together (sc2tog)
- st(s): stitch(es)
- FO: fasten off
- MR: magic ring (or magic circle)
Step-by-Step Pattern
This pattern is worked in continuous rounds for the body, so you won't join with a slip stitch at the end of each round unless specified. Use a stitch marker to keep track of the beginning of your rounds.
Part 1: The Base
We'll create an oval base by working around a starting chain.
- Ch 15.
- Round 1: Sc in 2nd ch from hook, sc in next 12 ch, 3 sc in the last ch. Now, working down the other side of the starting chain: sc in next 12 ch, 2 sc in the last ch. (Total: 30 stitches). Place stitch marker in the first sc of the next round.
- Round 2: 2 sc in first st (inc), sc in next 12 sts, 2 sc in next st (inc), 2 sc in next st (inc), 2 sc in next st (inc), sc in next 12 sts, 2 sc in next st (inc), 2 sc in next st (inc). (Total: 36 stitches).
- Round 3: Sc in each st around. (Total: 36 stitches). This helps create a flatter edge for the base before working up the sides.
Part 2: The Body
Now we'll build the height of the case, working in continuous rounds.
- Round 4: Working in the back loop only (BLO) for this round, sc in each st around. (Total: 36 stitches). This creates a neat ridge that defines the base of the case.
- Round 5 - Round 25: Sc in each st around. (Total: 36 stitches for each round). Continue working in regular single crochet (through both loops) for these 21 rounds, or until your desired height is reached. Your glasses should fit comfortably inside with about an inch or two of space at the top before the flap begins.
- Round 26: Sc in each st around. Sl st into the first sc of the round to finish, then FO.
Part 3: The Flap
We'll now create the flap that folds over to close the case. This is worked in rows.
- Flatten your case so the 'seam' (where your rounds ended or started, if you joined) is at the back. Join your yarn with a sl st in the 9th stitch from the back-center (this will position your flap nicely over the front).
- Row 1: Ch 1, sc in the same st and in the next 17 sts. (Total: 18 stitches). Ch 1, turn.
- Row 2: Sc in each st across. (Total: 18 stitches). Ch 1, turn.
- Row 3: Sc in next 7 sts, ch 4 (this creates your buttonhole), skip next 4 sts, sc in next 7 sts. (Total: 14 sc + 4 ch). Ch 1, turn.
- Row 4: Sc in next 7 sts, 4 sc into the ch-4 space, sc in next 7 sts. (Total: 18 stitches). Ch 1, turn.
- Row 5: Sc in each st across. (Total: 18 stitches). FO, leaving a long tail for weaving in.
Finishing
- Weave in all your loose ends securely using a yarn needle.
- If using a button, attach it to the front of the case, directly below the buttonhole created in the flap. Test the fit to ensure it aligns perfectly.
- (Optional) Block your finished case gently to refine its shape and dimensions.
Pro Tips
- Yarn Choice Matters: While cotton is recommended for its structure, a soft acrylic or even a blend with a small amount of wool can also work. Avoid very fluffy yarns, as they can leave lint on your lenses.
- Customizing Size: To make the case wider, increase the number of starting chains for the base (always an even number). To make it taller, add or subtract rounds from the body section. Remember to adjust your flap's width if you alter the case's width.
- Add a Lining: For extra protection or a luxurious feel, you can sew a simple fabric lining into your case. Cut two pieces of fabric slightly larger than your case, sew them into a tube, and then hand-stitch or machine-stitch the lining inside.
- Stitch Markers are Your Friend: Especially when working in continuous rounds, a stitch marker is invaluable for keeping track of the beginning of your rounds and preventing your work from spiraling unexpectedly.
- Tension Consistency: Try to maintain an even tension throughout your project. This will ensure your stitches are uniform, and your case has a smooth, professional finish.
- Blocking: While optional, a light blocking can help set the shape of your case, even out your stitches, and give it a more polished look. Gently wet your case, shape it, and let it air dry.
Frequently Asked Questions
Can I use a different weight of yarn?
Yes, absolutely! You can use a lighter (e.g., DK weight) or heavier (e.g., chunky weight) yarn, but you will need to adjust your hook size accordingly to achieve a fabric that is dense enough to protect your glasses. Be sure to check your gauge. If using a lighter yarn, you might need to add more stitches to your base chain and more rounds to the body. If using a heavier yarn, fewer stitches and rounds will be necessary.
How do I make the case larger or smaller to fit specific glasses?
To adjust the width, modify the initial chain length in Part 1. For every 2 stitches you add or subtract from the starting chain, you'll generally increase or decrease the width by about 0.5 inches (1.25 cm). Remember to keep the chain length an even number for symmetry. To adjust the height, simply add or remove rounds in Part 2, the Body section, until you reach your desired height before starting the flap.
Can I make this case without a button?
Of course! If you prefer a simple slip-in case, you can skip Part 3, the Flap. Instead, after completing the body rounds, simply sl st around the top edge for a neat finish, then FO and weave in ends. This creates an open-top pouch perfect for quick access to your glasses.
There you have it – a beautiful, practical Crochet Glasses Case, handmade with love! We hope you enjoyed creating this project as much as we enjoyed designing it for you. Your new case is not just a protector for your eyewear; it's a testament to your creativity and skill. Don't forget to customize it to your heart's content and share your finished creations!