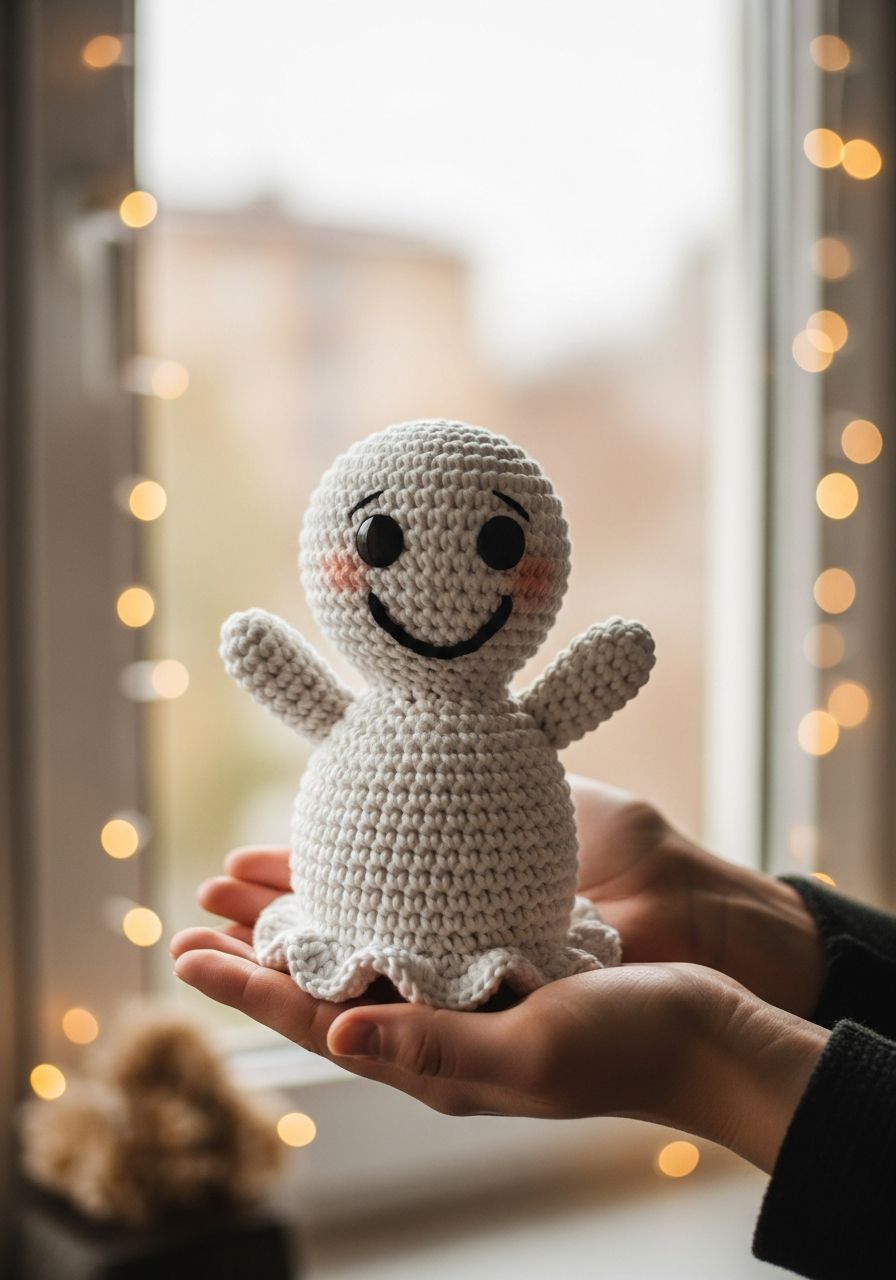
Imagine the joy of crafting a tiny, friendly spirit that brings a smile to everyone's face, not a fright! With just a few simple stitches, you can conjure up the most adorable little specter, a charming companion that's perfect for Halloween, year-round decor, or as a delightful gift. Dive into the enchanting world of amigurumi with our easy-to-follow guide and discover the magic of bringing your own sweet, spooky friend to life. This **Crochet Ghost Amigurumi** pattern isn't just about making a toy; it's about creating a memory, a handcrafted treasure filled with love and a touch of whimsical charm!
Welcome, fellow yarn enthusiasts, to a world where hooks and yarn transform into captivating characters! Today, we're embarking on a delightful journey to crochet the most endearing ghost you've ever seen. Whether you're a seasoned crocheter looking for a quick, satisfying project or a beginner eager to dip your toes into the art of amigurumi, this pattern is designed with you in mind. Our little ghost is not scary at all; rather, it’s a plump, friendly spirit ready to float into your heart and home. Get ready to gather your materials and let your creativity take flight as we stitch up some spooky-cute fun!
Why You'll Love This Pattern
- Beginner-Friendly: This pattern primarily uses basic stitches like single crochet, increases, and decreases, making it perfect for those new to amigurumi. We'll guide you through every step!
- Quick to Make: With its simple shape and minimal assembly, you can whip up one of these adorable ghosts in just a few hours. Ideal for last-minute gifts or decorating sprees.
- Versatile Decor: These ghosts aren't just for Halloween! They make charming additions to nurseries, bookshelves, or even as car rearview mirror danglers. Change up the yarn color for a different vibe!
- Perfect for Stash-Busting: This project uses very little yarn, making it an excellent way to use up those leftover skeins of white, cream, or even pastel yarns you have lying around.
- Customizable: Add your own flair! Embroider different facial expressions, add rosy cheeks, or even tiny accessories like a bow tie or a flower crown to give your ghost a unique personality.
- Gift-Ready: Hand-crocheted gifts are always cherished. These little ghosts are perfect for party favors, stocking stuffers, or a thoughtful handmade present for friends and family.
- Skill-Building: While easy, this pattern will help you practice essential amigurumi techniques like working in the round, stuffing, and basic embroidery, building your confidence for more complex projects.
Materials Needed
- Worsted Weight (Aran/10-ply) Yarn in White (or desired color) - approximately 50-70 yards
- Small amount of Black Embroidery Floss or thin black yarn for eyes/mouth
- Crochet Hook (size E/4-3.5mm recommended, adjust to achieve tight stitches)
- Polyester Fiberfill for stuffing
- Yarn Needle (for weaving in ends and assembly)
- Stitch Marker (highly recommended for working in the round)
- Scissors
Gauge & Sizing
Gauge: 5 single crochet stitches and 5 rows = 1 inch (2.5 cm). Achieving the exact gauge isn't critical for this project, but aim for tight stitches to prevent stuffing from showing through. If your stitches are too loose, go down a hook size.
Finished Size: Approximately 4.5-5 inches (11-13 cm) tall when made with worsted weight yarn and a 3.5mm hook, though size may vary based on your tension and yarn choice.
Abbreviations
- MR: Magic Ring / Magic Circle
- ch: Chain
- sl st: Slip Stitch
- sc: Single Crochet
- hdc: Half Double Crochet
- dc: Double Crochet
- inc: Increase (2 single crochet in one stitch)
- dec: Decrease (single crochet 2 stitches together)
- st(s): Stitch(es)
- FO: Fasten Off
- rep: Repeat
- (X): Number of stitches at the end of the round
Step-by-Step Pattern
This ghost is worked in continuous rounds. Use a stitch marker to keep track of the beginning of each round.
Body (Starting from the bottom)
- Round 1: Make a MR, ch 1, 6 sc into the ring. (6)
- Round 2: Inc in each st around. (12)
- Round 3: (Sc in next st, inc in next st) rep 6 times. (18)
- Round 4: (Sc in next 2 sts, inc in next st) rep 6 times. (24)
- Round 5: (Sc in next 3 sts, inc in next st) rep 6 times. (30)
- Round 6: (Sc in next 4 sts, inc in next st) rep 6 times. (36)
- Round 7-14: Sc in each st around. (36) (8 rounds of single crochet)
- Round 15: (Sc in next 4 sts, dec over next 2 sts) rep 6 times. (30)
- Round 16: Sc in each st around. (30)
- Round 17: (Sc in next 3 sts, dec over next 2 sts) rep 6 times. (24)
- Round 18: Sc in each st around. (24)
- Round 19: (Sc in next 2 sts, dec over next 2 sts) rep 6 times. (18) Start stuffing your ghost firmly with fiberfill. Continue to stuff as you go.
- Round 20: Sc in each st around. (18)
- Round 21: (Sc in next st, dec over next 2 sts) rep 6 times. (12)
- Round 22: Dec over next 2 sts 6 times. (6) Finish stuffing.
- FO, leaving a long tail. Use your yarn needle to weave the tail through the front loop of the remaining 6 stitches, pull tight to close the opening, and secure. Weave in any remaining tail.
Arms (Make 2)
- Round 1: Make a MR, ch 1, 6 sc into the ring. (6)
- Round 2-3: Sc in each st around. (6) (2 rounds)
- FO, leaving a long tail for sewing. Do not stuff.
Assembly & Finishing
- Embroider Eyes: Using black embroidery floss or thin black yarn, embroider two small circles or 'U' shapes for eyes on the front of the ghost's head, between Rounds 15 and 17, about 4-5 stitches apart. You can also embroider a small 'O' or 'U' shape for a mouth if desired.
- Attach Arms: Position the arms on either side of the ghost's body, roughly between Rounds 15 and 17 (the widest part of the 'neck'/tapering section). Use your yarn needle and the long tails to securely sew the arms to the body. Weave in any remaining ends.
- Shape: Gently shape your ghost by hand, ensuring the stuffing is evenly distributed to give it a pleasing, plump form. You can gently press the bottom to create a slightly flattened base if you want it to stand.
Pro Tips
- Tight Stitches are Key: For amigurumi, it's crucial to use a hook size smaller than what's typically recommended for your yarn. This creates tight stitches that prevent stuffing from showing through gaps, giving your ghost a polished finish.
- Invisible Decrease: For a cleaner look, try the invisible decrease (inv dec). Insert your hook into the front loop of the first stitch, then into the front loop of the second stitch, yarn over, pull through both front loops, yarn over, and pull through both loops on hook.
- Stuffing Smart: Stuff your ghost firmly but evenly. Use small pieces of fiberfill to avoid lumps. A chopstick or the back of your crochet hook can help push stuffing into tight spots, especially the top of the head.
- Stitch Marker Discipline: Always use a stitch marker at the beginning of each round, especially when working in continuous spirals. It saves a lot of headaches!
- Yarn Tails for Sewing: When fastening off parts that need to be sewn onto the main body (like the arms), leave a generous tail (at least 12-15 inches) to use for sewing. This eliminates extra weaving in of ends.
- Experiment with Faces: Don't be afraid to give your ghost unique expressions! Slanted eyes for a sleepy look, a wavy mouth for a mischievous grin, or simple French knots for tiny eyes. Felt cutouts glued on with fabric glue also work great for eyes and mouths.
- Weighted Base (Optional): If you want your ghost to stand more stably, you can place a small bag of poly pellets or rice at the very bottom of the body before fully stuffing. Be sure it's securely enclosed in a small fabric pouch to prevent leakage.
Frequently Asked Questions
Can I use different yarn weights for this pattern?
Absolutely! You can use any yarn weight you prefer. Just be sure to adjust your hook size accordingly to maintain tight stitches. A finer yarn (like sport or fingering weight) with a smaller hook will result in a tiny ghost, while a bulkier yarn (like chunky or super bulky) with a larger hook will create a much bigger, squishier ghost. Keep in mind that changing yarn weight will alter the finished size and potentially the amount of stuffing needed.
How do I make my ghost's bottom wavy instead of flat?
For a distinct wavy bottom, you can modify the last few rounds of the body or add a separate ruffle. A simple way is to work a round of (sc, hdc, dc, hdc, sc, sl st) repeat around the bottom edge of your ghost before fastening off (or after closing the main body if you want it to be an added skirt). Alternatively, after completing the body and closing, you can attach yarn to the bottom edge and work a round of (ch 3, skip 1 st, sl st in next st) or a similar shell stitch pattern to create a ruffled appearance.
What's the best way to prevent the stuffing from showing through my stitches?
The key to preventing stuffing peek-through is to use a crochet hook that is smaller than what is typically recommended for your chosen yarn weight. This creates a denser fabric with smaller gaps between stitches. Additionally, when stuffing, use small tufts of fiberfill rather than large clumps, and gently push it into place rather than forcing it, which can stretch your stitches. If you still have trouble, you can try lining the inside of your ghost with a piece of pantyhose or a thin fabric before stuffing.
And there you have it! Your very own adorable **Crochet Ghost Amigurumi**, ready to bring a touch of friendly charm wherever it goes. We hope you enjoyed creating this little spirit as much as we enjoyed sharing the pattern with you. Don't stop here; let this be the beginning of many more delightful amigurumi adventures. Happy hooking, and may your days be filled with creativity and crafty joy!