Imagine the sun on your skin, the music in the air, and the captivating sway of every step as your unique, handcrafted garment dances with you. That feeling of effortless style and bohemian chic is within your reach with our ultimate guide to creating a stunning crochet fringe dress. Get ready to turn heads, embrace your inner free spirit, and crochet a piece that truly reflects your vibrant personality!
Welcome, fellow fiber artists! This article isn't just a pattern; it's your comprehensive guide to crafting a beautiful, comfortable, and undeniably stylish fringe dress perfect for beach days, summer festivals, or simply adding a touch of whimsical elegance to your everyday wardrobe. We'll cover everything from selecting the right yarn to detailed stitch instructions and clever finishing techniques, ensuring that even intermediate crocheters can create a masterpiece they'll adore. Let's dive into the world of handmade fashion and create something truly spectacular together!
Why You'll Love This Pattern
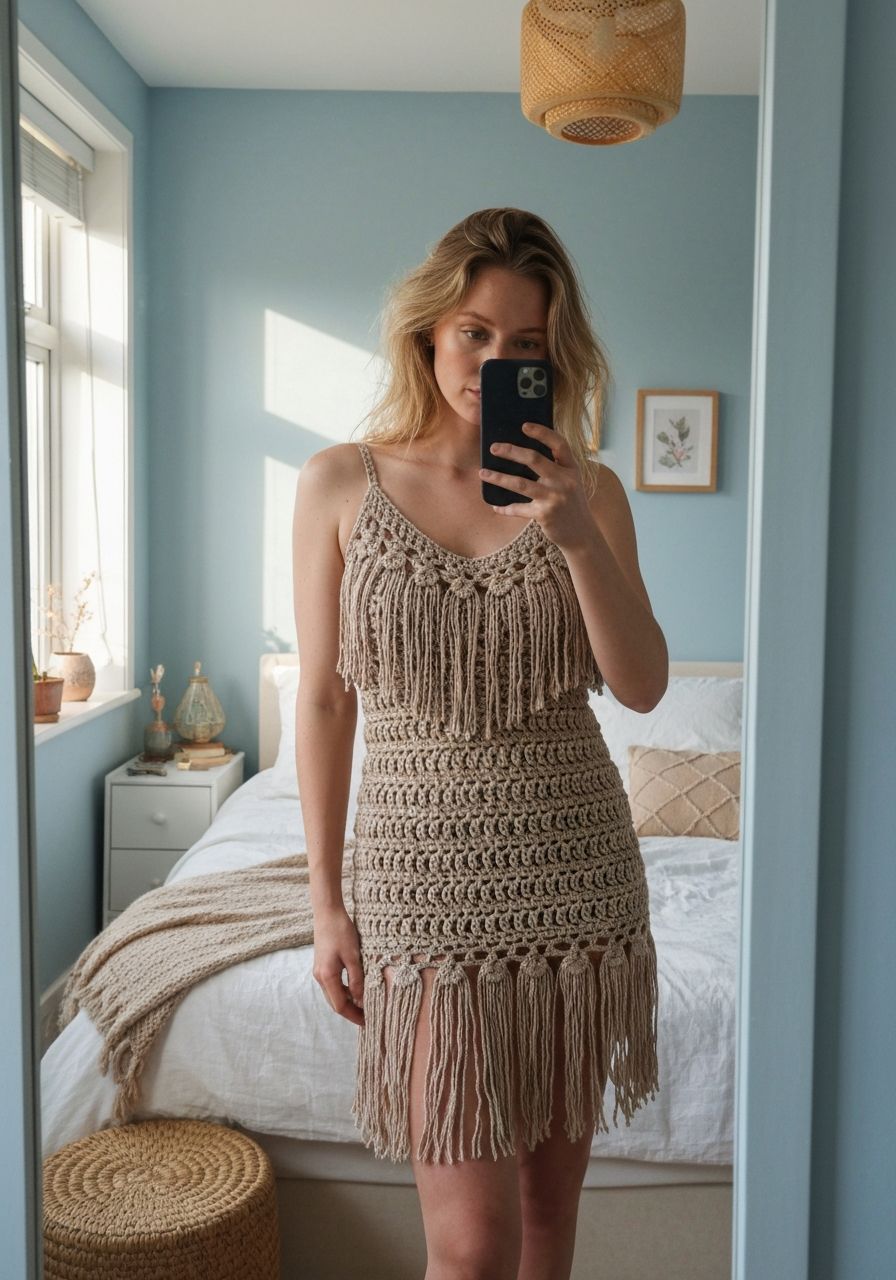
- Unique & Eye-Catching: Stand out from the crowd with a dress that exudes handmade charm and bohemian flair. The fringe adds incredible movement and texture, making every step a statement.
- Customizable Comfort: This top-down construction allows for easy adjustments to fit your unique body shape. You can easily modify the length, bust circumference, and even the density of the fringe to create your perfect dress.
- Perfect for Any Occasion: Whether you're heading to a music festival, a beach vacation, a summer party, or just want a cozy yet stylish everyday dress, this pattern fits the bill. Layer it over a slip or wear it as a swimsuit cover-up.
- Engaging & Rewarding: While using fundamental stitches, the construction and fringe application offer an engaging challenge that's incredibly satisfying to complete. You'll feel a huge sense of accomplishment with your finished garment.
- Sustainable Fashion: Embrace slow fashion by creating your own garments. Hand-making your clothes is not only rewarding but also a wonderful way to contribute to a more sustainable wardrobe.
Materials Needed
- Yarn: Sport (Weight 2) or DK (Weight 3) cotton or cotton blend yarn. Approximately 1000-1200 yards (915-1100 meters) for size Medium, depending on desired length and fringe density. I recommend Lion Brand 24/7 Cotton or similar for excellent drape and stitch definition. Choose a color that speaks to your boho soul!
- Crochet Hooks:
- 3.5mm (E) for the yoke and a tighter stitch.
- 4.0mm (G) for the main body for better drape.
- Scissors: Sharp pair for yarn.
- Yarn Needle: For weaving in ends.
- Stitch Markers: Essential for marking stitch counts, especially for increases and separating body sections.
- Measuring Tape: For accurate sizing and length.
Gauge & Sizing
Achieving the correct gauge is crucial for your dress to fit as intended. Please make a gauge swatch!
Gauge Swatch (with 4.0mm hook):
- Chain 18.
- Row 1: Hdc in 2nd ch from hook and in each ch across. (17 hdc)
- Row 2: Ch 1 (does not count as st), turn, hdc in each st across. (17 hdc)
- Repeat Row 2 until piece measures approximately 4 inches (10 cm) tall.
Your Gauge: 16 hdc and 10 rows should measure 4 inches (10 cm).
Sizing Information (approximate finished bust circumference):
- Small: 32-34 inches (81-86 cm)
- Medium: 36-38 inches (91-96 cm) - Pattern written for this size, with notes for adjustment.
- Large: 40-42 inches (102-107 cm)
- X-Large: 44-46 inches (112-117 cm)
- 2X-Large: 48-50 inches (122-127 cm)
To adjust sizing, you will primarily modify the starting chain for the yoke and the number of increase rounds. For a larger size, you'll need more initial stitches and/or more increase rounds. For a smaller size, fewer. Always try on your work as you go!
Abbreviations
- ch: chain
- sc: single crochet
- hdc: half double crochet
- dc: double crochet
- sl st: slip stitch
- inc: increase (usually 2 stitches in one)
- dec: decrease (usually sc2tog or hdc2tog)
- FO: fasten off
- rep: repeat
- st(s): stitch(es)
- R: Round
- sk: skip
- sp: space
Step-by-Step Pattern
This pattern is worked top-down, starting with the yoke, then separating for the body, and finally adding the fabulous fringe!
Yoke (Neckline to Underarm) - Size Medium
Using 3.5mm hook.
- R1: Ch 80, sl st to first ch to form a ring, being careful not to twist. Ch 2 (counts as first hdc), hdc in next st and in each ch around. Sl st to top of beg ch 2. (80 hdc)
- R2: Ch 2, *hdc in next 9 sts, 2 hdc in next st (inc)*. Rep from * to * 7 more times. Hdc in remaining sts. Sl st to top of beg ch 2. (88 hdc)
- R3: Ch 2, *hdc in next 10 sts, 2 hdc in next st*. Rep from * to * 7 more times. Hdc in remaining sts. Sl st to top of beg ch 2. (96 hdc)
- R4: Ch 2, *hdc in next 11 sts, 2 hdc in next st*. Rep from * to * 7 more times. Hdc in remaining sts. Sl st to top of beg ch 2. (104 hdc)
- R5-R12: Continue increasing evenly by adding one hdc between increases in each round (e.g., R5 will be hdc in 12, inc; R6 will be hdc in 13, inc, etc.) until you have 168 hdc stitches. Your yoke should now measure approximately 7-8 inches (18-20 cm) from the top of the neckline to the bottom of the yoke.
- R13: Ch 2, hdc in each st around. Sl st to top of beg ch 2. (168 hdc)
Bodice Separation & Body
Switch to 4.0mm hook.
- R14 (Separate for Armholes): Ch 2 (counts as first dc here and throughout), dc in next 24 sts (Front). Ch 6 (for underarm). Sk next 34 sts (First Armhole). Dc in next 50 sts (Back). Ch 6 (for underarm). Sk next 34 sts (Second Armhole). Dc in next 25 sts. Sl st to top of beg ch 2. (112 dc body sts + 12 ch sts = 124 sts)
- R15: Ch 2, dc in each dc and each ch around. Sl st to top of beg ch 2. (124 dc)
- R16-R19: Ch 2, dc in each st around. Sl st to top of beg ch 2. (124 dc)
- R20 (Increase for A-line): Ch 2, *dc in next 30 sts, 2 dc in next st*. Rep from * to * 3 more times. Sl st to top of beg ch 2. (128 dc)
- R21-R24: Ch 2, dc in each st around. Sl st to top of beg ch 2. (128 dc)
- R25 (Increase): Ch 2, *dc in next 31 sts, 2 dc in next st*. Rep from * to * 3 more times. Sl st to top of beg ch 2. (132 dc)
- R26-R29: Ch 2, dc in each st around. Sl st to top of beg ch 2. (132 dc)
- R30 (Increase): Ch 2, *dc in next 32 sts, 2 dc in next st*. Rep from * to * 3 more times. Sl st to top of beg ch 2. (136 dc)
- R31-R40: Ch 2, dc in each st around. Sl st to top of beg ch 2. (136 dc). Continue in this manner, adding an increase round every 5-6 rounds, until the dress reaches your desired length before the fringe starts (usually mid-thigh or knee length). End with a round of dc.
Fringe Application
The fringe will be attached in sections, giving the dress a dynamic, layered look.
- Prepare Fringe Strands: Cut strands of yarn approximately 10 inches (25 cm) long. Each fringe piece will use 2 strands, folded in half, resulting in 5-inch (12.5 cm) long fringe. You'll need a lot, so prepare a good batch!
- Fringe Section 1:
- R1 (Fringe Base): Ch 1, sc in each st around. Sl st to first sc. (136 sc)
- R2 (Attach Fringe): For each sc, use your hook to pull 2 folded strands of yarn through the stitch, creating a loop. Pull the tails of the yarn through the loop and tighten to secure the fringe. Do this in every 2nd or 3rd sc around. For a fuller fringe, attach in every sc. (I recommend every 2nd st for a good balance).
- R3 (Next Base Round): Ch 1, sc in each st around (working into the sc sts of R1). Sl st to first sc. (136 sc)
- Repeat Fringe Sections: Repeat R2-R3 of Fringe Section 1 for as many layers of fringe as you desire. A common length would be 5-7 sections, but you can go shorter or longer. Ensure you have enough yarn!
Finishing
- Weave in all loose ends securely with your yarn needle.
- Optional Neckline/Armhole Edging: For a neater finish, you can add a round of sc around the neckline and armholes. Join yarn with a sl st, ch 1, sc evenly around, sl st to first sc. FO.
- Blocking: Gently wash your dress and lay it flat to dry, shaping it to the correct dimensions. This will help the stitches relax and the dress to drape beautifully, and will help the fringe hang straight.
Pro Tips
- Yarn Choice Matters: Cotton or cotton blends are highly recommended for summer garments as they are breathable and have good drape. Avoid acrylic for this project as it can be hot and may not hang as nicely.
- Try On as You Go: This is crucial for garments! Periodically try on your dress to check the fit, especially after the yoke and before adding fringe. Adjust stitch counts or rounds as needed.
- Customizing Length: To make your dress shorter or longer, simply add or subtract rounds in the main body section before starting the fringe.
- Fringe Density: The pattern suggests attaching fringe in every 2nd or 3rd stitch. For a denser, more dramatic fringe, attach in every stitch. For a sparser, more subtle look, attach in every 3rd or 4th stitch.
- Comb Your Fringe: After washing and drying, gently comb through your fringe with your fingers or a wide-tooth comb to separate the strands and ensure they hang beautifully.
Frequently Asked Questions
Can I use a different yarn weight for this pattern?
Yes, you can! If you use a heavier yarn (e.g., Worsted Weight), your dress will be larger and thicker. You'll need to go up a hook size (e.g., 5.0mm/H or 5.5mm/I) and definitely check your gauge very carefully. Conversely, if you use a finer yarn (e.g., Fingering Weight), your dress will be smaller and more delicate, requiring a smaller hook. Always prioritize achieving the stated gauge with your chosen yarn and hook to ensure the sizing is accurate.
How do I adjust the size of the dress for a perfect fit?
For circumference adjustments: The initial chain for the yoke determines the neckline and shoulder fit. Adjust this in multiples of the increase repeat (e.g., 8 stitches for this pattern's 8 increase points in R2). You can also add or subtract increase rounds in the yoke. For the body, simply continue working straight rounds or add more increase rounds at intervals to achieve your desired bust and hip circumference. For length adjustments: The body section (before fringe) can be easily made longer or shorter by adding or subtracting plain dc rounds. The number of fringe sections also contributes to the overall length.
How should I care for my crochet fringe dress to prevent tangling?
To keep your fringe looking its best, gentle care is key. Hand wash your dress in cool water with a mild detergent, or use a delicate cycle in a mesh laundry bag. Avoid aggressive agitation. Gently squeeze out excess water (do not wring!). Lay the dress flat to dry, shaping it as it dries. While still damp, you can gently comb through the fringe with your fingers to separate and straighten the strands. Avoid machine drying, as it can cause significant tangling and damage to the fringe.
And there you have it – your very own, handcrafted crochet fringe dress! This project is a wonderful journey into garment making, yielding a beautiful and personal piece that will undoubtedly become a favorite. We can't wait to see your creations! Share your finished dress with us and let your unique style shine!