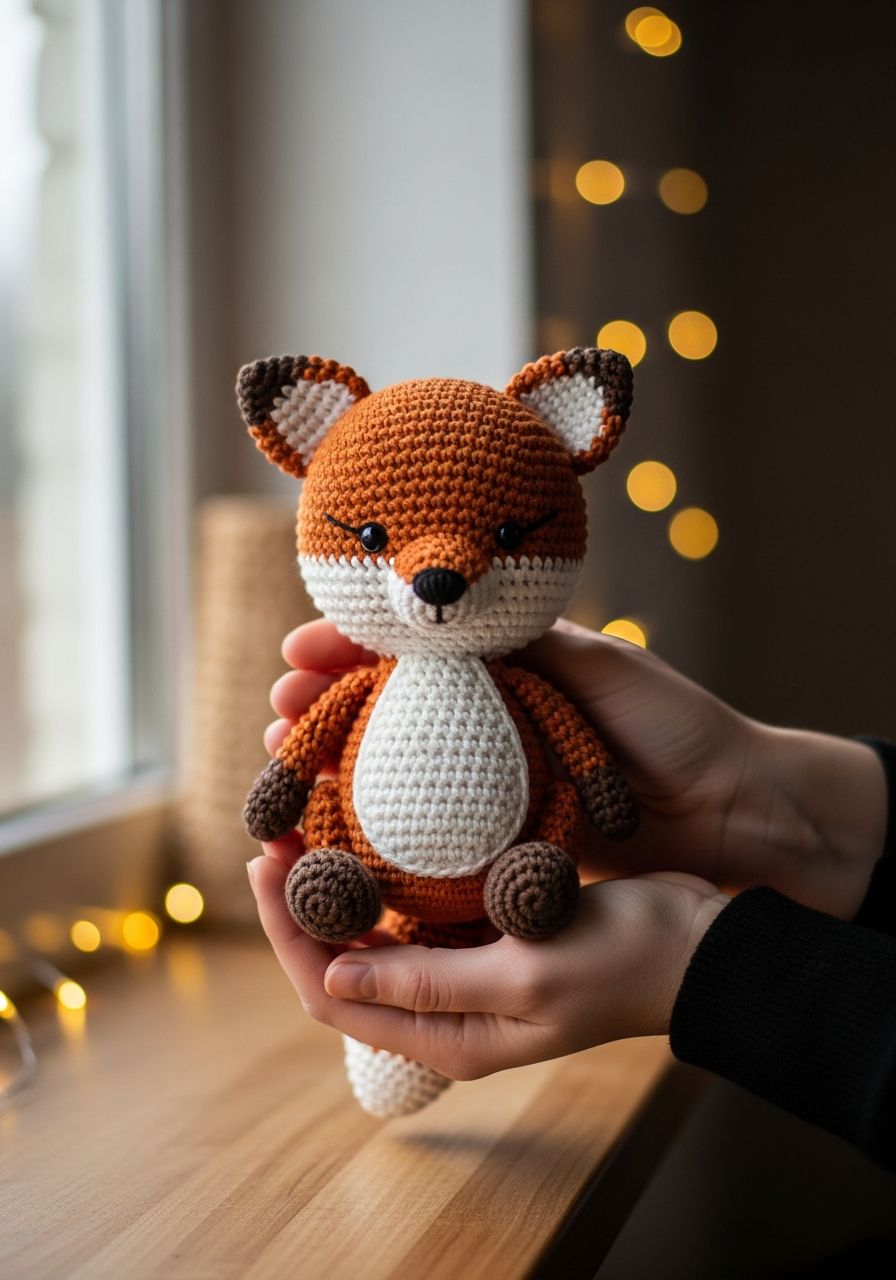
Imagine the gentle rustle of autumn leaves, the soft glow of a setting sun, and a mischievous, furry friend peeking out from the undergrowth. Now, imagine bringing that captivating woodland charm right into your home with your very own handmade creation! Get ready to embark on a delightful crafting journey as we present our enchanting Crochet Fox Amigurumi free pattern. This isn't just a pattern; it's an invitation to create a loyal, snuggly companion that will capture hearts and spark joy wherever it goes. Prepare to fall in love with every stitch!
Welcome to a world where yarn transforms into magic! Amigurumi, the Japanese art of crocheting small stuffed toys, offers a wonderfully meditative and rewarding experience. This detailed pattern for a charming fox friend is designed to be accessible for crocheters of various skill levels. Whether you're looking for a quick and satisfying project or a heartfelt gift, this adorable fox, with its clever ears, bushy tail, and sweet snout, is sure to become a cherished piece. Let's gather our supplies and begin bringing this foxy companion to life!
Why You'll Love This Pattern
- Irresistibly Adorable: The finished fox is incredibly cute, perfect for nurseries, gifts, or simply brightening your own space.
- Detailed & Clear Instructions: We've broken down every step, making it easy to follow even for those new to amigurumi.
- Skill-Building Project: Practice essential amigurumi techniques like working in the round, invisible decreases, and seamless assembly.
- Customizable: Easily change yarn colors or add embellishments to personalize your fox.
- Perfect Gift: Handmade gifts are always treasured. This fox makes a wonderful present for birthdays, baby showers, or just because!
Materials Needed
- Yarn: Worsted weight (Aran/10-ply) 100% acrylic or cotton yarn in the following colors:
- Approx. 70g Orange (main color)
- Approx. 20g White (belly, snout, tail tip)
- Small amount of Black (nose embroidery)
- Crochet Hook: 3.5mm (E/4) or size needed to achieve tight stitches to prevent stuffing from showing.
- Safety Eyes: 8mm (or size of your preference)
- Stuffing: Polyester fiberfill
- Yarn Needle: For weaving in ends and assembly
- Scissors
- Stitch Marker: Essential for working in continuous rounds
Gauge & Sizing
Gauge is not critical for this project, but maintaining tight stitches is important for amigurumi to ensure stuffing doesn't show through. If your stitches are too loose, go down a hook size. When completed with the recommended yarn and hook, your Crochet Fox Amigurumi will stand approximately 7-8 inches (18-20 cm) tall from its feet to the top of its head, not including the ears.
Abbreviations
- ch: chain
- sl st: slip stitch
- sc: single crochet
- hdc: half double crochet
- dc: double crochet
- inc: increase (2 sc in one stitch)
- dec: decrease (sc two stitches together)
- MR: magic ring (also known as magic circle)
- st(s): stitch(es)
- R: Round
- rep: repeat
- FO: fasten off
- (X): Indicates the number of stitches at the end of the round
Step-by-Step Pattern
This pattern is worked in continuous rounds unless otherwise specified. Use a stitch marker to keep track of the first stitch of each round.
Head & Body (Orange & White)
- R1: With Orange yarn, MR 6 sc. (6)
- R2: Inc in each st around. (12)
- R3: (Sc 1, inc) x6. (18)
- R4: (Sc 2, inc) x6. (24)
- R5: (Sc 3, inc) x6. (30)
- R6: (Sc 4, inc) x6. (36)
- R7-R13: Sc in each st around. (36) (7 rounds)
- R14: (Sc 4, dec) x6. (30)
- R15: Sc in each st around. (30)
- R16: (Sc 3, dec) x6. (24)
- R17: Sc in each st around. (24)
- R18: (Sc 2, dec) x6. (18) Insert safety eyes between R12 and R13, about 6 stitches apart. Begin stuffing firmly.
- R19: Sc in each st around. (18)
- R20: (Sc 1, dec) x6. (12)
- R21: Sc in each st around. (12) Continue stuffing to form the head.
- R22: Inc in each st around. (24)
- R23: (Sc 3, inc) x6. (30)
- R24-R27: Sc in each st around. (30) (4 rounds)
- R28: Switch to White yarn. Sc in each st around. (30)
- R29-R30: Sc in each st around. (30) (2 rounds)
- R31: Switch to Orange yarn. Sc in each st around. (30)
- R32-R36: Sc in each st around. (30) (5 rounds)
- R37: (Sc 3, dec) x6. (24)
- R38: (Sc 2, dec) x6. (18) Stuff body firmly.
- R39: (Sc 1, dec) x6. (12)
- R40: Dec x6. (6)
- FO, leaving a long tail. Weave the tail through the front loop of the remaining 6 stitches and pull tight to close. Weave in end.
Ears (Make 2) (Orange)
- R1: With Orange yarn, MR 4 sc. (4)
- R2: (Sc 1, inc) x2. (6)
- R3: (Sc 2, inc) x2. (8)
- R4: (Sc 3, inc) x2. (10)
- R5: Sc in each st around. (10)
- R6: (Sc 4, inc) x2. (12)
- R7: Sc in each st around. (12)
- Flatten the ear and sc through both layers across the top to close (6 sc). FO, leaving a long tail for sewing.
Snout (White)
- R1: With White yarn, MR 6 sc. (6)
- R2: Inc in each st around. (12)
- R3: (Sc 1, inc) x6. (18)
- R4-R5: Sc in each st around. (18) (2 rounds)
- FO, leaving a long tail for sewing. Lightly stuff.
Tail (Orange & White)
- R1: With White yarn, MR 4 sc. (4)
- R2: (Sc 1, inc) x2. (6)
- R3: (Sc 2, inc) x2. (8)
- R4: Sc in each st around. (8)
- R5: Switch to Orange yarn. (Sc 3, inc) x2. (10)
- R6: Sc in each st around. (10)
- R7: (Sc 4, inc) x2. (12)
- R8-R10: Sc in each st around. (12) (3 rounds)
- R11: (Sc 4, dec) x2. (10)
- R12-R13: Sc in each st around. (10) (2 rounds)
- R14: (Sc 3, dec) x2. (8)
- R15: Sc in each st around. (8) Stuff tail lightly, especially the tip.
- Flatten the opening and sc through both layers across to close (4 sc). FO, leaving a long tail for sewing.
Arms (Make 2) (Orange)
- R1: With Orange yarn, MR 6 sc. (6)
- R2: (Sc 1, inc) x3. (9)
- R3-R10: Sc in each st around. (9) (8 rounds)
- Lightly stuff the bottom half of the arm.
- Flatten the opening and sc through both layers across to close (4 sc). FO, leaving a long tail for sewing.
Legs (Make 2) (Orange)
- R1: With Orange yarn, MR 6 sc. (6)
- R2: Inc in each st around. (12)
- R3-R12: Sc in each st around. (12) (10 rounds)
- Stuff the leg firmly.
- Flatten the opening and sc through both layers across to close (6 sc). FO, leaving a long tail for sewing.
Assembly
- Snout: Pin the snout onto the face centrally, directly below the eyes. Sew into place. Using black yarn and a yarn needle, embroider a small triangular nose at the tip of the snout.
- Ears: Pin the ears to the top of the head, on R1-R2, about 5-6 stitches apart. Sew securely.
- Arms: Pin the arms to the sides of the body, just below the neck constriction (around R21-R22 of the Head/Body piece). Sew firmly.
- Legs: Pin the legs to the bottom of the body, evenly spaced, covering the final rounds of the body. Sew securely.
- Tail: Sew the tail to the back of the body, centered and slightly angled upwards, around R28-R30.
- Weave in all remaining loose ends.
Pro Tips
- Use a Stitch Marker Religiously: Amigurumi is worked in continuous rounds, making a stitch marker essential to avoid losing your place.
- Invisible Decrease: For a cleaner finish that blends seamlessly, use an invisible decrease (insert hook into front loop of first stitch, then into front loop of second stitch, yarn over, pull through both loops, yarn over, pull through remaining two loops).
- Stuffing is Key: Stuff your amigurumi firmly and evenly to give it a good shape. Use small pieces of fiberfill at a time to avoid lumps. Avoid overstuffing, which can distort the shape or cause stitches to stretch.
- Seamless Sewing: When attaching parts, use the mattress stitch or whip stitch for a neat and strong seam. Pin pieces in place before sewing to ensure proper alignment.
- Yarn Choice Matters: While worsted weight acrylic is recommended for its durability and ease of use, cotton yarn will give a slightly denser, firmer result.
- Practice Makes Perfect: Don't get discouraged if your first attempt isn't flawless. Every stitch is a learning experience, and your skills will improve with practice.
Frequently Asked Questions
How long will it take to make this fox?
The time it takes can vary greatly depending on your crochet speed and experience level. For an experienced crocheter, it might take 4-6 hours. For a beginner, plan for 8-12 hours or spread it out over a few days, enjoying the process at your own pace.
Can I use different yarn weights or types?
Yes, absolutely! You can use any yarn weight you prefer. Just be sure to adjust your hook size accordingly to maintain tight stitches. Using a thicker yarn will result in a larger fox, while a thinner yarn will make a smaller one. Keep in mind that different fiber types (e.g., wool, velvet) will also affect the final look and feel.
Is this pattern suitable for beginners?
While this pattern includes detailed instructions, it assumes familiarity with basic crochet stitches like single crochet, increases, and decreases, and working in the round. If you know these foundational techniques, you should be able to follow along successfully. The assembly might be the trickiest part for beginners, but patience and careful pinning will lead to great results!
There you have it – your very own charming Crochet Fox Amigurumi, ready to bring a touch of woodland wonder into your life! We hope you've enjoyed every moment of creating this adorable creature. May your new foxy friend bring you endless cuddles and a warm sense of accomplishment. Happy crocheting!