Imagine stepping out, hands-free, with all your essentials securely by your side, knowing you created that stylish accessory with your own two hands! Feel the thrill of crafting something both trendy and incredibly practical, a statement piece that reflects your unique style. Get ready to embark on a fun and rewarding journey as we dive into creating the ultimate Crochet Fanny Pack – your new favorite companion for festivals, errands, or everyday adventures!
Why You'll Love This Pattern
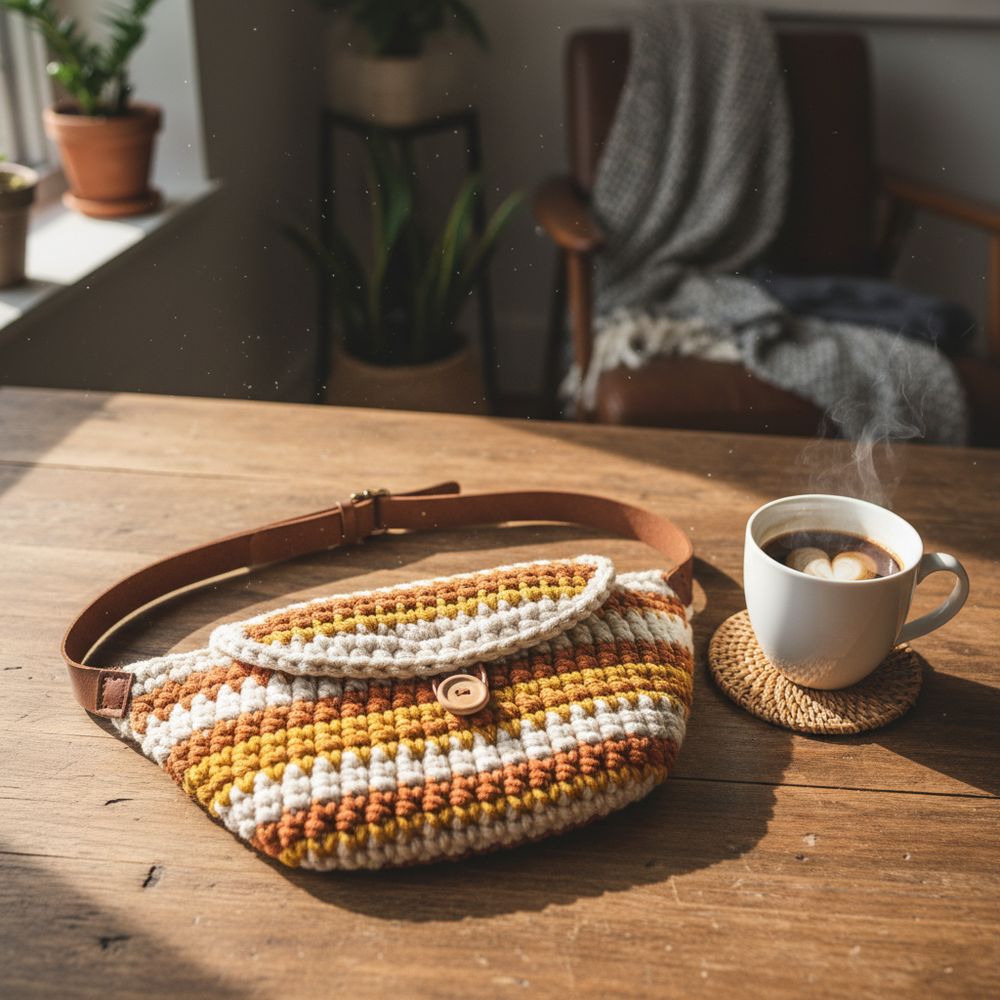
The fanny pack (or belt bag, if you prefer the modern term!) has made a triumphant return, blending retro charm with contemporary convenience. This pattern isn't just about making a bag; it's about embracing a functional fashion trend with a personal touch. Here’s why this project will quickly become a favorite:
- Trendy & Practical: Stay stylish while keeping your phone, wallet, keys, and lip balm easily accessible and secure. No more rummaging through a giant tote!
- Customization Galore: Choose your favorite colors and yarn textures to create a fanny pack that perfectly matches your wardrobe or stands out as a bold accessory.
- Skill-Building: This pattern incorporates foundational stitches and introduces construction techniques like working in rows, seaming, and attaching hardware, perfect for advancing your crochet skills.
- Quick & Satisfying: Designed to be a relatively quick make, you’ll see your project take shape rapidly, offering that satisfying sense of accomplishment in a short amount of time.
- Perfect Gift: Handmade fanny packs make thoughtful, personalized gifts for friends and family who appreciate unique, practical items.
- Eco-Friendly: By crafting your own accessories, you contribute to a more sustainable lifestyle, reducing reliance on mass-produced items.
Materials Needed
- Yarn: Worsted Weight (Category 4) Cotton or Cotton Blend yarn. Approximately 200-250 yards (180-220 meters). Choose a durable yarn for best results. (e.g., Lily Sugar'n Cream, Caron One Pound, Lion Brand 24/7 Cotton).
- Crochet Hook: 4.0 mm (G-6) or size needed to obtain gauge.
- Zipper: 7-inch to 9-inch (18-23 cm) nylon coil zipper. Match the color to your yarn or choose a contrasting color for a pop.
- Fanny Pack Strap Hardware:
- One 1-inch (2.5 cm) wide adjustable slide buckle.
- One 1-inch (2.5 cm) wide D-ring or rectangle ring.
- Approximately 1.5 yards (1.4 meters) of 1-inch (2.5 cm) wide nylon webbing or cotton strapping for the adjustable strap.
- Yarn Needle: For weaving in ends and seaming.
- Scissors: For cutting yarn.
- Stitch Markers: To mark stitch counts and important points.
- Sewing Needle & Thread: Strong, matching thread for attaching the zipper and strap webbing.
Gauge & Sizing
Gauge: 16 single crochet (sc) stitches and 18 rows = 4 inches (10 cm) using a 4.0 mm hook. It's crucial to check your gauge to ensure your fanny pack turns out the intended size. If your swatch is too small, go up a hook size; if it's too large, go down a hook size.
Finished Size: Approximately 8.5 inches (21.5 cm) wide x 5.5 inches (14 cm) tall x 2 inches (5 cm) deep (main pouch dimensions, excluding strap).
Abbreviations
- ch: Chain
- sl st: Slip Stitch
- sc: Single Crochet
- hdc: Half Double Crochet
- dc: Double Crochet
- inc: Increase (work 2 sc in the same stitch)
- dec: Decrease (sc2tog – single crochet 2 stitches together)
- fo: Fasten Off
- st(s): Stitch(es)
- rnd: Round
- row: Row
- rep: Repeat
- yo: Yarn Over
Step-by-Step Pattern
This pattern is worked in rows to create flat panels, which are then assembled. We’ll start with the main pouch body, then create the strap connectors, and finally assemble everything.
Main Pouch Body (Make 2)
We'll create two identical rectangular panels that will form the front and back of your fanny pack. For a slightly sturdier fabric, we will use single crochet.
- Ch 35. (This will be the width of your fanny pack. Adjust for desired width.)
- Row 1: Sc in the 2nd ch from hook and in each ch across. (34 sc)
- Row 2: Ch 1, turn. Sc in each st across. (34 sc)
- Rows 3-25: Rep Row 2. (34 sc per row). This will create a rectangle approximately 8.5 inches wide by 5.5 inches tall. If you want a taller pouch, add more rows.
- Fo. Weave in all ends on both panels.
Side Gussets (Make 2)
These pieces will give your fanny pack its depth and connect the front and back panels. We will make them slightly tapered for a sleeker look.
- Ch 9. (This will be the depth of your fanny pack. Adjust for desired depth.)
- Row 1: Sc in the 2nd ch from hook and in each ch across. (8 sc)
- Row 2: Ch 1, turn. Sc in each st across. (8 sc)
- Rows 3-4: Rep Row 2. (8 sc)
- Row 5 (Dec): Ch 1, turn. Sc2tog, sc in next 4 sts, sc2tog. (6 sc)
- Rows 6-7: Ch 1, turn. Sc in each st across. (6 sc)
- Row 8 (Dec): Ch 1, turn. Sc2tog, sc in next 2 sts, sc2tog. (4 sc)
- Rows 9-10: Ch 1, turn. Sc in each st across. (4 sc)
- Fo. Weave in ends. You should have two tapered pieces.
Strap Connectors (Make 2)
These small, durable pieces will hold your strap hardware securely.
- Ch 5.
- Row 1: Sc in 2nd ch from hook and in each ch across. (4 sc)
- Rows 2-10: Ch 1, turn. Sc in each st across. (4 sc)
- Fo, leaving a long tail for sewing. Weave in the starting end.
Assembly
Now for the fun part – bringing it all together!
- Attach Zipper:
- Lay one Main Pouch Body panel flat. Place your zipper along one of the 8.5-inch (34-stitch) edges, centered. The zipper teeth should face up.
- Using a sewing needle and strong matching thread, carefully sew the zipper to the top edge of the first main panel. Use a backstitch or whip stitch for security, making sure not to stitch through the zipper teeth themselves.
- Repeat with the second Main Pouch Body panel, attaching the other side of the zipper to its top edge. Ensure the panels are facing the same direction.
- Attach Side Gussets:
- Lay one main panel (with zipper attached) flat, right side up.
- Pin one Side Gusset piece to the side edge of the main panel, aligning the wider end with the zipper edge. Starting from the top (zipper end) and working down, use your yarn needle and a whip stitch or mattress stitch to securely join the gusset to the main panel. Stitch through both loops of the crochet fabric for a strong seam.
- Repeat for the other side of the same main panel with the second gusset.
- Now, take the second main panel. Align its side edges with the open edges of the attached gussets. Sew these seams, effectively creating the 3D pouch shape. You should now have a pouch with the zipper at the top.
- Attach Strap Connectors & Hardware:
- Thread one Strap Connector piece through the D-ring. Fold the connector in half so the D-ring is at the folded edge.
- Position this connector onto one of the side seams of your fanny pack, near the bottom corner, ensuring it's centered and secure. Use the long tail and your yarn needle to securely sew the connector to the fanny pack body. Stitch multiple times for durability.
- Take the second Strap Connector. Thread it through the adjustable buckle (ensure it’s threaded correctly for adjustment). Fold it in half and sew this connector to the opposite side seam of the fanny pack, matching the position of the first connector.
- Attach Webbing Strap:
- Take your 1.5 yards of 1-inch webbing. Thread one end through the D-ring attached to your fanny pack. Fold the end over by about 1 inch and sew it securely to itself using a sewing machine or strong hand stitches.
- Now, thread the other end of the webbing through the adjustable buckle, ensuring it can slide to adjust length. Thread it back through the buckle's second slot, then back through the D-ring.
- Adjust the strap to your desired length. Secure the final loose end by folding and sewing it, or leave it raw (melt nylon webbing edges carefully with a lighter to prevent fraying).
Pro Tips
- Yarn Choice Matters: For a durable fanny pack that holds its shape, opt for cotton or a cotton blend. Acrylic can work but might stretch more over time. Avoid superwash wool unless you want a very soft, less structured bag.
- Tight Tension: Maintain a consistent, tight tension, especially with single crochet, to create a dense fabric that won't easily stretch out or allow small items to poke through.
- Add a Fabric Lining: For extra durability, to prevent stretching, and to keep small items from slipping through stitches, consider sewing a simple fabric lining for the inside of your pouch. This can be done before attaching the zipper.
- Invisible Seams: When seaming the panels together, use a mattress stitch for an almost invisible join that lies flat. A whip stitch is also effective but creates a more visible ridge.
- Secure Hardware: Double and triple-stitch all strap connectors to the fanny pack body. These areas will bear the most stress, so security is key!
- Blocking: Gently block your finished crochet panels before assembly to ensure crisp edges and a professional finish.
- Zipper Placement: Before sewing, pin your zipper in place to ensure it's centered and aligned correctly.
Frequently Asked Questions
Can I use a different yarn weight?
Yes, you can! However, using a different yarn weight will affect your gauge and the final size of your fanny pack. If you go up a weight (e.g., bulky), your bag will be larger and require fewer stitches and rows. If you go down (e.g., sport weight), it will be smaller and require more stitches and rows. Always make a gauge swatch with your chosen yarn and hook to determine the necessary adjustments to the starting chain and row count.
How do I make the fanny pack bigger or smaller?
To adjust the size, you'll primarily modify the starting chain and the number of rows for your Main Pouch Body panels. For a wider fanny pack, increase your starting chain (and thus your stitch count per row). For a taller fanny pack, add more rows. Remember to keep the width of your zipper in mind when adjusting the main panel width. For a deeper fanny pack, adjust the starting chain for the Side Gussets.
Is this pattern beginner-friendly?
This pattern is suitable for an advanced beginner or intermediate crocheter. While it primarily uses basic stitches like single crochet, the assembly part, especially attaching the zipper and strap hardware, requires careful attention and some basic sewing skills. If you're new to these techniques, take your time and don't be afraid to watch a few video tutorials on zipper installation for crochet projects!
And there you have it – your very own handmade, stylish, and incredibly practical Crochet Fanny Pack! This project is more than just a pattern; it's an invitation to express your creativity, enhance your skills, and carry your essentials with a flair that only a handmade item can provide. Wear it with pride, knowing every stitch was crafted by you. Happy crocheting!