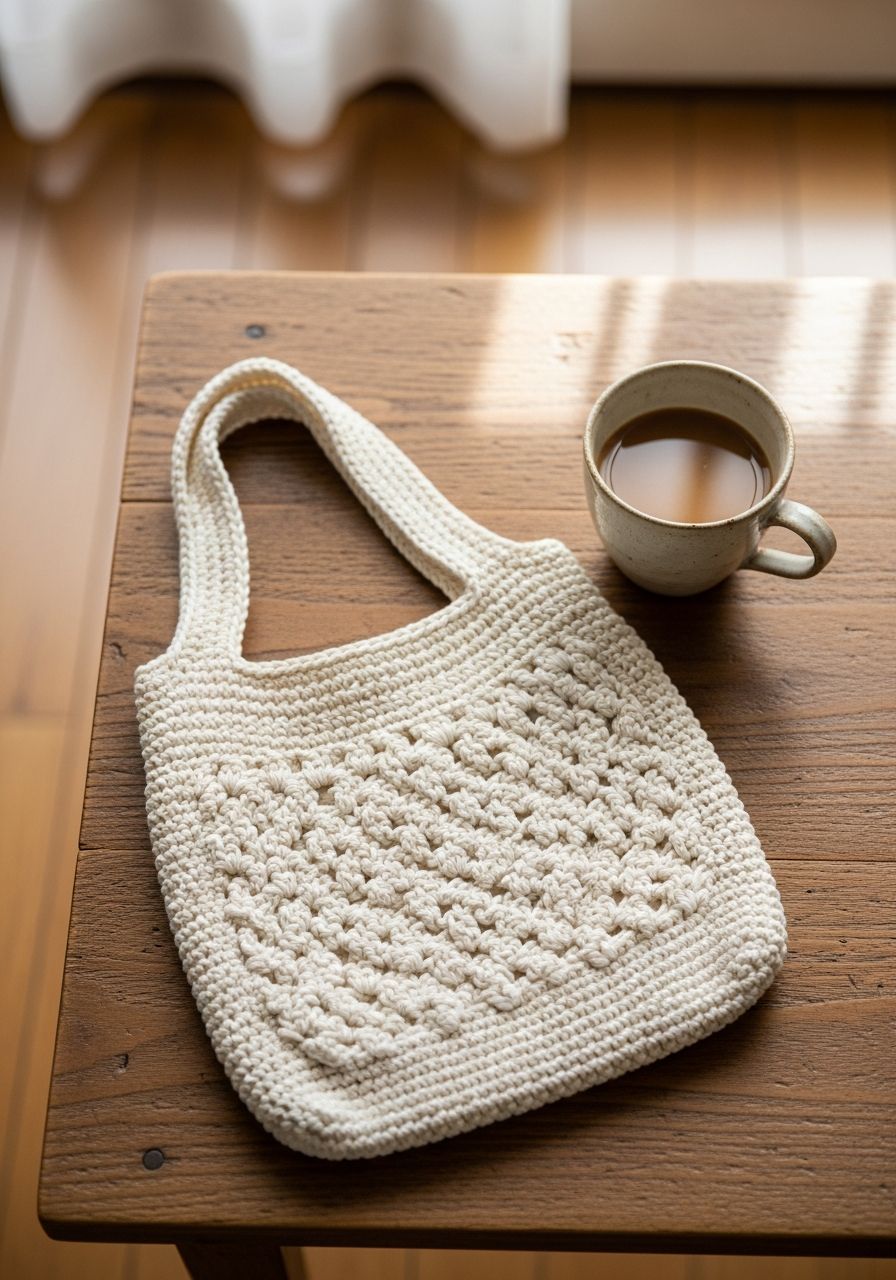
Imagine strolling through a bustling farmer's market, your reusable, handmade Crochet Cotton Bag slung comfortably over your shoulder, brimming with fresh produce and a sense of eco-conscious pride. Or perhaps you're heading to the beach, this versatile tote carrying your essentials with effortless style. There's a unique joy in creating something beautiful and functional with your own hands, and today, we're diving into a project that promises both: a durable, stylish, and incredibly satisfying cotton bag that you'll reach for again and again.
Welcome, fellow makers, to a pattern designed to bring a touch of handmade charm to your everyday. This free crochet pattern for a cotton bag is perfect for crocheters of all skill levels, offering clear, step-by-step instructions to create a sturdy and chic tote. Whether you're a seasoned pro looking for a quick project or a beginner eager to tackle your first functional item, this guide will walk you through every stitch, from the base to the perfect handles.
Why You'll Love This Pattern
This isn't just another crochet project; it's an invitation to create something truly special and practical. Here’s why you’ll absolutely adore making and using this cotton bag:
- Eco-Friendly & Sustainable: Say goodbye to single-use plastic bags! Your handmade cotton bag is a stylish statement for a greener planet, reducing waste with every use.
- Stylish & Versatile: With its classic design, this bag transitions seamlessly from a farmer's market haul to a chic beach carry-all, a handy project bag, or an everyday tote for your essentials.
- Beginner-Friendly with Room for Growth: Using fundamental stitches like half double crochet and single crochet, this pattern is accessible for those new to crochet. Yet, the satisfying construction and finished look will keep even experienced crocheters engaged.
- Customizable: Choose your favorite cotton yarn colors, add stripes, or even embellish it with appliqués. This pattern is a fantastic canvas for your personal style.
- Quick & Rewarding: Worsted weight cotton yarn and a relatively simple stitch pattern mean this bag works up surprisingly fast. You'll see your progress quickly, providing that wonderful sense of accomplishment.
- The Perfect Gift: Handmade gifts always hold a special place. This durable and thoughtful bag makes an excellent present for friends, family, or anyone who appreciates handmade craftsmanship.
Materials Needed
Gather your supplies before you begin to ensure a smooth crocheting experience. High-quality cotton yarn is recommended for durability and washability.
- Yarn: Worsted Weight (Category 4) 100% Cotton Yarn, approximately 500-600 yards. (e.g., Lily Sugar'n Cream, Dishie Cotton, Peaches & Creme).
- Crochet Hook: US H/8 (5.0 mm)
- Tapestry Needle: For weaving in ends.
- Scissors: For cutting yarn.
- Stitch Markers: At least 2, essential for marking rounds and handle placement.
Gauge & Sizing
Achieving the correct gauge is crucial for ensuring your finished bag matches the intended size and uses the correct amount of yarn. Always make a swatch!
- Gauge: 13 Half Double Crochet (HDC) stitches and 10 rows = 4 inches (10 cm) using a 5.0 mm hook.
- Finished Size: Approximately 14 inches (35.5 cm) wide x 15 inches (38 cm) tall (excluding handles). Handles add an additional 10 inches (25.5 cm) of height.
If your swatch is larger than the gauge, try using a smaller hook. If your swatch is smaller, try a larger hook. While precise gauge isn't critical for this project's functionality, it will affect the overall size and yarn usage.
Abbreviations
Familiarize yourself with these standard crochet abbreviations used in the pattern:
- ch: chain
- sl st: slip stitch
- sc: single crochet
- hdc: half double crochet
- st(s): stitch(es)
- inc: increase (work 2 stitches into the same stitch)
- FO: Fasten Off
Step-by-Step Pattern
Let's begin crocheting your beautiful new cotton bag! This pattern starts with a sturdy oval base, moves into the bag's body, and finishes with integrated handles.
Bottom of the Bag (Oval Base)
The base is worked in joined rounds, creating a sturdy foundation for your bag.
- Chain 31.
- Round 1: Work 2 hdc in the 2nd chain from the hook, hdc in the next 28 chains, 4 hdc in the last chain. Now, turn your work to crochet along the opposite side of the starting chain. Hdc in the next 28 chains, 2 hdc in the very last chain (the same chain as your first 2 hdc). Join with a sl st to the top of the first hdc. (64 sts)
- Round 2: Ch 1 (does not count as a stitch). *2 hdc in the next 2 stitches, hdc in the next 28 stitches*, repeat from * to * once more. Join with a sl st to the top of the first hdc. (72 sts)
- Round 3: Ch 1. *Hdc in the next stitch, 2 hdc in the next stitch, hdc in the next 28 stitches, 2 hdc in the next stitch, hdc in the next stitch*, repeat from * to * once more. Join with a sl st to the top of the first hdc. (80 sts)
- Round 4: Ch 1. *Hdc in the next 2 stitches, 2 hdc in the next stitch, hdc in the next 28 stitches, 2 hdc in the next stitch, hdc in the next 2 stitches*, repeat from * to * once more. Join with a sl st to the top of the first hdc. (88 sts)
- Round 5: Ch 1. *Hdc in the next 3 stitches, 2 hdc in the next stitch, hdc in the next 28 stitches, 2 hdc in the next stitch, hdc in the next 3 stitches*, repeat from * to * once more. Join with a sl st to the top of the first hdc. (96 sts)
Body of the Bag
Now we'll build the sides of the bag, working in continuous rounds to create a seamless fabric. The first round is worked into the back loop only to create a defined edge.
- Round 6: Ch 1. Working in the back loop only (BLO) for this round, hdc in each stitch around. Join with a sl st to the top of the first hdc. (96 sts)
- Rounds 7-30: Ch 1. Hdc in each stitch around. Join with a sl st to the top of the first hdc. (96 sts) (Total of 24 rounds for the body. You can add or subtract rounds here to adjust the height of your bag.)
Rim of the Bag
These rounds of single crochet create a neat, sturdy upper edge for the bag.
- Round 31: Ch 1. Sc in each stitch around. Join with a sl st to the top of the first sc. (96 sts)
- Rounds 32-33: Ch 1. Sc in each stitch around. Join with a sl st to the top of the first sc. (96 sts)
Handles
The handles are integrated into the top of the bag for a seamless and strong finish.
- Round 34: Ch 1. Sc in the first 12 stitches. Chain 40 (this will form your first handle opening). Skip the next 24 stitches. Sc in the next 24 stitches. Chain 40 (this forms your second handle opening). Skip the next 24 stitches. Sc in the last 12 stitches. Join with a sl st to the top of the first sc. (48 sc + 80 ch = 128 sts total in this round)
- Round 35: Ch 1. Sc in the first 12 sc. Now, work 40 sc into each of the 40 chain stitches for the first handle. Sc in the next 24 sc. Work 40 sc into each of the 40 chain stitches for the second handle. Sc in the last 12 sc. Join with a sl st to the top of the first sc. (128 sc)
- Rounds 36-37: Ch 1. Sc in each stitch around. Join with a sl st to the top of the first sc. (128 sc)
- Fasten off and weave in all loose ends securely with your tapestry needle.
Pro Tips
Elevate your crocheting experience and ensure your Crochet Cotton Bag is a masterpiece with these expert tips:
- Yarn Choice Matters: While any worsted weight cotton will work, consider the finish. Mercerized cotton offers a slight sheen and better stitch definition, while unmercerized cotton (like dishcloth cotton) provides a more rustic, absorbent texture. Both are excellent for durability.
- Consistent Tension: Maintain an even tension throughout your project. This ensures your stitches are uniform, your bag's fabric is consistent, and your finished project maintains its shape and gauge.
- Stitch Markers are Your Best Friends: Especially when working in rounds, a stitch marker placed in the first stitch of each round will save you from constant counting and potential errors. They are also crucial for accurately placing your handles.
- Washing & Care: Cotton can sometimes shrink or stretch. For best results, wash your finished bag in cold water on a gentle cycle, and lay it flat to dry. This will help maintain its shape and extend its life.
- Customization Ideas: Don't be afraid to experiment! Introduce stripes by changing colors every few rounds, create a color-blocked effect, or add fun appliqués for a personalized touch. You could also line your bag with fabric for extra durability and to prevent smaller items from falling through.
- Blocking for Perfection: While not strictly necessary for a sturdy cotton bag, blocking can help define the stitches, even out any minor imperfections, and give your bag a professional, polished finish. Gently wet your bag, shape it, and let it air dry.
Frequently Asked Questions
Q: Can I use a different yarn weight for this pattern?
A: Yes, you certainly can! However, be aware that changing the yarn weight will significantly alter the final size of your bag. If you use a thicker yarn (e.g., bulky weight), you’ll need a larger hook and will make a bigger bag with fewer stitches and rounds. Conversely, a thinner yarn (e.g., sport or DK weight) will require a smaller hook and result in a smaller bag, needing more stitches and rounds to achieve a similar size. Always make a gauge swatch if you deviate from the recommended yarn and hook size.
Q: How do I adjust the size of the bag?
A: To adjust the width, you'll need to modify the starting chain for the base. Ensure your initial chain length allows for an even number of stitches in the flat sides of the oval. For example, to make it wider, add more chains in multiples of two, and adjust the 'hdc in next X chains' segments in the base rounds accordingly. To adjust the height, simply add or subtract rounds in the 'Body of the Bag' section (Rounds 7-30). For longer or shorter handles, adjust the number of chain stitches in Round 34.
Q: My handles feel flimsy. How can I make them sturdier?
A: If your handles feel too thin or stretchy, there are a few ways to reinforce them. You can add more rounds of single crochet after Round 37 (e.g., 2-3 additional rounds of sc in each stitch around) to make them thicker. Alternatively, after completing Round 37, you could work a round of slip stitches across the handles only, or even across the entire top edge, to create a very dense, cord-like finish. For ultimate strength, you could make separate, thicker handle strips (e.g., 2-3 stitches wide) and sew them onto the bag.
Congratulations, you've just crafted your very own Crochet Cotton Bag! This versatile tote is more than just a bag; it's a statement of creativity, sustainability, and handmade love. We hope you enjoy using it for all your adventures. Don't forget to share your finished projects with us!