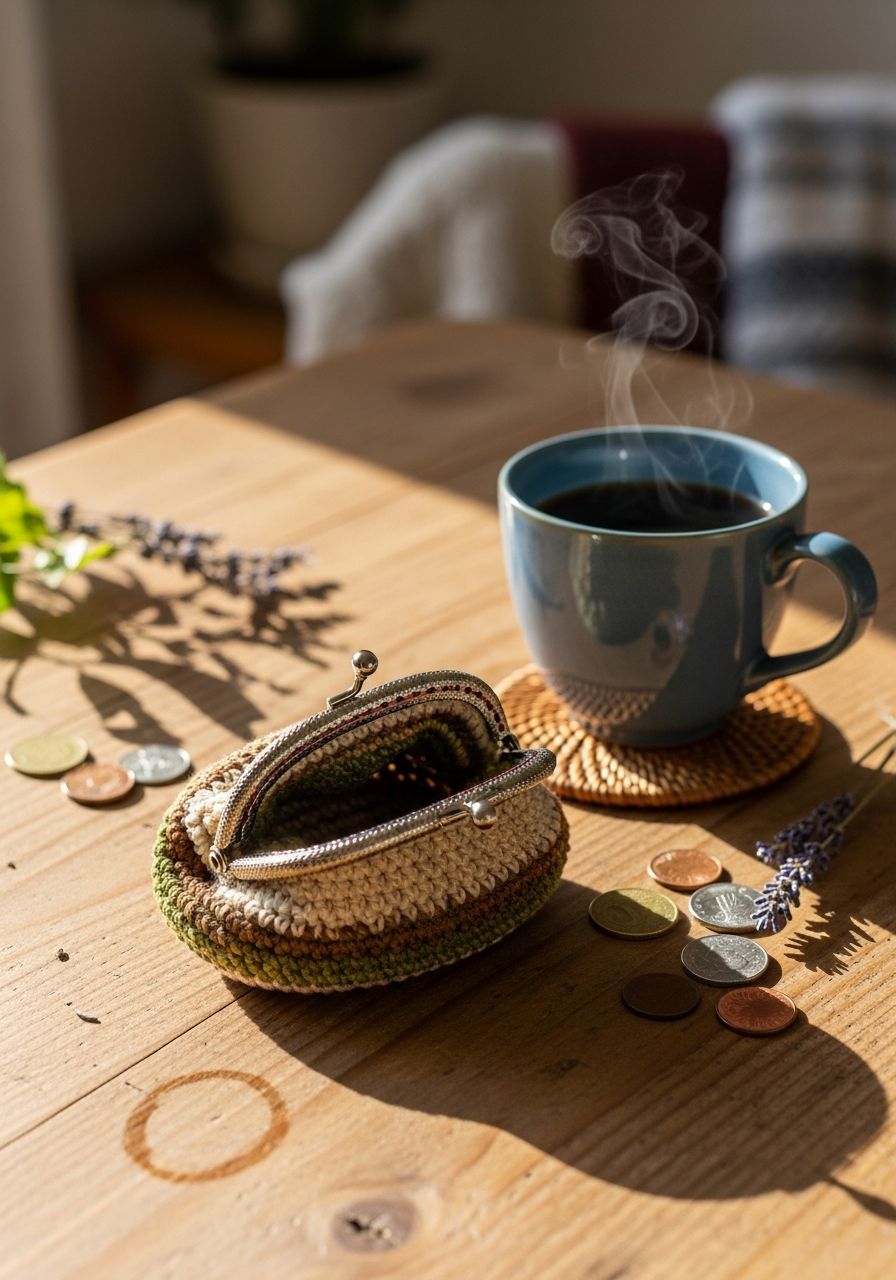
Imagine the joy of pulling out a perfectly handcrafted pouch, not just for coins, but for tiny treasures, lip balm, or even your earbuds – a little piece of art that fits right in your palm and makes everyday organization a delight. This isn't just a project; it's a journey into creating something beautiful and practical, and with our free, easy-to-follow pattern, you'll be able to create your very own charming Crochet Coin Purse faster than you can say "stitch marker!" Get ready to transform a simple skein of yarn into a functional accessory that's sure to turn heads and spark compliments.
Welcome, fellow fiber artists! If you've been searching for a quick, satisfying project that yields an incredibly useful item, you've landed in the right place. This comprehensive guide provides everything you need to crochet an adorable coin purse, suitable for beginners eager to expand their skills and experienced crocheters looking for a fun, portable make. We'll walk you through each step, from selecting the perfect yarn to adding those crucial finishing touches, ensuring your handmade coin purse is not only sturdy but also undeniably stylish. Dive in and discover the simple pleasure of creating something truly special with your own hands.
Why You'll Love This Pattern
This Crochet Coin Purse pattern isn't just another project; it's a delightful experience packed with benefits, making it an instant favorite for crocheters of all levels. Here's why you'll absolutely adore making this little treasure:
- Quick & Satisfying: Designed to be a fast make, you can often complete this coin purse in just a few hours. It’s the perfect "instant gratification" project when you need a creative boost.
- Skill Builder: While beginner-friendly, this pattern introduces fundamental techniques like working in rounds, creating an oval base, and forming a flap, helping you build confidence and expand your crochet repertoire.
- Stash Buster: Got small amounts of leftover yarn from previous projects? This pattern is ideal for using up those partial skeins, turning forgotten yarn into a charming, functional item.
- Customizable Creativity: From yarn color and texture to adding embellishments like buttons, beads, or embroidery, this coin purse is a blank canvas for your personal style. Make one to match every outfit or mood!
- Practical & Versatile: Beyond just coins, these little pouches are perfect for organizing earbuds, lip balm, hair ties, stitch markers, small jewelry, or any tiny essentials that tend to get lost in larger bags.
- Perfect Gift: Handmade gifts always carry extra love. Whip up a batch of these coin purses for birthdays, holidays, or as thoughtful "thank you" presents. They're universally appreciated and endlessly useful.
- Portable Project: The compact size of this project makes it easy to take with you anywhere. Crochet on your commute, during lunch breaks, or while relaxing on the couch.
Materials Needed
- Yarn: Approximately 50-70 yards of Worsted Weight (Aran/Medium #4) Cotton or Cotton Blend yarn. Cotton provides good structure and durability for a coin purse. (e.g., Lily Sugar'n Cream, Dishie Cotton)
- Crochet Hook: 4.0 mm (G-6 US) or size needed to obtain gauge.
- Yarn Needle: For weaving in ends.
- Scissors: For cutting yarn.
- Stitch Marker: Essential for working in rounds, especially for beginners.
- Button: One 0.75-1 inch (2-2.5 cm) button for the flap closure.
- Optional: Fabric lining, small charm, or tassel for embellishment.
Gauge & Sizing
Getting the correct gauge is important for achieving the intended size and look of your coin purse. While a coin purse is a forgiving project, matching the gauge will ensure your buttonhole and button align properly and the finished item isn't too loose or too stiff.
Gauge: 16 single crochet stitches and 18 rows = 4 inches (10 cm) with 4.0 mm hook, in single crochet.
To check your gauge, create a small swatch:
- Chain 17.
- Row 1: Sc in 2nd ch from hook and in each ch across. (16 sc)
- Rows 2-9: Ch 1, turn, sc in each sc across. (16 sc)
- Your swatch should measure approximately 4 inches wide and 2 inches tall. If your swatch is larger, try a smaller hook. If it's smaller, try a larger hook.
Finished Size: Approximately 4.5 inches (11.5 cm) wide x 3.5 inches (9 cm) tall (excluding the flap).
Abbreviations
- ch: Chain
- sl st: Slip stitch
- sc: Single crochet
- hdc: Half double crochet
- dc: Double crochet
- inc: Increase (work 2 stitches into the same stitch)
- dec: Decrease (single crochet 2 together - sc2tog)
- BLO: Back loop only
- st(s): Stitch(es)
- rnd(s): Round(s)
- FO: Fasten off
Step-by-Step Pattern
This pattern is worked in continuous rounds for the base and sides, then in rows for the flap. Use a stitch marker to keep track of the beginning of each round, moving it up as you complete each round.
Part 1: The Base (Oval)
We'll create a sturdy oval base by crocheting around a foundation chain.
- Ch 14. (This is your foundation chain.)
- Rnd 1: Sc in 2nd ch from hook, sc in next 11 ch. Work 3 sc in the last ch. Continue working on the opposite side of the foundation chain: sc in next 11 ch. Work 3 sc in the same ch as your very first sc. Join with sl st to the first sc of the round. (28 sts total)
- Rnd 2: Ch 1 (does not count as a stitch), sc in same st as join. Sc in next 11 sts. (Inc: 2 sc in next st, 2 sc in next st, 2 sc in next st - 3 increases total). Sc in next 11 sts. (Inc: 2 sc in next st, 2 sc in next st, 2 sc in next st - 3 increases total). Join with sl st to first sc. (34 sts total)
- Rnd 3: Ch 1, sc in same st as join. Sc in next 13 sts. (Inc: 2 sc in next st, sc in next st, 2 sc in next st, sc in next st, 2 sc in next st). Sc in next 13 sts. (Inc: 2 sc in next st, sc in next st, 2 sc in next st, sc in next st, 2 sc in next st). Join with sl st to first sc. (40 sts total)
Part 2: The Sides
Now we'll build the walls of your coin purse straight up from the base.
- Rnd 4: Ch 1, working in the BLO (back loop only) for this round, sc in each st around. This creates a neat ridge at the base of the purse. Join with sl st to first sc. (40 sts)
- Rnd 5-13: Ch 1, sc in each st around (working through both loops now). Join with sl st to first sc. (40 sts)
- At the end of Rnd 13, do not FO. We will now proceed to create the flap.
Part 3: The Flap
The flap will be worked in rows directly from the top edge of the coin purse, centered on one of the longer sides.
- Positioning: Flatten your purse. The seam from your joins (where you sl st each round) should ideally be at the back/side. We will now work across 12 stitches centered on the opposite "front" side for the flap. Count 14 stitches from your last sl st. The next 12 stitches will be your flap stitches.
- Row 1: Ch 1, sc in the first of the 12 designated flap stitches, sc in next 11 sts. Turn. (12 sc)
- Row 2-5: Ch 1, sc in each sc across. Turn. (12 sc)
- Row 6 (Buttonhole Row): Ch 1, sc in first 4 sc, ch 4 (this creates the buttonhole), skip next 4 sc, sc in last 4 sc. Turn. (8 sc, 1 ch-4 space)
- Row 7: Ch 1, sc in first 4 sc, work 4 sc into the ch-4 space, sc in last 4 sc. Turn. (12 sc)
- Row 8: Ch 1, sc in each sc across. Turn. (12 sc)
- FO, leaving a long tail for sewing the button.
Part 4: Finishing Touches
- Weave in Ends: Using your yarn needle, carefully weave in all loose ends. Take your time to hide them securely within the stitches to prevent unraveling.
- Attach Button: With the flap closed, position your button on the front of the coin purse, directly beneath the buttonhole, to ensure proper alignment. Securely sew the button in place using the long tail from the flap or a new piece of yarn.
- Optional Embellishments: Consider adding a small tassel to the side, a charm to the zipper pull (if adding one, though this pattern uses a button flap), or even a fabric lining for extra durability and a polished finish.
Pro Tips
- Choose Your Yarn Wisely: Cotton or cotton blend yarns are excellent for coin purses as they provide good structure, durability, and are easy to clean. Acrylic can also work, but might be slightly stretchier. Avoid very fuzzy or splitty yarns if you're a beginner.
- Stitch Marker is Your Best Friend: When working in rounds, especially continuous rounds, it's incredibly easy to lose track of the beginning of your round. Always use a stitch marker in the first stitch of each round and move it up as you go.
- Invisible Join for a Seamless Look: After completing the last stitch of a round and before chaining for the next, you can create a nearly invisible join. Cut your yarn, pull the loop through, then use a yarn needle to thread the tail under the second stitch of the round, then back down into the top of the last stitch you made. This creates a faux stitch that blends in beautifully.
- Maintain Consistent Tension: Uneven tension can lead to a wonky-shaped purse. Try to keep your stitches consistent throughout the project. If your stitches are too tight, your purse will be stiff and small; too loose, and it will be floppy and larger than intended.
- Personalize It: Don't be afraid to experiment! Change colors every few rounds for stripes, embroider a small initial or simple design onto the flap, or add beads to the border. This is your chance to make it truly unique.
- Consider a Lining: For extra durability and to prevent small items from poking through stitches, you can hand-sew a simple fabric lining into your coin purse. Cut a piece of fabric slightly larger than the purse's interior, sew it into a pouch shape, and then stitch it discreetly inside.
Frequently Asked Questions
Can I use different yarn weights for this pattern?
Yes, you absolutely can! However, keep in mind that changing yarn weight will significantly alter the final size of your coin purse. If you use a bulkier yarn (e.g., Chunky #5), your purse will be larger, and you'll need a larger hook. If you use a lighter yarn (e.g., DK #3), it will be smaller, and you'll need a smaller hook. Always check your gauge with the new yarn and hook combination to get an idea of the finished dimensions and adjust the initial chain length if needed to maintain the desired width.
How do I make the coin purse bigger or smaller?
To make the coin purse larger, you can start with a longer foundation chain in Part 1. For every 2 stitches you add to the initial chain, your finished purse will be approximately 1 inch wider. You would also need to add more increase rounds in Part 1, ensuring you maintain the oval shape. For more height, simply add more rounds in Part 2. To make it smaller, do the opposite: start with a shorter chain and fewer rounds in Part 1, and fewer rounds in Part 2.
What if my edges aren't straight, or my purse leans to one side?
This is a common issue, especially for beginners! It often comes down to inconsistent tension or accidentally skipping stitches or adding extra ones. Ensure you're always counting your stitches at the end of each round to catch errors early. Also, make sure you're working into both loops (unless specified, like the BLO round) and not just one. Using a stitch marker in the first stitch of every round is crucial. If your purse still leans slightly, it's often a characteristic of working in the round with single crochet, but a good blocking at the end can often help even things out.
Congratulations! You've just crocheted your very own charming and practical coin purse. We hope you've enjoyed every stitch of this creative journey. Whether you keep it for yourself, fill it with treasures, or gift it to a loved one, this little pouch is a testament to your growing skills and dedication to the craft. Don't forget to share your creations with us – we love seeing your unique interpretations of our patterns!