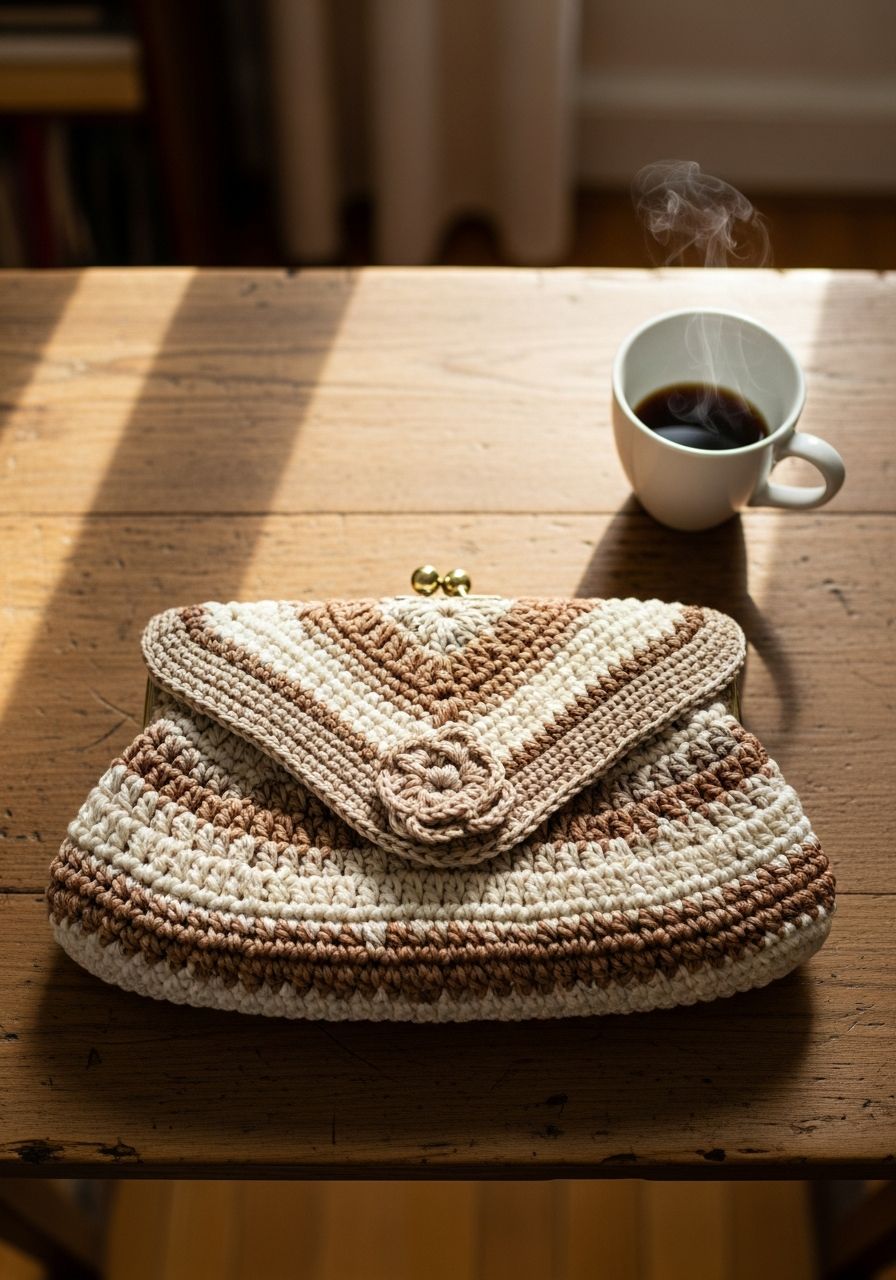
Imagine stepping out, confident and chic, with a stunning accessory that perfectly complements your outfit – and knowing you crafted it with your own hands! This isn't just any bag; it's a testament to your creativity, a stylish statement piece, and a project that fills you with pride. Get ready to fall in love with making your very own versatile Crochet Clutch, designed to be both elegant and practical. Our free pattern and comprehensive guide will lead you through every stitch, making it an incredibly satisfying and achievable project for crocheters of all levels.
Welcome, fellow yarn enthusiasts, to a world where functionality meets fabulous! Today, we're diving into the delightful craft of creating a beautiful crochet clutch. Whether you're looking for a sophisticated evening bag, a handy organizer for your larger tote, or a thoughtful handmade gift, this pattern has you covered. We'll explore everything from selecting the perfect yarn to mastering the stitches, ensuring your finished clutch is not only gorgeous but also durable and uniquely yours.
Why You'll Love This Pattern
- Elegance & Versatility: This clutch boasts a classic design that can be dressed up or down. Choose vibrant colors for a pop, or sophisticated neutrals for timeless appeal.
- Quick & Rewarding: A relatively small project, you'll see your clutch take shape quickly, offering immense satisfaction without a huge time commitment.
- Skill Building: Practice foundational stitches while learning how to create a structured accessory. Beginners can confidently tackle this, while experienced crocheters will appreciate the straightforward design.
- Customization Galore: Easily adapt the size, add a lining, choose different closures (button, zipper, magnetic snap!), or experiment with surface embellishments to make it truly unique.
- Perfect Gift Idea: Handmade gifts always feel special. A crochet clutch makes a thoughtful, personalized present for birthdays, holidays, or just because.
Materials Needed
- Yarn: Approximately 150-200 yards (137-183 meters) of Worsted Weight (Category 4) cotton or cotton blend yarn. Cotton provides excellent stitch definition and structure, which is ideal for a clutch. (e.g., Lion Brand 24/7 Cotton, Lily Sugar’n Cream, Caron One Pound – check yardage for quantity needed).
- Crochet Hook: H/5.00mm (or size needed to obtain gauge).
- Scissors: For cutting yarn.
- Tapestry Needle: For weaving in ends and sewing on accessories.
- Stitch Marker: Highly recommended for working in the round.
- Closure (Optional): One 1-inch (2.5 cm) decorative button OR a magnetic snap, OR a 7-inch (18 cm) zipper.
- Fabric for Lining (Optional): A piece of fabric approximately 19 inches (48 cm) x 7 inches (18 cm) for a custom lining.
Gauge & Sizing
Gauge: 14 single crochet (sc) stitches and 15 rows = 4 inches (10 cm) using an H/5.00mm hook.
Achieving the correct gauge is crucial for your clutch to be the intended size and to use the correct amount of yarn. Take a moment to create a small swatch (at least 5x5 inches) before starting.
Finished Size: Approximately 9.5 inches (24 cm) wide x 6.5 inches (16.5 cm) tall when folded, excluding the flap.
Abbreviations
- ch: Chain
- sl st: Slip Stitch
- sc: Single Crochet
- hdc: Half Double Crochet
- dc: Double Crochet
- inc: Increase (work 2 sc in the same stitch)
- dec: Decrease (single crochet 2 together, sc2tog)
- st(s): Stitch(es)
- rep: Repeat
- f/o: Fasten Off
- RS: Right Side
- WS: Wrong Side
Step-by-Step Pattern
This clutch is worked seamlessly from the bottom up, creating an oval base, then straight sides, and finally adding a flap. Use a stitch marker to mark the first stitch of each round.
Clutch Body (Base & Sides)
- Foundation Chain: Ch 28.
- Round 1: Sc in 2nd ch from hook, sc in next 25 ch, 3 sc in last ch. Now working down the other side of the foundation chain: sc in next 25 ch, 2 sc in the very last ch (this is the same chain where you made your first sc). Join with sl st to the first sc. (56 stitches)
- Round 2: Ch 1 (does not count as a stitch). Inc in first st, sc in next 25 sts, inc in next 3 sts, sc in next 25 sts, inc in next 2 sts. Join with sl st to the first sc. (62 stitches)
- Round 3: Ch 1. Sc in first st, inc in next st, sc in next 26 sts, inc in next 2 sts, sc in next st, inc in next st, sc in next 26 sts, inc in next st. Join with sl st to the first sc. (68 stitches)
- Round 4: Ch 1. Sc in each st around. Join with sl st to the first sc. (68 stitches)
- Rounds 5-25: Repeat Round 4. (You will have 21 rounds of straight body, forming the height of the clutch).
Clutch Flap
The flap is worked back and forth in rows, attached to the back top edge of your clutch. For simplicity, identify the 'back' as the side opposite where your rounds typically joined if there's a visible seam. Count 34 stitches across the back top edge of your clutch.
- Row 1: With RS facing, attach yarn with a sl st to the center-back 34th stitch from where you last joined (or simply count 17 stitches from a side seam for the center 34). Ch 1, sc in the same st and in the next 33 sts. (34 stitches)
- Row 2-8: Ch 1, turn. Sc in each st across. (34 stitches)
- Row 9 (Buttonhole Row): Ch 1, turn. Sc in first 15 sts, ch 4, skip 4 sts (this creates the buttonhole), sc in next 15 sts. (30 sc, 4 ch)
- Row 10: Ch 1, turn. Sc in first 15 sts, 4 sc into the ch-4 space (working over the chain), sc in next 15 sts. (34 stitches)
- Row 11: Ch 1, turn. Sc in each st across. (34 stitches) Fasten off, leaving a long tail for weaving in.
Assembly & Finishing
- Weave in Ends: Using your tapestry needle, carefully weave in all loose yarn tails.
- Attach Closure:
- For a Button: Position your chosen button on the front of the clutch, directly below the buttonhole, ensuring it aligns nicely. Using your tapestry needle and matching yarn, securely sew the button in place.
- For a Magnetic Snap: Follow the manufacturer's instructions to attach a magnetic snap to the flap and the front of the clutch. This usually involves small prongs that poke through the fabric and bend back.
- For a Zipper: This is a more advanced option, often requiring hand-sewing the zipper into the top opening of the clutch.
- Blocking (Recommended): Gently wet your clutch (if using cotton or wool) or spray lightly with water (for acrylic). Shape it to the desired dimensions on a flat surface or a foam mat, pinning it if necessary. Allow it to air dry completely. Blocking helps to even out stitches and give your clutch a more professional, polished look.
- Add a Fabric Lining (Optional but Recommended): A lining provides extra structure, prevents stretching, and ensures small items don't slip through the crochet stitches. Cut a piece of fabric 19 inches (48 cm) wide by 7 inches (18 cm) tall. Fold it in half, right sides together, and sew the side seams, leaving the top open. Press a 1/2 inch hem around the top opening and hand-stitch or machine-stitch it. Insert the lining into your clutch, matching the bottom and side seams. Hand-stitch the top edge of the lining to the inside top edge of your crochet clutch using small, invisible stitches.
Pro Tips
- Yarn Choice Matters: For a structured clutch, cotton or a cotton blend is excellent. Acrylic can work but may result in a softer, less rigid clutch. Wool blends also offer good stitch definition and can be blocked beautifully.
- Consistent Tension: Maintaining even tension throughout your project is key to a beautiful, uniform fabric. If your stitches vary, your clutch might appear lumpy or uneven.
- Stitch Markers are Your Best Friend: Especially when working in the round, a stitch marker at the beginning of each round will prevent you from losing your place and help you keep an accurate stitch count.
- Don't Skip Blocking: Even a simple wet block can dramatically improve the drape, shape, and overall finish of your crochet clutch, making it look much more professional.
- Personalize Your Closure: The choice of closure can completely change the look and feel of your clutch. A decorative button adds a classic touch, while a magnetic snap offers sleek functionality.
- Consider a Wrist Strap: If you want to convert your clutch into a wristlet, crochet a simple strap (e.g., a chain of 50-60 stitches, then sc back down the chain) and attach it to one side seam with a small D-ring or by sewing it directly.
Frequently Asked Questions
Q: Can I use a different yarn weight for this pattern?
A: Yes, you can! However, be aware that changing yarn weight will significantly alter the finished size of your clutch. If you go up to a bulky weight, your clutch will be larger; a sport or DK weight will make it smaller. Always remember to adjust your hook size accordingly to achieve a fabric that's dense enough for a clutch (you don't want your belongings falling out!). Most importantly, make sure to swatch and check your gauge if you deviate from the recommended worsted weight.
Q: How do I make my crochet clutch stiffer or more structured?
A: There are several ways to add more structure. First, ensure you're using a yarn with good body, like cotton. Second, a tighter gauge (using a slightly smaller hook) will create a denser fabric. Third, and most effectively, adding a fabric lining (as detailed in the 'Assembly & Finishing' section) will provide significant structure and prevent stretching. You can also interface the fabric lining with a stiff interfacing for even more rigidity.
Q: What's the best way to clean my crochet clutch?
A: The cleaning method depends entirely on the fiber content of your yarn. For cotton, you can typically hand wash in cool water with a mild detergent, gently squeezing out excess water (do not wring or twist!). Reshape and lay flat to dry. For acrylics, machine washing on a delicate cycle in a mesh bag might be an option, but always check your yarn label for specific care instructions. If you've added a fabric lining, make sure its care instructions are compatible with your yarn's.
And there you have it – your very own handmade crochet clutch, a beautiful and functional accessory crafted with care and creativity! We hope you enjoyed every stitch of this journey. Don't forget to share your finished clutches with us and tag your projects online; we love to see your unique interpretations. Happy crocheting!