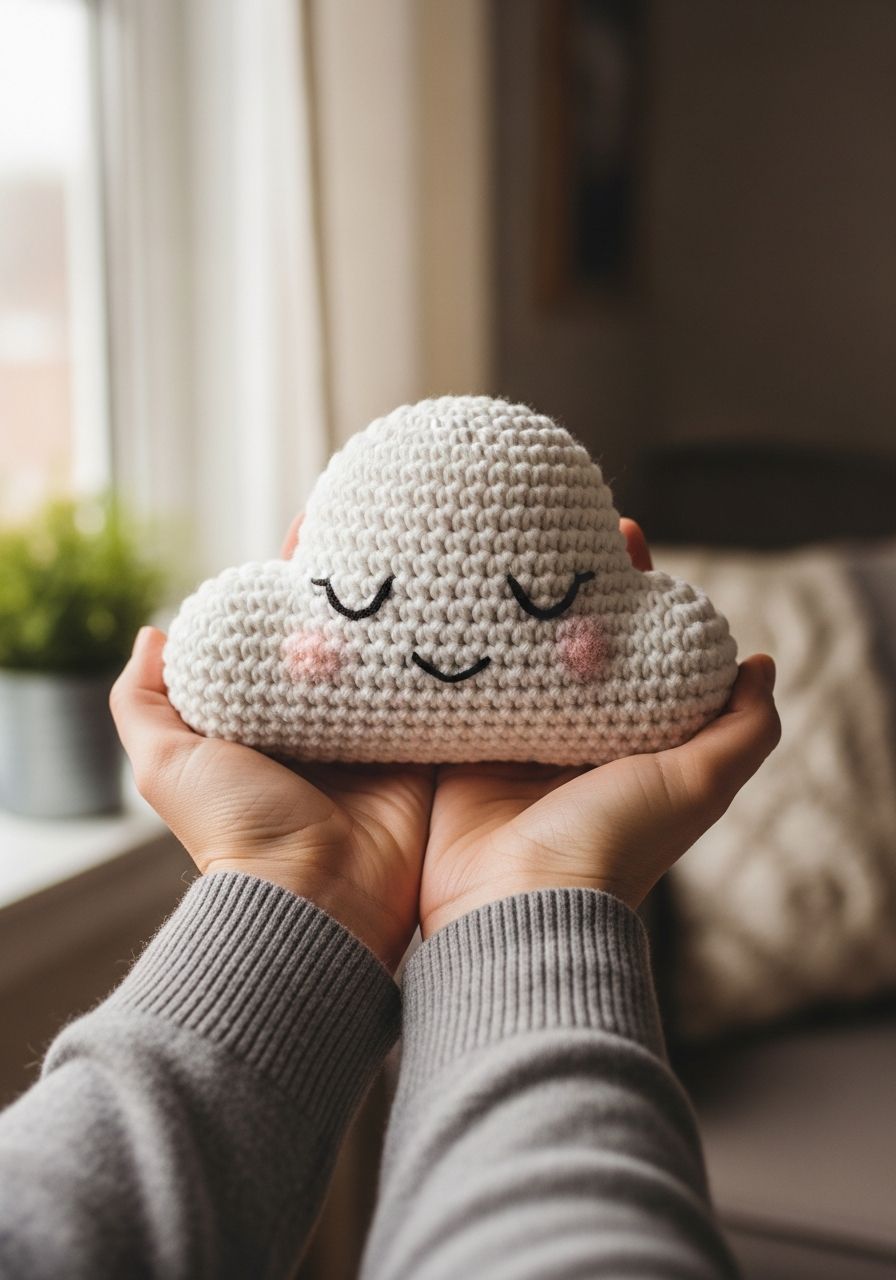
Imagine the softest, most whimsical cloud, not in the sky, but nestled right in your hands, ready to bring a touch of serene magic to any space. There’s something profoundly comforting about a cloud, a symbol of dreams, calm, and endless possibilities. Now, imagine crafting that comfort with your own hands! This delightful and surprisingly simple project will guide you through creating your very own fluffy, adorable Crochet Cloud Amigurumi. Whether you’re looking to decorate a nursery, craft a unique gift, or simply indulge in a wonderfully relaxing crochet session, this free pattern is designed to lift your spirits and fill your home with handmade charm. Get ready to embark on a journey of creativity and bring a little piece of the sky indoors!
Welcome, fellow fiber artists, to a pattern that's as dreamy as it is delightful! This free crochet pattern is designed to help you create an enchanting cloud amigurumi that's perfect for cuddles, nursery decor, or as a charming photo prop. We've broken down every step to ensure a smooth and enjoyable crafting experience, even if you're relatively new to amigurumi. You'll learn how to create a main cloud body and several smaller puffs, then artfully assemble them to achieve that iconic, pillowy cloud shape. Let's gather our supplies and get ready to stitch up some pure joy!
Why You'll Love This Pattern
-
Beginner-Friendly: While it might look intricate, this pattern primarily uses basic stitches like single crochet, increases, and decreases, making it accessible for those new to amigurumi. We've included detailed instructions to guide you every step of the way.
-
Quick & Satisfying: The individual cloud components work up fairly quickly, providing a satisfying sense of progress. You can easily complete this project over a weekend, or even in a few dedicated crafting sessions.
-
Customizable: Choose your favorite yarn colors and textures! While white or light blue is classic, imagine a pastel rainbow cloud, or even a stormy grey one. You can also vary the size by using different yarn weights and hook sizes.
-
Versatile Decor: This cloud makes an adorable addition to a baby's nursery, a child's bedroom, or even a whimsical touch to your own living space. Hang it, display it, or simply cuddle it!
-
Heartfelt Gift: Handmade gifts carry a special meaning. A crochet cloud is a thoughtful and unique present for baby showers, birthdays, or just to show someone you care.
-
Stress-Relieving: The repetitive motion of crochet is known for its calming benefits. Unwind and de-stress as you bring this lovely cloud to life.
Materials Needed
- Yarn: Worsted weight (Aran/10-ply) yarn in white or a light shade of blue. (Approx. 150-200 yards). I recommend a soft acrylic or cotton blend for a cuddly finish.
- Crochet Hook: 3.5mm (E/4) or 4.0mm (G/6) – choose a hook size that gives you tight stitches to prevent stuffing from showing through.
- Safety Eyes: Two 9mm safety eyes (or embroidery floss if you prefer to embroider the eyes for infants).
- Stuffing: Polyester fiberfill.
- Yarn Needle: For weaving in ends and assembly.
- Stitch Markers: Essential for working in continuous rounds.
- Scissors: For cutting yarn.
- Optional: Pink embroidery floss for rosy cheeks.
Gauge & Sizing
Gauge is not strictly critical for this amigurumi project, as long as your stitches are tight enough to hold the stuffing without gaping. However, your gauge will affect the final size of your cloud. If you tend to crochet loosely, you might want to go down a hook size. With the recommended yarn and hook, your finished cloud will measure approximately 8-9 inches wide and 5-6 inches tall, depending on how you arrange and stuff the puffs.
Abbreviations
- ch: Chain
- sc: Single Crochet
- inc: Increase (2 sc in one stitch)
- dec: Decrease (single crochet 2 stitches together)
- sl st: Slip Stitch
- MR: Magic Ring (or magic circle)
- st(s): Stitch(es)
- FO: Fasten Off
- ( ): Repeat instructions in parentheses the specified number of times
- [ ]: Total number of stitches at the end of the round
Step-by-Step Pattern
We will be working in continuous rounds unless otherwise specified. Use a stitch marker to mark the first stitch of each round.
Part 1: Main Cloud Body (Make 1)
This will be the largest, central component of our cloud. We'll start with an oval base.
- Ch 11.
- Rnd 1: Sc in 2nd ch from hook, sc in next 8 ch, 3 sc in last ch. Now working on the other side of the chain: sc in next 8 ch, 2 sc in last ch. [22]
- Rnd 2: Inc, sc in next 8, inc x 3, sc in next 8, inc x 2. [28]
- Rnd 3: Sc in next st, inc, sc in next 8, (sc in next st, inc) x 3, sc in next 8, (sc in next st, inc) x 2. [34]
- Rnd 4: Sc in next 2 sts, inc, sc in next 8, (sc in next 2 sts, inc) x 3, sc in next 8, (sc in next 2 sts, inc) x 2. [40]
- Rnd 5: Sc in next 3 sts, inc, sc in next 8, (sc in next 3 sts, inc) x 3, sc in next 8, (sc in next 3 sts, inc) x 2. [46]
- Rnd 6: Sc in next 4 sts, inc, sc in next 8, (sc in next 4 sts, inc) x 3, sc in next 8, (sc in next 4 sts, inc) x 2. [52]
- Rnd 7-12: Sc in each st around. [52] (6 rounds of straight sc)
- Rnd 13: Sc in next 4 sts, dec, sc in next 8, (sc in next 4 sts, dec) x 3, sc in next 8, (sc in next 4 sts, dec) x 2. [46]
- Rnd 14: Sc in next 3 sts, dec, sc in next 8, (sc in next 3 sts, dec) x 3, sc in next 8, (sc in next 3 sts, dec) x 2. [40]
- Rnd 15: Sc in next 2 sts, dec, sc in next 8, (sc in next 2 sts, dec) x 3, sc in next 8, (sc in next 2 sts, dec) x 2. [34]
- Rnd 16: Sc in next st, dec, sc in next 8, (sc in next st, dec) x 3, sc in next 8, (sc in next st, dec) x 2. [28]
- Start stuffing firmly. Insert safety eyes between Rnd 7 and 8, approximately 6-7 stitches apart.
- Rnd 17: (Sc in next 2 sts, dec) x 7. [21]
- Rnd 18: (Sc in next st, dec) x 7. [14]
- Rnd 19: Dec x 7. [7]
- FO, leaving a long tail for closing. Weave the tail through the front loop of the remaining 7 stitches and pull tight to close. Weave in end.
Part 2: Medium Cloud Puffs (Make 2)
These will be slightly smaller, spherical puffs.
- Rnd 1: 6 sc in MR. [6]
- Rnd 2: Inc in each st around. [12]
- Rnd 3: (Sc, inc) x 6. [18]
- Rnd 4-6: Sc in each st around. [18] (3 rounds)
- Rnd 7: (Sc, dec) x 6. [12]
- Start stuffing firmly.
- Rnd 8: Dec x 6. [6]
- FO, leaving a long tail for sewing. Close the opening and weave in end.
Part 3: Small Cloud Puffs (Make 3)
These are the smallest puffs to add extra texture.
- Rnd 1: 6 sc in MR. [6]
- Rnd 2: Inc in each st around. [12]
- Rnd 3-4: Sc in each st around. [12] (2 rounds)
- Rnd 5: Dec x 6. [6]
- Start stuffing firmly.
- FO, leaving a long tail for sewing. Close the opening and weave in end.
Part 4: Assembly & Finishing
This is where your cloud truly comes to life!
- Take your Main Cloud Body. If you're adding rosy cheeks, use pink embroidery floss and a yarn needle to make a few small stitches below each eye.
- Arrange the Medium Cloud Puffs. Place one on each side of the main body, slightly above the bottom edge, where the curve starts to narrow. Pin them in place to visualize the arrangement.
- Using the long tail from each Medium Puff and your yarn needle, carefully sew them securely to the Main Cloud Body. Stitch neatly to create a seamless join.
- Next, arrange the Small Cloud Puffs. Place one in the center-top of the main cloud body, and the other two towards the bottom-front, filling in any gaps and adding to the cloud's organic shape. You can overlap them slightly for a fuller look. Again, pin them first.
- Sew the Small Cloud Puffs firmly in place.
- Once all puffs are attached, gently squish and shape your cloud to your liking. Add more stuffing into any areas that feel too soft or flat through the joins, if necessary.
- Weave in any remaining loose ends into the body of the cloud.
Pro Tips
-
Yarn Choice Matters: For an extra fluffy cloud, consider using a chenille or blanket yarn, adjusting your hook size accordingly. Just be aware that these yarns can be harder to see stitches in for beginners.
-
Stuffing Uniformly: Stuff your amigurumi gradually and firmly, using small pieces of fiberfill. This helps avoid lumps and ensures a smooth, even finish. Don't be afraid to use a good amount of stuffing – a firm cloud holds its shape better!
-
Invisible Decrease: For an even neater look, especially on the decrease rounds, try the invisible decrease (inv dec). Insert your hook into the front loop of the first stitch, then into the front loop of the next stitch, yarn over, and pull through both front loops. Yarn over and pull through the remaining two loops on your hook. This creates a much less noticeable decrease stitch.
-
Stitch Marker is Your Best Friend: When working in continuous rounds, it's easy to lose track. Always place a stitch marker in the first stitch of each round to avoid miscounting.
-
Personalize It: Beyond eye placement, consider adding a tiny embroidered smile, some blush with fabric paint or embroidery floss, or even little dangling raindrops made from beads or felt for an extra touch of whimsy!
-
Safety First: If making this for a baby or small child, always embroider the eyes and mouth instead of using safety eyes, which can be a choking hazard.
Frequently Asked Questions
Can I use a different weight of yarn for this pattern?
Absolutely! You can easily adapt this pattern for different yarn weights. Just be sure to use a crochet hook size appropriate for your chosen yarn (usually 1-2 sizes smaller than recommended on the yarn label for a tight amigurumi fabric). Keep in mind that using a bulkier yarn will result in a larger cloud, and a finer yarn will yield a smaller one. The stitch counts remain the same, only the final dimensions will change.
How can I make my cloud bigger or smaller?
To make your cloud larger, you can use a heavier weight yarn (like a super bulky blanket yarn) and a larger hook, or you can add extra rounds of single crochet to the 'straight' sections of the main body and puffs before starting decreases. To make it smaller, use a lighter weight yarn (like DK or sport weight) and a smaller hook. You could also reduce the initial chain length for the main body and skip some increase/decrease rounds, but be careful to maintain the overall shape.
Is this pattern suitable for complete beginners?
While this pattern uses fundamental stitches (magic ring, single crochet, increases, decreases), assembling multiple parts might be a bit challenging for someone who has never crocheted before. However, if you're a beginner who has mastered these basic stitches and are comfortable following written instructions, you should find this pattern very achievable. Take your time, use stitch markers, and don't hesitate to look up video tutorials for specific stitches if you need a visual guide!
And there you have it – your very own beautiful, handmade crochet cloud, ready to float into your heart and home! Every stitch you made is a testament to your creativity and patience, and the result is a unique piece that carries a special warmth. We hope you enjoyed crafting this dreamy project as much as we loved sharing it with you. Don't forget to share your finished clouds with our community; we can't wait to see your wonderful creations!