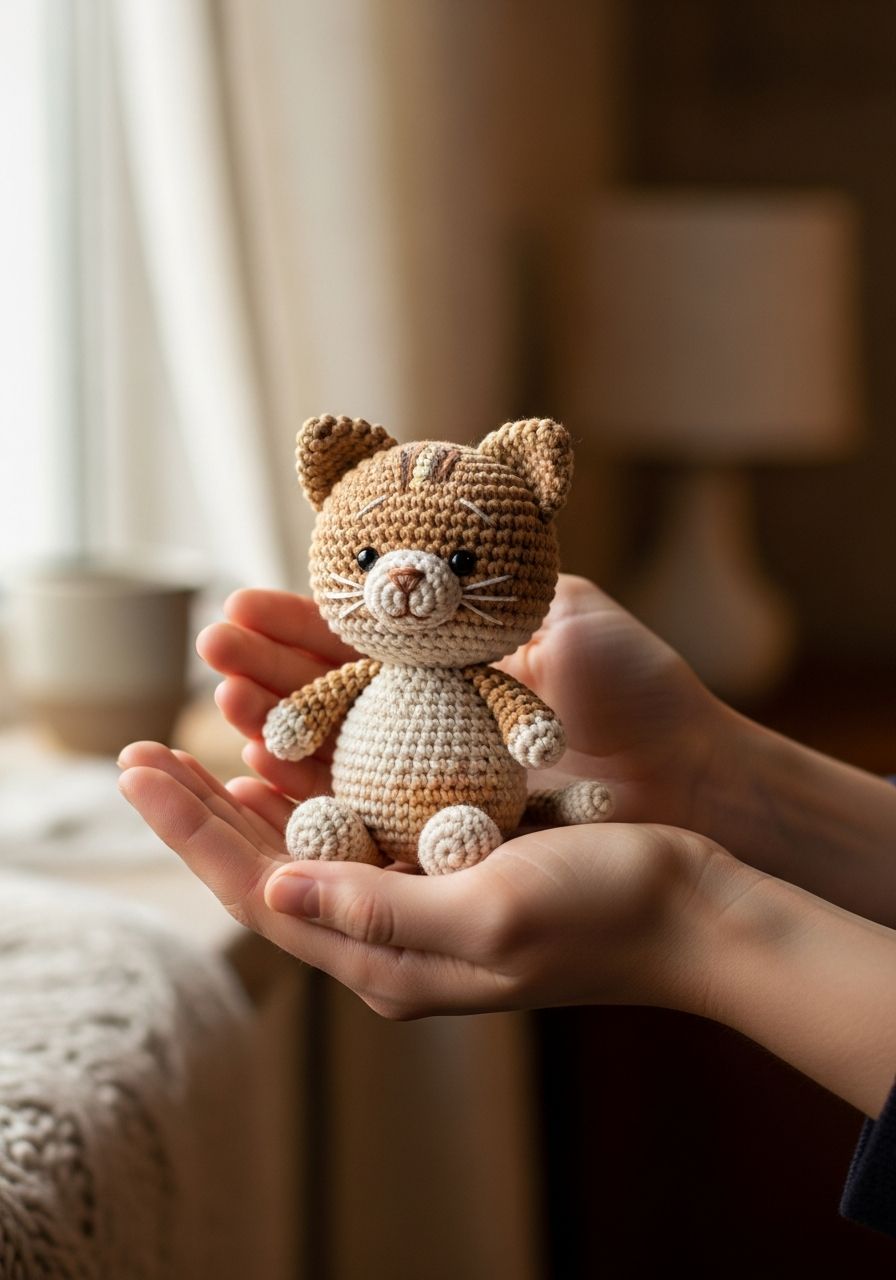
Imagine the soft purr of a tiny friend nestled in your hand, a companion crafted by your very own creativity and love. There's something truly magical about bringing a cuddly creature to life with just yarn and a hook, and now you can experience that joy with our adorable Crochet Cat Amigurumi pattern! Get ready to stitch your way to a purr-fectly charming feline companion that will capture hearts and bring endless smiles to anyone who meets it.
Welcome, fellow yarn enthusiasts, to a project that promises both delight and satisfaction! This free crochet pattern is designed to guide you through creating your very own charming cat amigurumi. Whether you're new to the whimsical world of amigurumi or a seasoned pro looking for a quick and gratifying make, this pattern offers clear, easy-to-follow instructions to ensure your success. We've focused on creating a classic, endearing design that can be customized to reflect your favorite feline friend or simply made into a beloved new toy. Let's gather our supplies and get ready to crochet a companion that's sure to be cherished!
Why You'll Love This Pattern
- Beginner-Friendly: Uses basic stitches and straightforward shaping, making it perfect for those new to amigurumi.
- Quick to Make: With its modest size, you can whip up this kitty in just a few dedicated crochet sessions.
- Customizable: Easily change yarn colors, add stripes, or embroider unique facial expressions to make each cat truly one-of-a-kind.
- Perfect for Gifting: A handmade cat makes a thoughtful and personal gift for birthdays, baby showers, or just because.
- Uses Scraps: A fantastic way to use up leftover yarn from previous projects, reducing waste and creating something adorable.
- Portable Project: Small enough to take with you, making it ideal for crocheting on the go.
Materials Needed
- Worsted Weight Yarn (Category 4) in your chosen main color (approximately 50-70g). Suggested colors: grey, white, orange, black, or any cat-like hue.
- Small amount of Worsted Weight Yarn in a contrasting color for nose/inner ears (e.g., pink).
- Crochet Hook: 3.0mm or 3.5mm (depending on your tension and desired fabric density).
- Safety Eyes: 8mm or 9mm (or embroider eyes for young children).
- Polyester Fiberfill for stuffing.
- Yarn Needle (tapestry needle) for sewing parts together and weaving in ends.
- Stitch Marker: Essential for working in continuous rounds.
- Scissors.
Gauge & Sizing
For amigurumi, gauge isn't as critical as it is for garments, but maintaining consistent tension is key to a smooth, even fabric that holds stuffing well. You want your stitches to be tight enough so that the stuffing doesn't show through. Using a hook size smaller than typically recommended for your yarn weight usually achieves this. With the recommended yarn and hook, your finished Crochet Cat Amigurumi will stand approximately 6-7 inches (15-18 cm) tall from the top of its head to the bottom of its body, not including the ears.
Abbreviations
- ch: Chain
- sc: Single Crochet
- hdc: Half Double Crochet
- dc: Double Crochet
- sl st: Slip Stitch
- inc: Increase (2 single crochet in one stitch)
- dec: Decrease (single crochet 2 together - use invisible decrease for best results)
- Rnd: Round
- st/sts: Stitch/Stitches
- FO: Fasten Off
- MR: Magic Ring (also known as Magic Circle or Adjustable Ring)
Step-by-Step Pattern
Work in continuous rounds unless otherwise specified. Use a stitch marker to keep track of your first stitch in each round.
Head (Main Color)
- Rnd 1: 6 sc in a magic ring (6)
- Rnd 2: [inc] x 6 (12)
- Rnd 3: [sc, inc] x 6 (18)
- Rnd 4: [2 sc, inc] x 6 (24)
- Rnd 5: [3 sc, inc] x 6 (30)
- Rnd 6: [4 sc, inc] x 6 (36)
- Rnd 7-12: Sc in each st around (36)
- Rnd 13: [4 sc, dec] x 6 (30)
- Rnd 14: [3 sc, dec] x 6 (24)
- Rnd 15: [2 sc, dec] x 6 (18)
- Rnd 16: [sc, dec] x 6 (12)
- Begin stuffing the head firmly, shaping as you go.
- Rnd 17: [dec] x 6 (6)
- FO, leaving a long tail. Weave the tail through the front loop of the remaining 6 stitches and pull tight to close. Weave in the end.
Body (Main Color)
- Rnd 1: 6 sc in a magic ring (6)
- Rnd 2: [inc] x 6 (12)
- Rnd 3: [sc, inc] x 6 (18)
- Rnd 4: [2 sc, inc] x 6 (24)
- Rnd 5: [3 sc, inc] x 6 (30)
- Rnd 6: [4 sc, inc] x 6 (36)
- Rnd 7-14: Sc in each st around (36)
- Rnd 15: [4 sc, dec] x 6 (30)
- Rnd 16-17: Sc in each st around (30)
- Rnd 18: [3 sc, dec] x 6 (24)
- Begin stuffing the body firmly, ensuring a nice shape.
- Rnd 19: Sc in each st around (24)
- FO, leaving a long tail for sewing.
Ears (Make 2) (Main Color)
Work in rows or rounds, depending on desired look. This pattern uses rounds to create a slightly cupped ear.
- Rnd 1: 4 sc in a magic ring (4)
- Rnd 2: [inc] x 4 (8)
- Rnd 3: [sc, inc] x 4 (12)
- Rnd 4: [2 sc, inc] x 4 (16)
- Rnd 5: Sc in each st around (16)
- FO, leaving a long tail for sewing. Do not stuff. Flatten the ear before sewing.
Arms (Make 2) (Main Color)
- Rnd 1: 6 sc in a magic ring (6)
- Rnd 2: [sc, inc] x 3 (9)
- Rnd 3-8: Sc in each st around (9)
- Lightly stuff the bottom half of the arm.
- Rnd 9: Sc in each st around (9)
- Flatten the opening and sc through both sides to close (4-5 sc).
- FO, leaving a long tail for sewing.
Legs (Make 2) (Main Color)
- Rnd 1: 6 sc in a magic ring (6)
- Rnd 2: [inc] x 6 (12)
- Rnd 3: Sc in each st around (12)
- Rnd 4: [sc, dec] x 4 (8)
- Rnd 5-9: Sc in each st around (8)
- Stuff the leg firmly.
- Flatten the opening and sc through both sides to close (4 sc).
- FO, leaving a long tail for sewing.
Tail (Main Color)
- Rnd 1: 5 sc in a magic ring (5)
- Rnd 2: [inc] x 5 (10)
- Rnd 3-12: Sc in each st around (10)
- Do not stuff.
- Flatten the opening and sc through both sides to close (5 sc).
- FO, leaving a long tail for sewing.
Assembly
This is where your cat truly comes to life! Take your time with sewing for a neat finish.
- Attach the Head to the Body: Using the long tail from the body, center the head on top of the body. Sew around the opening, attaching the two pieces securely. Make sure the head is upright and balanced.
- Place Safety Eyes: Decide where you want the eyes to be. A good general placement is between Rnds 10 and 11 of the head, about 5-7 stitches apart. Press them firmly into place. If making for a very young child, embroider eyes instead of using safety eyes.
- Embroider Face Details: Using black or dark brown yarn, embroider a small 'V' shape for the nose just below the eyes. Then, embroider a straight line down from the 'V' and two small 'Y' shapes curving out to form the mouth. You can also add whiskers with a few straight stitches on each side of the nose.
- Attach the Ears: Pinch the bottom of each ear slightly and sew them to the top of the head, approximately on Rnd 3-4, about 8-10 stitches apart. Angle them slightly forward for a cute expression.
- Attach the Arms: Position the arms on either side of the body, just below the neck seam (around Rnd 17-18 of the body). Sew them securely.
- Attach the Legs: Sew the legs to the bottom of the body, towards the front, ensuring the cat can sit or stand upright.
- Attach the Tail: Sew the tail to the back of the body, centered, just above the bottom edge.
- Finishing Touches: Weave in any remaining loose ends. Give your cat a gentle pat and squeeze to distribute the stuffing evenly and shape it as desired.
Pro Tips
- Invisible Decrease: For a seamless look in your amigurumi, use the invisible decrease method. Instead of yarning over, insert your hook into the front loop of the first stitch, then immediately into the front loop of the second stitch, yarn over, and pull through both loops (2 loops on hook), yarn over and pull through remaining 2 loops.
- Stuffing Technique: Stuff your amigurumi firmly and evenly. Use small pieces of fiberfill, pushing them into all nooks and crannies with the back of your hook or a chopstick. Overstuffing can distort the shape, while understuffing can make it floppy.
- Stitch Marker is Your Best Friend: Always use a stitch marker to mark the first stitch of each round when working in continuous spirals. This prevents you from losing your place and ensures accurate stitch counts.
- Color Changes: If you want to add stripes or different colored paws, learn how to make neat color changes. A common method is to complete the last yarn over of the final stitch of the old color with the new color.
- Yarn Tails for Sewing: When fastening off a piece that needs to be sewn, always leave a long tail (at least 12-18 inches) to use for attaching that piece. This saves you from having to attach a new strand of yarn later.
- Safety Eye Placement: Before permanently attaching safety eyes, experiment with their placement. Pin them in different spots to see how it changes the cat's expression. Small changes can make a big difference!
Frequently Asked Questions
Q: Can I use a different weight of yarn?
A: Absolutely! You can use any yarn weight you prefer. Just be aware that using a thicker yarn (like bulky) will result in a larger cat, and a thinner yarn (like sport or fingering weight) will make a smaller cat. Remember to adjust your hook size accordingly; generally, you'll want to use a hook that's at least one size smaller than what's recommended for your chosen yarn to ensure a tight fabric that won't show the stuffing.
Q: Is this pattern suitable for complete beginners who have never crocheted before?
A: While this pattern uses basic stitches, it does assume you have a grasp of fundamental crochet techniques like making a magic ring, single crochet, increases, and decreases. If you're a complete beginner, we recommend practicing these stitches on a flat swatch first. There are many excellent video tutorials online for each of these techniques. Once you're comfortable with the basics, this pattern will be a fantastic project to tackle as your first amigurumi!
Q: How do I make my crochet cat stand up on its own?
A: Getting amigurumi to stand can be tricky, as it primarily depends on firm stuffing and the balance of the piece. For this cat, ensure the legs are stuffed very firmly and sewn symmetrically. You can also try shaping the bottom of the body and legs to be a bit flatter. For more advanced stability, some crafters insert wire armatures, but this is not recommended for toys given to young children due to safety concerns. Often, a well-stuffed amigurumi will sit nicely even if it can't stand freely.
Congratulations on completing your very own Crochet Cat Amigurumi! We hope you enjoyed every stitch of this journey. This little feline friend is a testament to your creativity and patience, ready to bring warmth and charm wherever it goes. Whether it's destined for a shelf, a child's toy box, or a gift for a loved one, this handmade cat carries a special touch that only you could provide. Share your finished creation with us – we love seeing your unique interpretations!