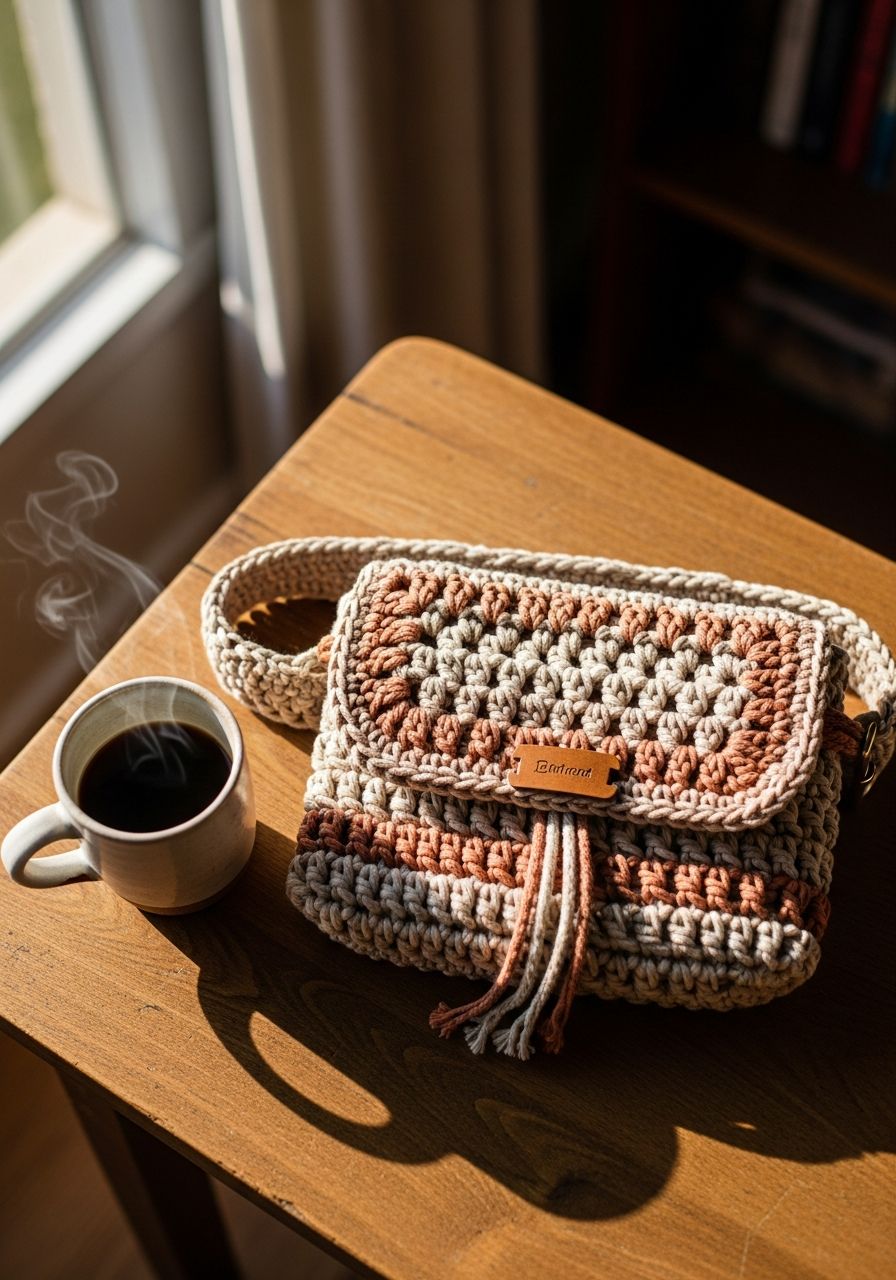
Imagine stepping out, hands-free, with all your essentials stylishly secured right by your side. No more fumbling through a cavernous tote or grappling with a slipping shoulder bag! The freedom, the convenience, the sheer chicness – that's the magic of a beautifully handmade Crochet Belt Bag. This isn't just a pattern; it's your ticket to crafting the ultimate on-the-go accessory, a practical fashion statement that you'll be proud to wear and show off to everyone!
Belt bags, fanny packs, hip bags – whatever you call them, they're back and better than ever, evolving from purely practical to undeniably fashionable. This versatile accessory is perfect for everything from quick errands to long walks, music festivals to busy travel days. With this free pattern, you'll learn to create your own bespoke version, choosing colors and textures that truly reflect your personal style. Let's dive into making a durable, stylish, and incredibly useful accessory that will become your new everyday favorite!
Why You'll Love This Pattern
- Fashion-Forward & Functional: This pattern creates a modern, sleek belt bag that's perfectly sized for your phone, wallet, keys, and lip balm, keeping your hands free and your essentials secure.
- Customizable Style: Choose your favorite yarn colors and fiber types to match your wardrobe or make a bold statement. The design is simple enough to be a fantastic canvas for color blocking or textured stitches.
- Beginner-Friendly with a Challenge: While the core stitches are basic, the assembly involves a few steps that will help you level up your crochet skills, especially with attaching zippers and finishing details.
- Durable Design: We'll be using stitches and techniques that ensure your belt bag is sturdy enough for daily wear and tear.
- Portable & Practical: Whether you're commuting, hiking, or just enjoying a casual day out, this bag keeps your necessities close without weighing you down.
Materials Needed
- Yarn: Approximately 300-350 yards of Worsted Weight (Category 4) yarn. A sturdy cotton, cotton blend, or durable acrylic is recommended for structure and longevity. (e.g., Lily Sugar'n Cream, Lion Brand 24/7 Cotton, Bernat Handicrafter Cotton)
- Crochet Hook: H/8 (5.0 mm) or size needed to obtain gauge.
- Zipper: One 10-inch (25 cm) standard zipper.
- Strap Hardware: Two 1-inch (2.5 cm) D-rings or rectangular rings for attaching the strap. One 1-inch (2.5 cm) swivel clasp and one 1-inch (2.5 cm) slider buckle for an adjustable strap.
- Notions: Yarn needle, scissors, stitch markers, sewing needle, strong matching thread for zipper attachment.
Gauge & Sizing
Gauge: 14 hdc and 10 rows = 4 inches (10 cm) worked in half double crochet (hdc) in rows.
It is crucial to check your gauge to ensure your bag turns out the correct size and to ensure your zipper fits properly. If your swatch is too small, try a larger hook. If your swatch is too large, try a smaller hook.
Finished Bag Dimensions (approximate):
- Main Body: 10 inches (25 cm) wide x 6 inches (15 cm) tall
- Depth: 2 inches (5 cm)
- Strap: Adjustable up to 45 inches (114 cm)
Abbreviations
- ch: chain
- sl st: slip stitch
- sc: single crochet
- hdc: half double crochet
- dc: double crochet
- inc: increase (2 sc in one stitch)
- dec: decrease (sc2tog – single crochet 2 together)
- st(s): stitch(es)
- rep: repeat
- fo: fasten off
Step-by-Step Pattern
Bag Body (Make 2)
We will create two identical rectangular panels for the front and back of the bag.
- Ch 31.
- Row 1: Hdc in 2nd ch from hook and in each ch across. (30 hdc)
- Row 2: Ch 1 (does not count as st), turn. Hdc in each st across. (30 hdc)
- Rows 3-20: Repeat Row 2 for a total of 20 rows.
- At the end of Row 20, fo and weave in ends.
Gusset/Side Panel (Main)
This long strip forms the bottom and sides of the bag's depth, excluding the zipper opening.
- Ch 9.
- Row 1: Hdc in 2nd ch from hook and in each ch across. (8 hdc)
- Row 2: Ch 1 (does not count as st), turn. Hdc in each st across. (8 hdc)
- Rows 3-62: Repeat Row 2 for a total of 62 rows, or until the strip measures approximately 24 inches (61 cm). This length will be adjusted during assembly.
- At the end of the last row, fo, leaving a long tail for sewing.
Zipper Panels (Make 2)
These two narrower strips will frame the zipper opening.
- Ch 31.
- Row 1: Sc in 2nd ch from hook and in each ch across. (30 sc)
- Row 2: Ch 1 (does not count as st), turn. Sc in each st across. (30 sc)
- At the end of Row 2, fo, leaving a long tail for sewing.
Strap Connectors (Make 2)
Small loops to attach the D-rings.
- Ch 11.
- Row 1: Hdc in 2nd ch from hook and in each ch across. (10 hdc)
- Row 2: Ch 1 (does not count as st), turn. Hdc in each st across. (10 hdc)
- At the end of Row 2, fo, leaving a long tail for sewing.
Adjustable Strap
This strap will be crocheted and made adjustable with hardware.
- Ch 7.
- Row 1: Sc in 2nd ch from hook and in each ch across. (6 sc)
- Row 2: Ch 1 (does not count as st), turn. Sc in each st across. (6 sc)
- Rows 3-140 (or desired length): Repeat Row 2 until your strap measures approximately 40-45 inches (100-114 cm), or your preferred length.
- At the end of the last row, fo, leaving a long tail for sewing.
Assembly
This is where your bag takes shape! Take your time with these steps for a professional finish.
- Attach Zipper to Zipper Panels: Using your sewing needle and strong thread, hand-sew one zipper panel to one side of the zipper tape. Position the panel so the crochet edge slightly overlaps the zipper teeth, hiding them. Repeat with the second zipper panel on the other side of the zipper tape. Ensure the zipper can still open and close smoothly.
- Join Gusset Pieces: Take your main Gusset/Side Panel. Find the center of one long edge. Mark 5 inches (12.5 cm) to the left and 5 inches (12.5 cm) to the right (a total of 10 inches/25 cm). This will be the bottom of your bag. Now, take your assembled zipper unit. Sew the long edge of one zipper panel to one 10-inch (25 cm) segment of the Gusset/Side Panel, starting 5 inches from one end and ending 5 inches from the other (this forms the top opening). Repeat with the other zipper panel on the opposite long edge of the Gusset/Side Panel.
- Form the Gusset Loop: With right sides facing each other, join the short ends of the main Gusset/Side Panel (the remaining un-sewn ends) using sl st or by sewing with a yarn needle, forming a continuous loop.
- Attach Strap Connectors: Fold each Strap Connector piece in half around a D-ring. Use the long tail to sew the ends together securely, forming a loop around the D-ring. Position these D-rings on the side edges of the Gusset/Side Panel, approximately 1 inch (2.5 cm) down from the top (zipper) edge, centering them on the 8-hdc width of the gusset. Stitch them firmly into place.
- Attach Bag Body Panels: Pin one Bag Body Panel to the perimeter of the Gusset/Side Panel loop, matching the edges. Use a yarn needle and the remaining long tail from the gusset (or a new piece of yarn) to whip stitch or mattress stitch the panel securely to the gusset. Work your way around the entire perimeter. Repeat with the second Bag Body Panel on the other side of the gusset.
- Assemble Adjustable Strap: Thread one end of your crocheted strap through the center bar of the slider buckle, folding it over about 1 inch (2.5 cm) and sewing it securely to itself. Thread the other end of the strap through the swivel clasp, then back through the slider buckle (over the bar, under the first loop). Adjust the length and sew the remaining loose end of the strap to one of the D-rings you attached to the bag. Attach the swivel clasp to the other D-ring.
Pro Tips
- Lining for Durability: For ultimate longevity and to prevent stretching or items poking through, consider sewing a fabric lining for your belt bag. You can cut fabric pieces slightly smaller than your crochet panels and sew them in by hand.
- Yarn Choice Matters: Stiff cotton or a sturdy cotton-acrylic blend will yield the best results for a structured bag. Avoid very soft or stretchy yarns like merino wool, as they might cause the bag to sag.
- Zipper Attachment: Use a strong, polyester thread for sewing the zipper, as it's more durable than cotton thread. Take small, neat stitches close to the zipper teeth for a clean finish.
- Customizing Size: To make your bag wider, increase your starting chain for the Bag Body and Zipper Panels. To make it taller, add more rows to the Bag Body. Adjust the Gusset/Side Panel and Zipper Panel lengths accordingly.
- Stitch Markers are Your Friend: Especially during assembly, use stitch markers to hold panels in place before sewing to ensure even alignment.
Frequently Asked Questions
Q: What's the best yarn for a crochet belt bag?
A: For a crochet belt bag, a sturdy worsted weight (Category 4) yarn is ideal. Cotton, like Lily Sugar'n Cream or Lion Brand 24/7 Cotton, is an excellent choice as it provides good stitch definition, durability, and minimal stretch, which helps the bag maintain its shape. A durable acrylic or a cotton-blend yarn would also work well, just make sure it's not too soft or prone to stretching.
Q: Can I make this pattern larger or smaller?
A: Yes, absolutely! To adjust the size, you'll need to modify the initial chain counts and row numbers for the main Bag Body, Zipper Panels, and Gusset/Side Panel. For a wider bag, increase your starting chain for the Bag Body and Zipper Panels (keeping an even number of stitches for symmetry). For a taller bag, add or subtract rows from the Bag Body panels. Remember to adjust the length of the Gusset/Side Panel to match the new perimeter of your main panels.
Q: How do I attach a zipper securely to crochet?
A: The most secure way to attach a zipper to crochet is by hand-sewing it with a strong polyester thread and a sharp sewing needle. First, ensure your crocheted zipper panels are firmly sewn to the main gusset. Then, place the zipper between the two zipper panels and carefully pin it. Using small, even backstitches or a whip stitch, sew through the edge of the crochet fabric and the zipper tape, making sure not to stitch through the zipper teeth themselves. Take your time to create neat, strong stitches that will hold up to repeated use.
Congratulations! You've just created a functional and fabulous Crochet Belt Bag that's ready for all your adventures. This project is a testament to your skill and creativity, offering both style and practicality in one handmade accessory. Don't be afraid to experiment with different colors or even add embellishments like embroidery or patches to make it uniquely yours. Wear it with pride, and enjoy the freedom of hands-free living!