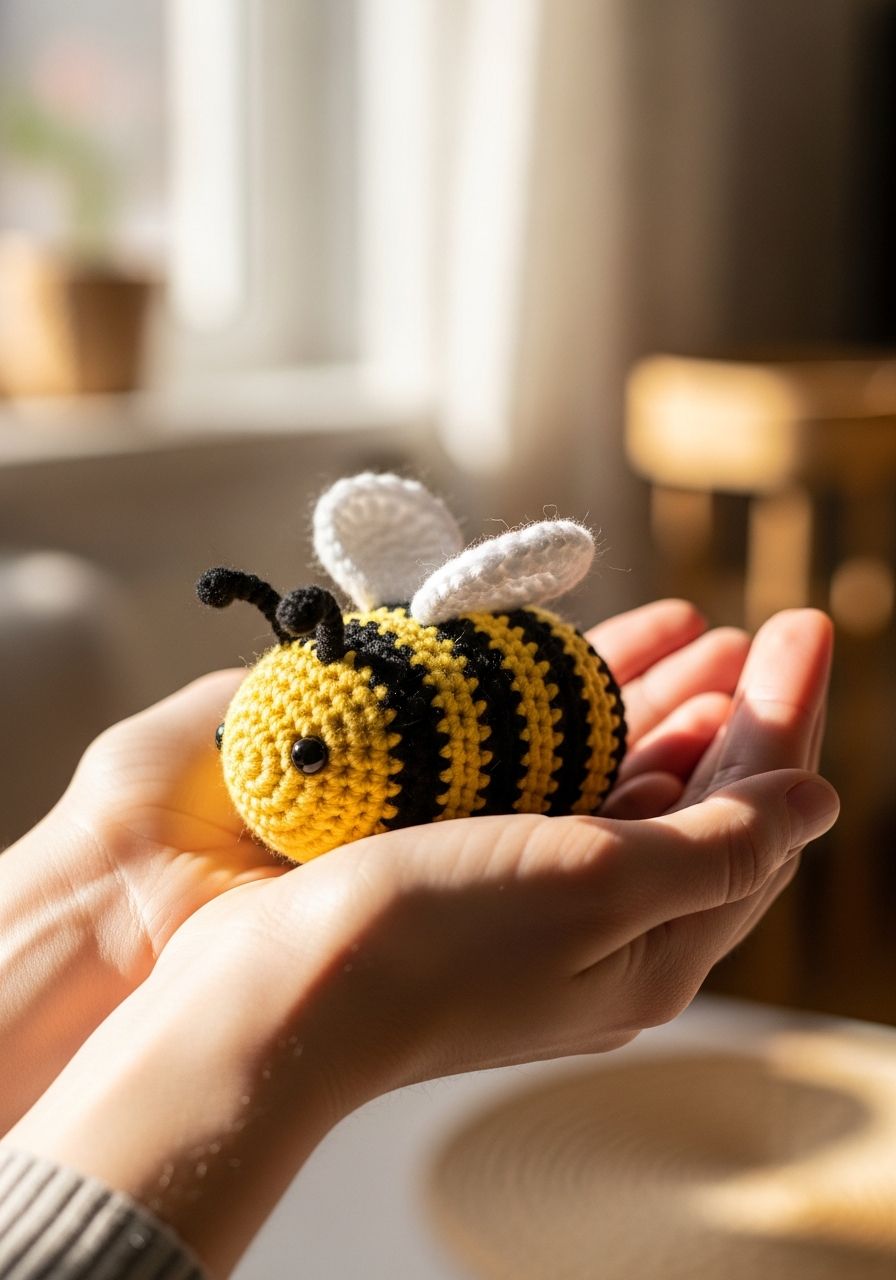
Imagine the pure joy of holding a tiny, buzzing friend crafted with your own hands! There’s something truly magical about bringing an adorable creature to life stitch by stitch, and this Crochet Bee Amigurumi free pattern is designed to do just that. Get ready to fall in love with the process as you create a sweet, stripey companion that’s perfect for gifting, decorating, or simply brightening your day with its whimsical charm. This isn't just a pattern; it's an invitation to unleash your creativity and weave a little bit of happiness into existence!
Welcome, fellow yarn enthusiasts! If you're searching for your next delightful crochet project, look no further. This comprehensive free pattern will guide you through creating an absolutely charming bee amigurumi, perfect for all skill levels from confident beginners to seasoned crocheters. We'll cover everything from selecting your materials to the final adorable assembly, ensuring your little bee turns out perfectly plump and ready to buzz into your heart. Let's gather our hooks and yarn and embark on this sweet journey together!
Why You'll Love This Pattern
- Beginner-Friendly: Uses basic stitches and simple construction, making it accessible for those new to amigurumi.
- Quick to Make: With just a few components, you can whip up one of these adorable bees in an afternoon or a couple of evenings.
- Stash Buster: Perfect for using up those leftover bits of yellow, black, and white yarn.
- Endlessly Customizable: Easily change yarn weights, hook sizes, or add unique embellishments to make your bee truly one-of-a-kind.
- Adorable Gifts: These little bees make fantastic gifts for children, friends, or anyone who needs a dose of handmade cuteness.
- Versatile Decor: Use them as keychains, nursery decor, desk companions, or part of a charming mobile.
Materials Needed
- Worsted Weight (Aran/10-ply) Yarn in:
- Yellow (approx. 30g)
- Black (approx. 15g)
- White (approx. 10g for wings)
- Small amount of Pink (for cheek embroidery, optional)
- Crochet Hook: 3.0mm (US D/3) or 3.5mm (US E/4) – choose based on your tension and desired fabric density.
- Safety Eyes: 6mm or 8mm (depending on desired expression).
- Polyester Fiberfill for stuffing.
- Tapestry Needle for weaving in ends and assembly.
- Stitch Marker (essential for working in continuous rounds).
- Scissors.
Gauge & Sizing
For amigurumi, gauge isn't critical in the same way it is for garments. The most important thing is to achieve a tight fabric that prevents stuffing from showing through. If your stitches are too loose, go down a hook size. If they are too tight, go up a size. Using a 3.0mm hook and worsted weight yarn, your finished bee will be approximately 4-5 inches (10-12 cm) long, not including antennae.
Abbreviations
- ch: chain
- sc: single crochet
- hdc: half double crochet
- dc: double crochet
- sl st: slip stitch
- inc: increase (2 sc in the same stitch)
- dec: decrease (sc2tog - single crochet 2 stitches together)
- MR: magic ring (or magic circle)
- st(s): stitch(es)
- FO: fasten off
- (...) x N: repeat instructions in parentheses N times
- [#]: number of stitches at the end of the round
Step-by-Step Pattern
Bee Body (Yellow & Black Yarn)
Start with Yellow yarn.
- Round 1: MR, 6 sc into the ring. [6]
- Round 2: (inc) x 6. [12]
- Round 3: (sc, inc) x 6. [18]
- Round 4: (2 sc, inc) x 6. [24]
- Round 5: (3 sc, inc) x 6. [30]
- Round 6: (4 sc, inc) x 6. [36]
- Round 7-10: Sc in each st around (4 rounds). [36]
- Round 11: (4 sc, dec) x 6. [30]
- Round 12: Sc in each st around. [30]
- Round 13: (3 sc, dec) x 6. [24]
- Change to Black yarn.
- Round 14: Sc in each st around. [24]
- Round 15: (2 sc, dec) x 6. [18]
- Change to Yellow yarn.
- Round 16: Sc in each st around. [18]
- Round 17: (sc, dec) x 6. [12]
- Change to Black yarn.
- Round 18: Sc in each st around. [12]
- Round 19: (dec) x 6. [6]
Fasten off, leaving a long tail for closing. Stuff the body firmly, shaping as you go. Use the tail to sew the remaining 6 stitches closed, then weave in the end.
Note on Safety Eyes: Before closing, insert safety eyes between Rounds 8 and 9, about 6-7 stitches apart. If you prefer embroidered eyes, you can do this after stuffing and closing.
Wings (White Yarn, Make 2)
Start with White yarn.
- Row 1: Ch 7.
- Row 2: Starting in the 2nd ch from hook, sc in next 5 ch, 3 sc in last ch. Now working on the other side of the chain, sc in next 5 ch. [13]
- Row 3: Ch 1, turn. Sc in next 5 sts, inc, sc in next st, inc, sc in next 5 sts. [15]
- Row 4: Ch 1, turn. Sc in each st around. [15]
- Row 5: Ch 1, turn. Sc in next 6 sts, dec, sc in next st, dec, sc in next 4 sts. [13]
- Row 6: Ch 1, turn. Sc in each st around. [13]
- Row 7: Ch 1, turn. Sc in next 5 sts, dec, sc in next st, dec, sc in next 3 sts. [11]
Fasten off, leaving a long tail for sewing. Create a second identical wing.
Antennae (Black Yarn, Make 2)
Start with Black yarn.
- Row 1: Ch 5.
- Row 2: Starting in the 2nd ch from hook, sl st in each of the next 4 ch. [4]
Fasten off, leaving a long tail for sewing. Create a second identical antenna.
Assembly
- Eyes: If you're using safety eyes, they should already be in place. If embroidering, use black yarn to create two small 'X's or vertical lines for eyes on the yellow head section, between Rounds 8 and 9.
- Cheeks (Optional): With a small amount of pink yarn, embroider small oval blush marks under each eye using a satin stitch or French knots.
- Wings: Position the wings on the bee's back, over the yellow section of the body (Rounds 8-10). They should be placed symmetrically, slightly angled upwards. Using the tails, sew them securely to the body with a tapestry needle.
- Antennae: Attach the antennae to the top of the bee's head, between the eyes. Thread the tail through the bee's head, bringing it out a few stitches away, and tie a knot inside to secure. Trim excess yarn.
- Smile (Optional): Using black embroidery floss or a thin strand of black yarn, embroider a small 'V' or 'U' shape for a smile between the eyes and the first black stripe.
- Weave in all remaining ends.
Pro Tips
- Invisible Decrease: For a cleaner look in your amigurumi, use the invisible decrease method (insert hook into front loop of first stitch, then front loop of second stitch, yarn over, pull through both front loops, yarn over, pull through both loops on hook).
- Stuffing Consistency: Stuff your bee firmly and evenly to avoid lumps and bumps. Use small pieces of fiberfill at a time to fill out the shape smoothly. Ensure the head and body are well-packed to maintain their form.
- Stitch Marker is Your Best Friend: When working in continuous rounds, it's incredibly easy to lose your place. Always use a stitch marker in the first stitch of each round and move it up as you go.
- Yarn Choice Matters: While worsted weight is recommended, you can use any yarn weight with a corresponding hook size. Just remember that thicker yarn will result in a larger bee, and thinner yarn will make a smaller one. Always ensure your fabric is tight enough to prevent stuffing from showing.
- Secure Attachments: When sewing on the wings and antennae, take your time and use multiple stitches to ensure they are firmly attached. This is especially important if the bee is for a child.
Frequently Asked Questions
Can beginners really make this bee?
Absolutely! This pattern is designed with beginners in mind. It primarily uses single crochet stitches, magic ring, increases, and decreases – all fundamental techniques in amigurumi. The detailed step-by-step instructions and clear stitch counts will guide you through each part. If you know how to make a single crochet, you're well on your way!
What if I don't have safety eyes?
No problem at all! You can easily embroider the eyes using black yarn or embroidery floss. French knots make lovely round eyes, or you can create small 'X' shapes or vertical lines for a different expression. This is a great alternative, especially if the bee is intended for very young children.
How can I make my bee bigger or smaller?
To change the size of your bee, simply adjust your yarn weight and hook size. For a larger bee, use a bulkier yarn (e.g., chunky or super bulky) with a larger hook. For a smaller bee, opt for a finer yarn (e.g., sport or fingering weight) with a smaller hook. Remember to always choose a hook size that gives you a tight enough fabric for amigurumi with your chosen yarn.
Congratulations, you've just created the most adorable little buzzing companion! We hope you enjoyed every moment of bringing this sweet bee to life. Whether it's nestled on a shelf, gifted to a loved one, or simply brightening your own day, your handmade creation carries a special kind of warmth and joy. Keep buzzing with your crochet hook and happy crafting!