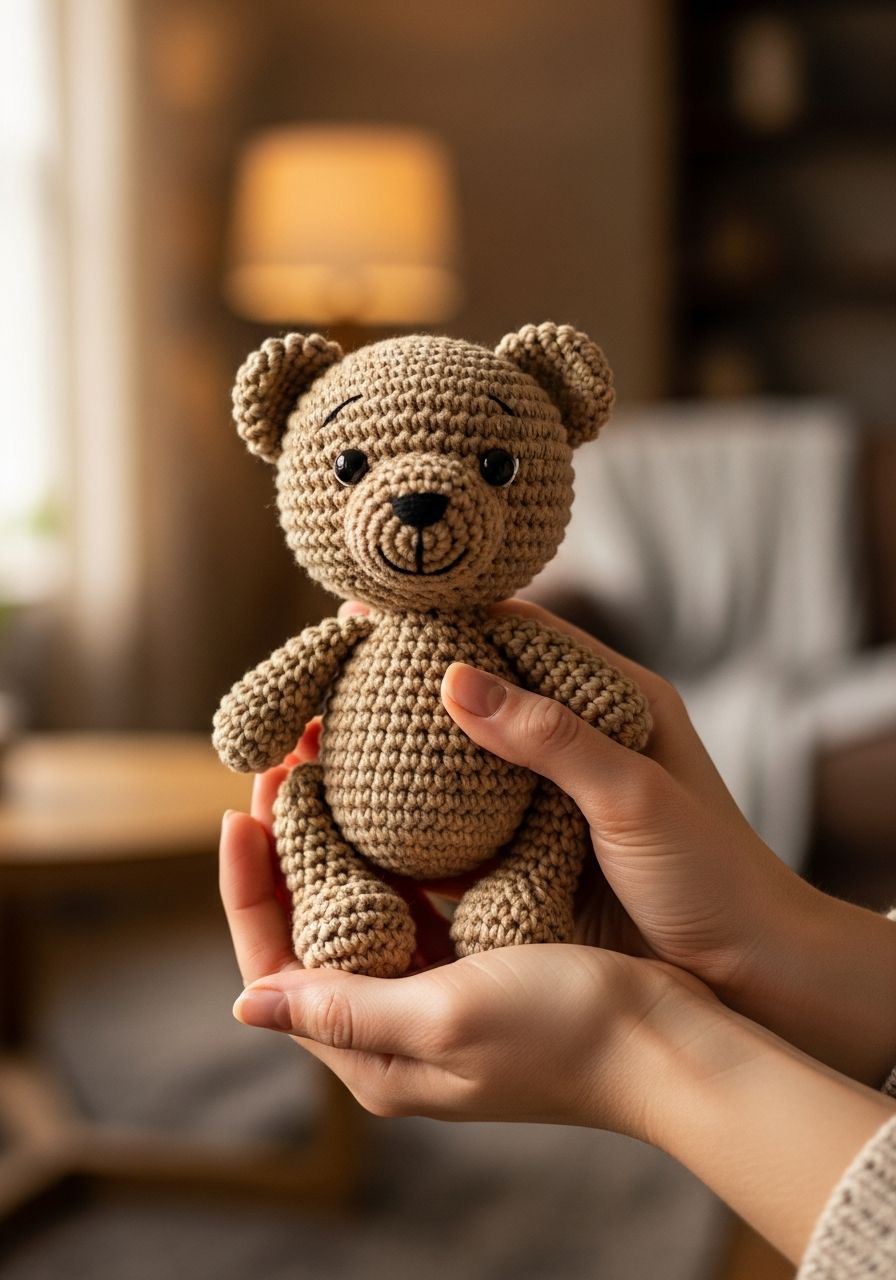
Imagine the pure delight on a child's face, or the cozy comfort a handmade friend brings to any desk or shelf. There's an undeniable magic in creating something with your own hands, especially when it's as irresistibly cute as a little bear. Get ready to embark on a heartwarming crafting journey as we share our brand new, completely free Crochet Bear Amigurumi pattern, designed to fill your world with cuddly charm and endless smiles!
Welcome, fellow yarn enthusiasts, to a pattern that's destined to become your next favorite project! Whether you're a seasoned crocheter looking for a quick and satisfying make, or a curious beginner eager to dive into the wonderful world of amigurumi, this adorable bear is perfect for you. We've meticulously designed this pattern to be clear, concise, and incredibly fun, ensuring a smooth and enjoyable crafting experience from the first stitch to the final assembly.
Why You'll Love This Pattern
- Beginner-Friendly: This pattern uses fundamental stitches and clear instructions, making it accessible for those new to amigurumi.
- Quick to Make: With its modest size and straightforward construction, you can whip up this charming bear in just a few dedicated sessions.
- Perfect for Gifting: Handmade gifts carry so much love. This little bear makes an ideal present for birthdays, baby showers, or just because!
- Customizable: Easily change yarn colors, add a bow, or embroider unique facial expressions to make your bear truly one-of-a-kind.
- Uses Scrap Yarn: A great project for using up those smaller balls of yarn you've been saving.
- Portable Project: Small enough to take with you, making it perfect for crocheting on the go.
Materials Needed
- Worsted weight (Aran/10-ply) yarn in:
- Main Color (MC): Approx. 60g (e.g., light brown, beige, grey)
- Contrast Color (CC): Small amount for snout (e.g., cream, white)
- Crochet Hook: 3.5mm (E/4) or size needed to achieve tight stitches
- Safety Eyes: 8mm (or embroider eyes for younger children)
- Polyester Fiberfill Stuffing
- Tapestry Needle
- Stitch Marker
- Scissors
- Embroidery floss in black (for nose/mouth, optional)
Gauge & Sizing
Gauge is not critically important for amigurumi, as long as your stitches are tight enough to prevent stuffing from showing through. However, consistency in your tension is key for even shaping. When made with worsted weight yarn and a 3.5mm hook, your finished Crochet Bear Amigurumi will stand approximately 7-8 inches (18-20 cm) tall.
Abbreviations
- ch: chain
- sc: single crochet
- hdc: half double crochet
- dc: double crochet
- sl st: slip stitch
- inc: increase (2 sc in one stitch)
- dec: decrease (sc2tog – single crochet 2 together)
- MR: magic ring
- st(s): stitch(es)
- FO: fasten off
- ( ) : repeat instructions in parentheses
- [ ] : total number of stitches in the round
Step-by-Step Pattern
Work in continuous rounds unless otherwise specified. Use a stitch marker to keep track of your first stitch in each round.
Head (MC)
- MR 6 sc [6]
- Inc in each st around [12]
- (Sc 1, inc) x 6 [18]
- (Sc 2, inc) x 6 [24]
- (Sc 3, inc) x 6 [30]
- (Sc 4, inc) x 6 [36]
- Sc in each st around for 8 rounds (Rounds 7-14) [36]
- (Sc 4, dec) x 6 [30]
- (Sc 3, dec) x 6 [24]
- Insert safety eyes between Rounds 10 and 11, about 6-7 stitches apart. Begin stuffing firmly.
- (Sc 2, dec) x 6 [18]
- (Sc 1, dec) x 6 [12]
- Dec x 6 [6]
- FO, leaving a long tail for sewing. Close the remaining hole with the tapestry needle and weave in ends. Continue stuffing as you close the hole.
Ears (Make 2, MC)
- MR 6 sc [6]
- Inc in each st around [12]
- Sc in each st around [12]
- (Sc 2, dec) x 3 [9]
- FO, leaving a long tail for sewing. Do not stuff. Flatten the ear before sewing.
Snout (CC)
- MR 6 sc [6]
- Inc in each st around [12]
- (Sc 1, inc) x 6 [18]
- Sc in each st around [18]
- FO, leaving a long tail for sewing. Lightly stuff.
Body (MC)
- MR 6 sc [6]
- Inc in each st around [12]
- (Sc 1, inc) x 6 [18]
- (Sc 2, inc) x 6 [24]
- (Sc 3, inc) x 6 [30]
- (Sc 4, inc) x 6 [36]
- Sc in each st around for 6 rounds (Rounds 7-12) [36]
- (Sc 4, dec) x 6 [30]
- Sc in each st around [30]
- (Sc 3, dec) x 6 [24]
- Sc in each st around [24]
- (Sc 2, dec) x 6 [18]
- Begin stuffing firmly.
- Sc in each st around [18]
- FO, leaving a long tail for sewing.
Arms (Make 2, MC)
- MR 6 sc [6]
- Inc in each st around [12]
- Sc in each st around for 6 rounds (Rounds 3-8) [12]
- (Sc 2, dec) x 3 [9]
- Stuff lightly.
- Sc in each st around [9]
- FO, leaving a long tail for sewing.
Legs (Make 2, MC)
- MR 6 sc [6]
- Inc in each st around [12]
- (Sc 1, inc) x 6 [18]
- Sc in each st around for 4 rounds (Rounds 4-7) [18]
- (Sc 1, dec) x 6 [12]
- Stuff firmly.
- Sc in each st around for 2 rounds (Rounds 9-10) [12]
- FO, leaving a long tail for sewing.
Tail (MC)
- MR 6 sc [6]
- Inc in each st around [12]
- Sc in each st around [12]
- FO, leaving a long tail for sewing. Do not stuff.
Assembly
- Attach the Head: Using the long tail from the head, sew the head to the body. Ensure it's centered and securely attached, adding more stuffing to the neck area if needed for stability.
- Attach the Snout: Pin the snout to the front of the head, centered below the eyes, and sew in place. Before fully closing, add a tiny bit more stuffing. Using black embroidery floss, embroider a small triangular nose at the top of the snout and a small line for the mouth.
- Attach the Ears: Position the ears on top of the head, slightly to the sides, aligning with the outer edge of the eyes. Sew securely.
- Attach the Arms: Sew the arms to the sides of the body, just below the neck seam, so they hang naturally.
- Attach the Legs: Attach the legs to the bottom sides of the body, ensuring the bear can sit upright.
- Attach the Tail: Sew the tail to the back of the body, slightly above the bottom seam.
- Weave in all remaining ends. Give your bear a gentle squeeze to distribute the stuffing evenly and fluff it up!
Pro Tips
- Use a Stitch Marker Religiously: Amigurumi is worked in continuous rounds, making it easy to lose your place. A stitch marker is your best friend!
- Stuffing is Key: Stuff your pieces firmly and evenly. Start stuffing when the opening is still large enough to work with, but not so early that the stuffing gets caught in your stitches. Use small pieces of fiberfill to avoid lumps.
- Invisible Decrease: For a cleaner look, use an invisible decrease (insert hook into front loop of next st, then into front loop of following st, yarn over and pull through both front loops, yarn over and pull through remaining 2 loops on hook).
- Tight Stitches: Use a hook size that creates tight stitches. This prevents stuffing from poking through and gives your amigurumi a neater finish.
- Embroidering Details: If you're using safety eyes, consider embroidering eyebrows or a little blush to add more personality to your bear.
- Seamless Joins: When finishing a piece, after your last stitch, sl st into the next stitch, then FO. This creates a smoother edge for sewing.
Frequently Asked Questions
Is this pattern suitable for beginners?
Absolutely! This Crochet Bear Amigurumi pattern is designed with beginners in mind. It primarily uses basic stitches like single crochet, increases, and decreases. We've broken down each step clearly, and with a little practice, you'll be creating your own adorable bear in no time. Don't be afraid to try!
What type of yarn is best for amigurumi?
For amigurumi, a worsted weight (or Aran) yarn is generally recommended, especially for beginners. Acrylic yarn is a popular choice because it's widely available, affordable, durable, and comes in a vast array of colors. Cotton yarn is also excellent for its stitch definition and natural feel. The key is to choose a yarn that doesn't split easily and has good tension for tight stitches.
Can I make a smaller or larger bear with this pattern?
Yes, you certainly can! To make a smaller bear, use a lighter weight yarn (e.g., sport or DK weight) and a smaller hook (e.g., 2.0mm or 2.5mm). For a larger bear, opt for a bulkier yarn (e.g., chunky or super bulky) and a larger hook (e.g., 5.0mm or 6.0mm). Remember that changing yarn and hook size will alter the finished dimensions, but the proportions of the bear will remain the same, so it will still look adorable!
Congratulations, you've just brought a charming new friend into the world! Crafting this Crochet Bear Amigurumi is more than just making a toy; it's about creating memories, sharing joy, and mastering a beautiful skill. We hope you cherish every stitch and the adorable result. Don't forget to share your finished bear with us – we love seeing your creations!