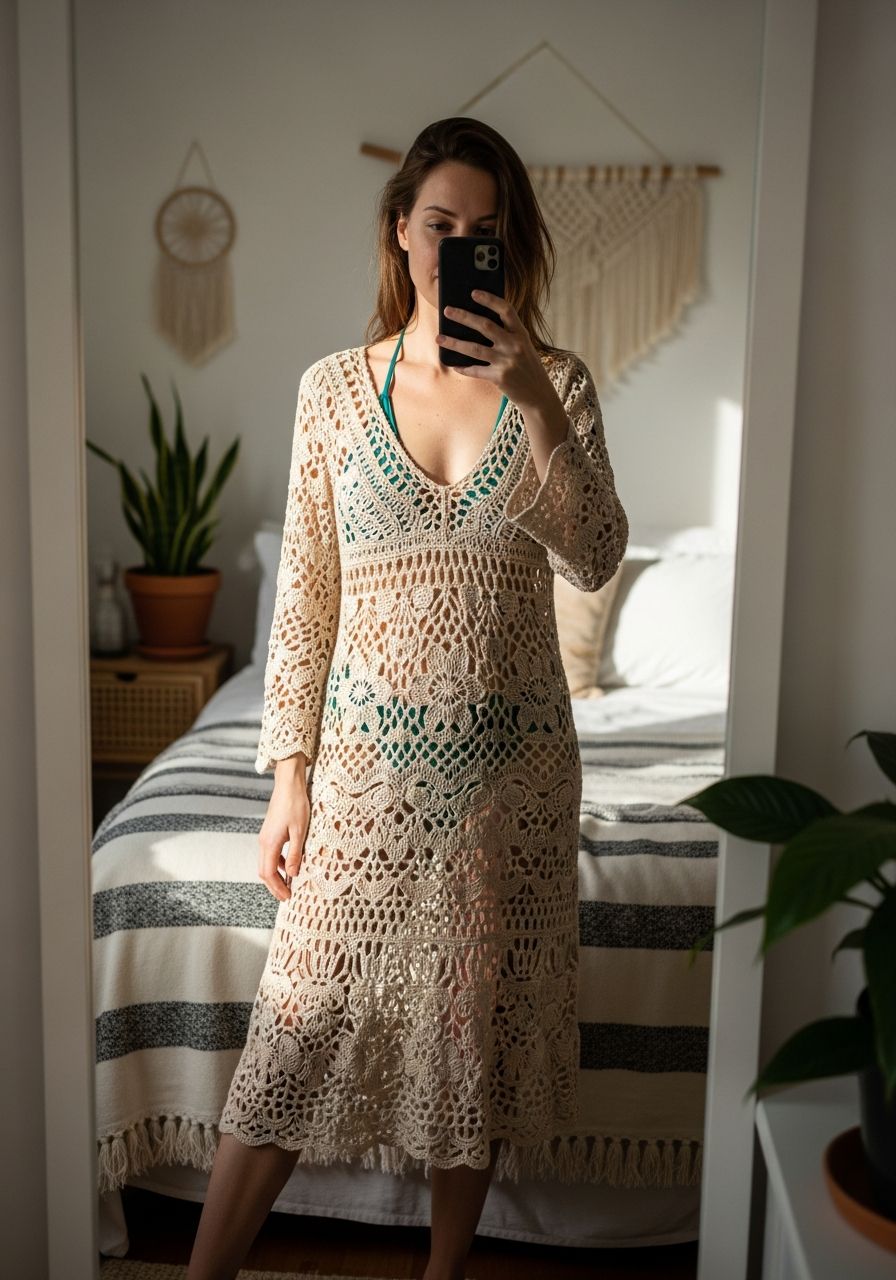
Imagine the gentle sea breeze, the warm sun on your skin, and the perfect outfit to complete the picture. This summer, transform your wardrobe with a stunning, handmade crochet beach dress that will make you feel effortlessly chic and utterly comfortable. Get excited to create a unique piece that captures the essence of summer relaxation and brings your beach-day dreams to life!
There's nothing quite like slipping into a light, airy dress on a hot day, and a crocheted beach dress offers unparalleled comfort and style. Whether you're strolling along the shore, relaxing by the pool, or enjoying a casual brunch, this versatile garment is your go-to for effortless elegance. Our free pattern is designed to be accessible for crocheters of all skill levels, guiding you through each step to create a beautiful, custom-fit dress that you'll cherish for seasons to come. Say goodbye to mass-produced fashion and hello to your new favorite handmade statement piece!
Why You'll Love This Pattern
- Lightweight & Breathable: Crafted with a lovely open stitch pattern and a light yarn, this dress is perfect for warm weather, allowing your skin to breathe.
- Customizable Fit: The pattern is easily adaptable to different body types and lengths, ensuring a flattering fit for everyone.
- Beginner-Friendly: Utilizing basic crochet stitches like chains, single crochet, half double crochet, and double crochet, this pattern is perfect for those new to garment making.
- Versatile Styling: Wear it as a cover-up over your swimsuit, layer it over a slip for a casual day out, or accessorize it for an evening look.
- Quick Project: With its simple construction and repetitive stitch pattern, you'll be able to whip up this dress in no time, ready for your next adventure.
Materials Needed
- Yarn: Approximately 800-1000 yards (730-915 meters) of DK weight (light #3) cotton or cotton blend yarn. We recommend a 100% cotton or a cotton/bamboo blend for best drape and breathability.
- Hook: 4.0 mm (G/6) crochet hook, or size needed to obtain gauge.
- Scissors: For cutting yarn ends.
- Tapestry Needle: For weaving in ends and seaming.
- Stitch Markers: A few to mark key stitches and seams.
- Measuring Tape: For checking gauge and sizing.
Gauge & Sizing
Gauge: 16 double crochet (dc) stitches x 10 rows = 4 inches (10 cm) square, blocked.
Achieving the correct gauge is crucial for the final fit of your dress. Please make a gauge swatch before you begin. If your swatch is too large, try a smaller hook. If it's too small, try a larger hook. The pattern is written for a women's size Medium (M), with notes for adjusting to Small (S), Large (L), and Extra Large (XL).
- Size S: Bust 32-34 inches (81-86 cm)
- Size M: Bust 36-38 inches (91-97 cm)
- Size L: Bust 40-42 inches (102-107 cm)
- Size XL: Bust 44-46 inches (112-117 cm)
To adjust the size, simply modify the initial chain length for the bodice panels (see instructions below) and ensure your overall stitch count for the skirt base is a multiple of 3 for the shell stitch pattern. You can also add or subtract rows in the skirt for desired length.
Abbreviations
- ch: chain
- sl st: slip stitch
- sc: single crochet
- hdc: half double crochet
- dc: double crochet
- inc: increase (usually 2 stitches in one)
- sk: skip
- st(s): stitch(es)
- rep: repeat
- yo: yarn over
Step-by-Step Pattern
This dress is constructed in two main parts: the bodice (made from two identical panels, seamed) and the skirt (worked in rounds from the bodice base).
The Bodice (Make 2 identical panels: Front & Back)
- Initial Chain: Ch 62. (For Size S, ch 54; for Size L, ch 70; for Size XL, ch 78).
- Row 1: Hdc in 2nd ch from hook and in each ch across. (61 hdc for Size M).
- Rows 2-20: Ch 1, turn. Hdc in each st across. (61 hdc for Size M). This creates a panel approximately 15.5 inches wide by 10 inches tall. (For Size S, work 18 rows; for Size L, work 22 rows; for Size XL, work 24 rows).
- Fasten off and weave in ends on both panels.
Joining the Bodice
- Lay one bodice panel flat. Place the second panel directly on top, aligning all edges.
- Shoulder Seams: Using a tapestry needle and yarn, or by slip stitching/single crocheting, join the top 15 stitches from each side on both panels together. This will create two shoulder seams and leave an unjoined section in the middle for the neck opening (approx. 31 stitches for Size M).
- Side Seams: Join the bottom 15 stitches from each side on both panels together. This creates two side seams and leaves an unjoined section at the top for the armholes (approx. 10 rows/5 inches for Size M).
- Turn the bodice right side out.
Body Base (Transition to Skirt)
- Attach yarn with a sl st to the bottom edge of one of the side seams.
- Round 1: Ch 2 (counts as first hdc). Work 120 hdc evenly around the entire bottom edge of the joined bodice. Ensure your stitch count is a multiple of 3 for the skirt pattern. Adjust by adding or skipping a stitch every few stitches if necessary to reach 120 (e.g., if you have 122, skip 2 stitches evenly; if you have 118, add 2 stitches evenly). Sl st to top of beg Ch 2 to join. (For Size S, aim for 108 hdc; for Size L, aim for 132 hdc; for Size XL, aim for 144 hdc).
- Rounds 2-3: Ch 2, hdc in each st around. Sl st to top of beg Ch 2 to join. (120 hdc for Size M).
The Skirt
- Round 4 (Increase Round 1): Ch 3 (counts as dc). Dc in next 4 sts. *2 dc in next st (inc), dc in next 9 sts*. Repeat from * to * 11 more times. 2 dc in next st, dc in last 4 sts. Sl st to top of beg Ch 3. (132 dc for Size M).
- Round 5: Ch 3, dc in each st around. Sl st to top of beg Ch 3. (132 dc for Size M).
- Round 6 (Increase Round 2): Ch 3. Dc in next 4 sts. *2 dc in next st (inc), dc in next 10 sts*. Repeat from * to * 11 more times. 2 dc in next st, dc in last 5 sts. Sl st to top of beg Ch 3. (144 dc for Size M).
- Round 7: Ch 3, dc in each st around. Sl st to top of beg Ch 3. (144 dc for Size M).
- Round 8 (Increase Round 3): Ch 3. Dc in next 4 sts. *2 dc in next st (inc), dc in next 11 sts*. Repeat from * to * 11 more times. 2 dc in next st, dc in last 6 sts. Sl st to top of beg Ch 3. (156 dc for Size M).
- Round 9 (Shells Start): Ch 3 (counts as dc), 2 dc in same st. *Sk 2 sts, 3 dc in next st (shell made)*. Repeat from * to * around. Sk last 2 sts, sl st to top of beg Ch 3. (52 shells for Size M).
- Round 10: Ch 3, 2 dc in the center dc of the first shell (the second dc of the 3-dc group). *3 dc in the center dc of the next shell*. Repeat from * to * around. Sl st to top of beg Ch 3. (52 shells for Size M).
- Rounds 11-30 (or until desired length): Repeat Round 10. For a longer dress, simply add more rounds. For a shorter dress, subtract rounds.
Finishing Touches
- Neckline Edging: Attach yarn with a sl st to any point on the neckline. Ch 1, sc evenly around the entire neckline. Sl st to first sc to join. Fasten off.
- Armhole Edging: Attach yarn with a sl st to the bottom of one armhole. Ch 1, sc evenly around the armhole opening. Sl st to first sc to join. Repeat for the second armhole. Fasten off.
- Weave in Ends: Using your tapestry needle, carefully weave in all remaining yarn tails.
- Blocking (Optional but Recommended): Gently wet your finished dress, then lay it flat on a towel or blocking mats, shaping it to your desired dimensions. Pin in place and allow it to air dry completely. Blocking helps open up the stitches, even out the fabric, and enhances the drape of the dress.
Pro Tips
- Yarn Choice Matters: For a true beach dress feel, stick to natural fibers like cotton, linen, or bamboo. They are breathable, absorbent, and have a beautiful drape. Acrylic can work but may be warmer.
- Customize Your Length: Don't be afraid to adjust the number of skirt rounds to achieve your perfect mini, midi, or maxi length. Try it on periodically as you crochet!
- Personalize Your Edges: Instead of simple sc edging, consider a round of picot stitches or a small shell border for a more decorative finish on the neckline and armholes.
- Add a Drawstring: For a more cinched waist, crochet a long chain (approx. 60-80 inches) and weave it through one of the hdc rounds at the base of the bodice. Add tassels to the ends for extra flair.
- Read Your Stitches: Before starting each round, take a moment to identify the stitches from the previous round. This helps maintain stitch count and consistency.
Frequently Asked Questions
Can I use a different yarn weight for this pattern?
Yes, you can! However, you will need to adjust your hook size to meet the specified gauge. Using a bulkier yarn will result in a larger, heavier dress, and a finer yarn will create a smaller, lacier garment. Always make a gauge swatch to ensure your finished dress will be the correct size.
Is this pattern suitable for complete beginners?
This pattern uses basic stitches, making it approachable for beginners who are comfortable with chaining, slip stitching, single crochet, and double crochet. The construction is straightforward, and the repetitive nature of the skirt makes it an excellent project for practicing consistency. If you're new to garment construction, take your time and don't hesitate to refer to online tutorials for any unfamiliar stitches.
There you have it – your very own free pattern and guide to crocheting a beautiful beach dress! We hope you enjoy every moment of crafting this lovely garment and feel absolutely radiant wearing it. Happy hooking, and get ready to soak up the sun in style!