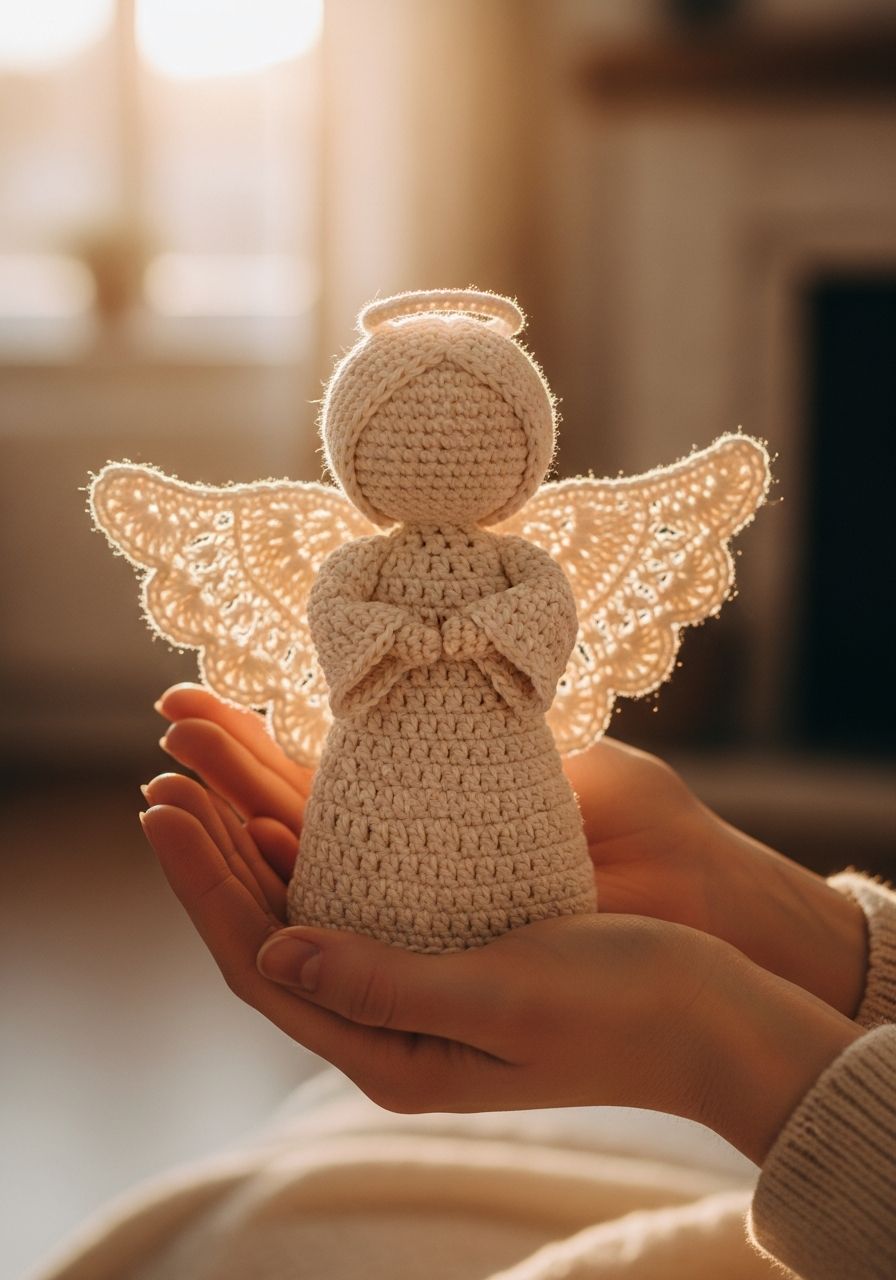
Imagine a tiny guardian watching over you, a symbol of peace and comfort, crafted with your own loving hands. There's something truly magical about bringing a character to life with yarn and hook, and this project is no exception. Get ready to embark on a heartwarming journey as we create an enchanting Crochet Angel Amigurumi that will capture hearts and bring a touch of celestial charm to any space. This free pattern is designed to be a delightful experience for crocheters of all levels, promising a beautiful outcome that's perfect for gifting, decorating, or simply cherishing yourself!
Welcome, fellow yarn enthusiasts, to a pattern that's as rewarding to make as it is beautiful to behold! This adorable Crochet Angel Amigurumi is designed to be a quick and enjoyable project, perfect for adding a touch of handmade warmth to your home or creating a thoughtful, personalized gift. Whether you're looking for a sweet addition to a nursery, a unique Christmas ornament, or a comforting companion, this little angel fits the bill perfectly. We'll guide you through every stitch, from the magic ring to the final assembly, ensuring your angel turns out absolutely divine.
Why You'll Love This Pattern
- Beginner-Friendly: While offering a beautiful finished product, this pattern utilizes fundamental crochet stitches like single crochet, making it accessible for those new to amigurumi.
- Quick to Create: Designed with efficiency in mind, you can complete this charming angel in just a few hours, making it perfect for last-minute gifts or a weekend project.
- Versatile Gifting: Angels are universally cherished symbols. This amigurumi makes an ideal present for baby showers, baptisms, confirmations, birthdays, Christmas, or as a comforting keepsake.
- Customizable: Easily adapt the colors of the dress, hair, and halo to match personal preferences or specific themes. Add embroidered details for extra personality.
- Perfect for Decoration: Beyond gifting, these angels make lovely additions to bookshelves, nurseries, Christmas trees, or as part of a heartfelt display.
- Uses Scraps: A fantastic way to use up those smaller skeins of yarn you have in your stash, especially for the hair and halo.
Materials Needed
- DK (Light Worsted/8-ply) weight yarn in:
- White or Cream (for body and wings) - approx. 30g
- Skin Tone (for head) - approx. 10g
- Yellow or Gold (for hair and halo) - approx. 5g
- Crochet Hook: 2.5mm or 3.0mm (or size suitable for your yarn to achieve tight stitches)
- Safety Eyes: 6mm (or black embroidery floss for embroidered eyes)
- Polyester Fiberfill for stuffing
- Tapestry needle
- Scissors
- Stitch markers
Gauge & Sizing
Gauge is not critical for this project, but aiming for tight stitches is recommended to prevent stuffing from showing through. If your stitches are too loose, consider going down a hook size. Using a 3.0mm hook and DK weight yarn, your finished angel will be approximately 4.5-5 inches (11-13 cm) tall.
Abbreviations
- MR: Magic Ring
- ch: Chain
- sc: Single Crochet
- hdc: Half Double Crochet
- dc: Double Crochet
- sl st: Slip Stitch
- inc: Increase (2 sc in one stitch)
- dec: Decrease (sc two stitches together)
- FO: Fasten Off
- st(s): Stitch(es)
- BLO: Back Loop Only
- FLO: Front Loop Only
- [ ] x N: Repeat instructions in brackets N times
- (N): Total number of stitches at the end of the round/row
Step-by-Step Pattern
This pattern is worked in continuous rounds unless otherwise specified. Use a stitch marker to mark the first stitch of each round.
Head (using Skin Tone yarn)
- MR, 6 sc (6)
- [Inc] x 6 (12)
- [Sc, inc] x 6 (18)
- [2 sc, inc] x 6 (24)
- [3 sc, inc] x 6 (30)
- Sc around (30)
- Sc around (30)
- Sc around (30)
- Sc around (30)
- Sc around (30)
- Insert safety eyes between R7 and R8, about 5-6 stitches apart. Start stuffing firmly. [3 sc, dec] x 6 (24)
- [2 sc, dec] x 6 (18)
- [Sc, dec] x 6 (12)
- [Dec] x 6 (6)
- FO, leaving a long tail for sewing to the body.
Body (using White/Cream yarn)
- MR, 6 sc (6)
- [Inc] x 6 (12)
- [Sc, inc] x 6 (18)
- [2 sc, inc] x 6 (24)
- [3 sc, inc] x 6 (30)
- Sc around (30)
- Sc around (30)
- Sc around (30)
- Sc around (30)
- Sc around (30)
- [3 sc, dec] x 6 (24)
- Sc around (24)
- Sc around (24)
- Sc around (24)
- [2 sc, dec] x 6 (18)
- Sc around (18)
- Sc around (18)
- Start stuffing the body firmly. [Sc, dec] x 6 (12)
- FO, leaving a long tail for sewing.
Wings (using White/Cream yarn - Make 2)
- Ch 8.
- Row 1: Sc in 2nd ch from hook, hdc in next 2 ch, dc in next 2 ch, hdc in next ch, sc in last ch. Ch 1, turn. (7 sts)
- Row 2: Sc in first st, hdc in next 2 sts, 2 dc in next st, hdc in next 2 sts, sc in last st. Ch 1, turn. (8 sts)
- Row 3: Sc in first st, hdc in next 2 sts, (2 dc in next st) x 2, hdc in next 2 sts, sc in last st. Ch 1, turn. (10 sts)
- Row 4: Sc around the entire edge of the wing to create a neat finish, working 3 sc in each corner. Sl st to first sc.
- FO, leaving a long tail for sewing.
Hair (using Yellow/Gold yarn)
- MR, 6 sc (6)
- [Inc] x 6 (12)
- [Sc, inc] x 6 (18)
- [2 sc, inc] x 6 (24)
- [3 sc, inc] x 6 (30)
- Sc around (30)
- To create curls/strands: [Ch 5, sl st into 2nd ch from hook, sl st in next 3 ch. Skip next st on R6 of hair cap, sl st into next st] repeat around R6 (approx 15 curls).
- FO, leaving a long tail for sewing.
Halo (using Yellow/Gold yarn)
- Ch 15.
- Sl st to the first ch to form a ring.
- FO, leaving a short tail to secure.
Assembly
- Using the long tail from the head, sew the head firmly to the body. Ensure it's centered and secure.
- Position the hair cap on the head, centering the curls around the face. Sew securely.
- Sew the two wings to the back of the angel's body, slightly overlapping them at the center.
- Using the short tail from the halo, secure it to the top of the angel's head, slightly behind the front curls.
- If desired, embroider a small mouth and eyebrows onto the face using black or brown embroidery floss.
- Weave in any remaining loose ends to finish your angel.
Pro Tips
- Even Stuffing: Stuff your amigurumi gradually and evenly to avoid lumps and bumps. Use the back of your crochet hook or a chopstick to push fiberfill into smaller areas like the neck.
- Invisible Decreases: For a neater finish, especially on the head, use invisible decreases (insert hook into FLO of next stitch, then FLO of following stitch, yarn over, pull through both loops, yarn over, pull through remaining two loops).
- Yarn Choice Matters: While DK weight is suggested, you can use any yarn weight with a corresponding hook. Just remember that the finished size of your angel will change. Finer yarn will create a smaller angel, bulkier yarn a larger one.
- Stitch Markers are Your Friends: Especially when working in continuous rounds, a stitch marker helps you keep track of the beginning of each round, preventing miscounts.
- Embroidered Features: If you're nervous about safety eyes, or making this for a very young child, embroider the eyes and any facial features using embroidery floss for a softer, safer finish.
- Personalize It: Don't be afraid to experiment! Add tiny beads to the dress, a small ribbon bow, or even a mini flower crown to make your angel truly unique.
Frequently Asked Questions
Q: Can I use different yarn weights for this pattern?
A: Absolutely! This pattern is quite adaptable. Just be sure to use a crochet hook size appropriate for your chosen yarn weight. Keep in mind that using a thicker yarn will result in a larger angel, and a thinner yarn will create a smaller one. The key is to maintain tight stitches so the stuffing doesn't show through.
Q: How can I make my angel unique?
A: There are many ways to personalize your angel! You can try different color combinations for the dress, hair, and halo. Consider adding a small embroidered heart on the chest, tiny beads sewn onto the dress, or even a delicate lace trim around the bottom of the dress. You could also embroider different facial expressions.
Q: Is this pattern suitable for beginners?
A: Yes, definitely! While amigurumi can seem intimidating, this pattern primarily uses basic stitches like single crochet, increases, and decreases. The detailed step-by-step instructions and assembly guide are designed to lead you through the process, making it an excellent project for those new to amigurumi or looking to expand their skills.
And there you have it – your very own Crochet Angel Amigurumi, lovingly crafted and ready to bring a little bit of heaven into your home or to the heart of a loved one. We hope you enjoyed every moment of creating this charming figure. Don't forget to share your finished angels with us; we love seeing your unique touches and creations!